Super Easy No-Bake Cheesecake Jars – A Busy Parent’s Dream!

TOTAL TIME
SERVES
COURSE
DIFFICULTY
Tested5× before publishing

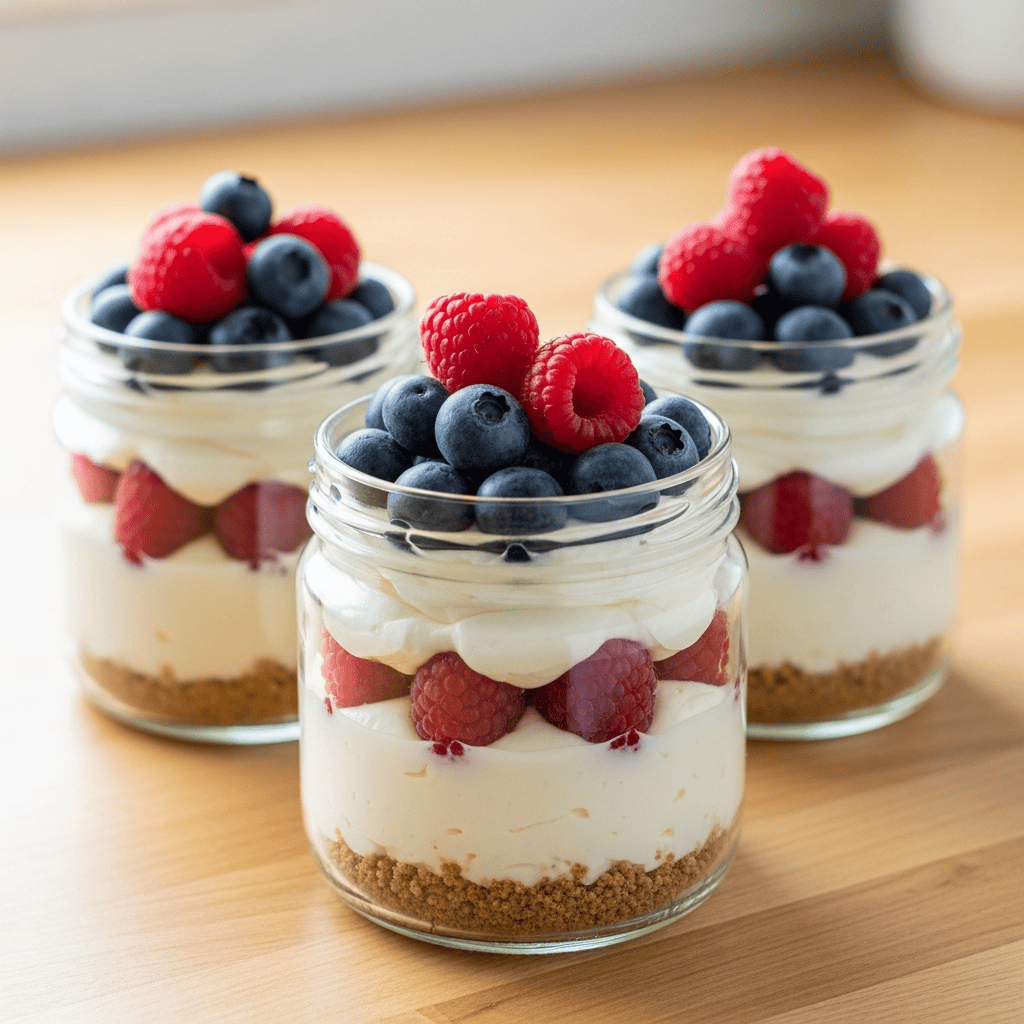
Hey friends! I don’t know about you, but sometimes I just need a little something sweet at the end of a long day, without, you know, actually *doing* a lot of work. Baking a whole cheesecake feels like a weekend project, not a Tuesday night impulse. That’s exactly how these no-bake cheesecake jars became my new obsession. They deliver all that creamy, tangy deliciousness without ever needing to turn on your oven. Plus, they’re perfectly portioned, which is a lifesaver when you’re trying to manage dessert cravings (or keep little hands from taking too big a slice!).

I’ve made these so many times now, trying different crusts and toppings, and this classic version is a definite winner. It’s got that rich cheesecake flavor everyone loves, paired with a simple graham cracker crust, all tucked into cute little jars. The best part? You can prep them in about half an hour, then just pop them in the fridge until you’re ready to serve. Seriously, if you’ve been looking for a dessert that feels special but is super low-stress, you’ve found it. Let’s make some!

Getting That Smooth, Creamy Filling

The secret to a truly dreamy no-bake cheesecake filling is twofold: soft cream cheese and perfectly whipped cream. Seriously, these two things make all the difference. For your cream cheese, make sure it’s at actual room temperature. If it’s even a little bit cold, you’ll end up with tiny lumps in your filling, and nobody wants that! I usually take mine out of the fridge at least an hour before I plan to start. If you’re really short on time, you can cut the brick into smaller pieces and let it sit for 20-30 minutes, or give it a quick zap in the microwave for 10-15 seconds, being super careful not to actually melt it.

For the heavy cream, the colder, the better! This helps it whip up quickly and hold those beautiful stiff peaks. Over-mixing your whipped cream can sometimes make it grainy, so stop as soon as it’s nice and thick and holds its shape. When you fold the whipped cream into the cream cheese mixture, be gentle. You’ve just worked to get all that lovely air into the cream, and you don’t want to deflate it all. Just fold until everything is just combined, no more.

Portioning Like a Pro (Even When You’re Tired)

One of the best things about these jars is the built-in portion control. It makes serving dessert so simple, especially after a busy day. When you’re spooning in the crust, I like to gently press it down with the back of a spoon. It helps create a nice, firm base. Then, when adding the filling, don’t fill the jars all the way to the top! Leave at least an inch or so of space. This way, you have plenty of room for your toppings without anything overflowing or getting messy. It also makes them look really appealing when you add those fresh berries or chocolate chips right before serving.

These are also fantastic for packing into lunchboxes (if you have a way to keep them cold, of course!) or taking to a potluck. No slicing, no serving utensils, just grab and go. It takes a little extra time upfront to assemble individual portions, but believe me, it pays off in convenience later!

AD — Mediavine Content 300×250 / Responsive

Why This Recipe Works

This recipe works so well because it skips the oven, saving you a ton of time and keeping your kitchen cool. The individual jar format means easy serving and storage, and the simple ingredient list comes together for a classic flavor that everyone enjoys. The use of cold cream and room temperature cream cheese ensures a smooth, stable, and delicious filling every time.

These cheesecake jars are a dream come true for dessert lovers who need something quick, easy, and absolutely delicious.— Charlotte
AD — Mediavine Native / 728×90 Leaderboard

Prep 30 minutesCook 0 minutesYield 6 (8-ounce) or 10 (6-ounce) jars
Ingredients
  • 2 Tablespoons unsalted butter, melted
  • 1 cup (100g) graham cracker crumbs (about 8 graham crackers)
  • 1 cup (240ml) heavy cream or heavy whipping cream, cold
  • 8 ounces (226g) full-fat brick cream cheese, softened to room temperature
  • 1/3 cup (65g) granulated sugar
  • 2 Tablespoons (30g) sour cream, at room temperature
  • 1 teaspoon lemon juice
  • 1/2 teaspoon pure vanilla extract
  • various toppings & garnishes (see notes)
Instructions
  1. Prep Your Jars Gather your jars! This recipe is designed for about 6 standard 8-ounce jars or around 10 smaller 6-ounce jars. Have them ready to go before you start mixing.
  2. Make the Crust Melt your butter in a microwave-safe bowl or in a small saucepan on the stove. Once melted, stir in the graham cracker crumbs until everything is evenly moistened and looks like damp sand. Spoon a generous amount into the bottom of each jar — roughly 2 tablespoons for 8-ounce jars or 1 1/2 tablespoons for 6-ounce jars. If you have any extra, just sprinkle it in! Set these jars aside.
  3. Whip the Cream In a clean bowl, using a hand mixer or a stand mixer with a whisk attachment, whip the very cold heavy cream on medium-high speed. Keep going until you have nice, stiff peaks that hold their shape, usually about 3-4 minutes. Gently set this aside for a moment.
  4. Make the Cheesecake Base Now, in a separate bowl (no need to wash the mixer attachment yet!), beat the softened cream cheese, granulated sugar, room temperature sour cream, lemon juice, and vanilla extract together. Use medium-high speed until the mixture is super smooth and creamy. Seriously, beat it well to make sure there are no little lumps of cream cheese left behind.
  5. Combine Filling With your mixer on low speed, or using a silicone spatula if you prefer, gently fold the whipped cream into the smooth cream cheese mixture. Take your time with this part! You want to combine everything fully, but you also want to keep as much of that lovely air in the whipped cream as possible. A few gentle turns are usually all it takes.
  6. Fill the Jars Spoon several large spoonfuls of your creamy cheesecake filling over the crust in each jar. For 8-ounce jars, aim for about 1/4 to 1/3 cup of filling. For 6-ounce jars, about 3 tablespoons should do it, or whatever you can fit while still leaving a good bit of room at the top for your chosen toppings.
  7. Chill and Serve At this point, your cheesecake jars are at room temperature. For the best texture and flavor, pop them in the fridge to chill for at least 30 minutes. You can even make these up to 3 days in advance (just cover them tightly!). I always recommend adding your toppings right before serving, or at most, a couple of hours beforehand. This prevents any liquids from the toppings from seeping down and making your crust soggy.
  8. Add Toppings & Enjoy! When you're ready to serve, spoon your favorite toppings and garnishes over the chilled filling, then dig in! Enjoy your perfectly portioned, delicious dessert.
  9. Store Leftovers Any leftover cheesecake jars (if there are any!) can be covered and stored in the refrigerator for up to 5 days.
Tested Tip

Always use full-fat brick cream cheese, not the spreadable kind in a tub. The full-fat brick holds its structure much better and gives you that perfect, rich cheesecake texture. And seriously, make sure it’s softened completely!

AD — Mediavine Content 300×250 / Responsive

Getting That Smooth, Creamy Filling

Portioning Like a Pro (Even When You're Tired)

Make It Yours

  • Berry Burst — Top with a mix of fresh strawberries, blueberries, and raspberries. You can even make a quick berry compote by simmering berries with a spoonful of sugar and lemon juice.
  • Chocolate Lover's Dream — Swap graham cracker crumbs for crushed chocolate wafer cookies (like Oreos, just the cookie part!). Top with chocolate syrup, mini chocolate chips, or a sprinkle of cocoa powder.
  • Key Lime Zing — Add an extra teaspoon of lime juice instead of lemon for a brighter, tarter filling. Garnish with a thin lime slice and a sprinkle of zest.
  • Tropical Twist — Fold in a couple of tablespoons of finely shredded unsweetened coconut to the filling. Top with fresh mango or pineapple chunks.
AD — Mediavine Content / Native

FAQ

Can I make these ahead of time?

Absolutely! You can assemble the cheesecake jars up to 3 days in advance. Just cover them tightly with lids or plastic wrap and keep them in the refrigerator. Add your toppings right before serving for the best look and texture.

What if my cream cheese isn't soft enough?

If your cream cheese is still a bit firm, your filling might have small lumps. To avoid this, cut the brick into smaller pieces and let it sit at room temperature for at least 30 minutes, or microwave for 10-15 seconds at a time until just softened (not melted!).

Can I use low-fat cream cheese?

I really recommend using full-fat brick cream cheese for this recipe. Low-fat varieties tend to have more water content and can make the filling less stable and creamy. For the best result, stick with full-fat!

How long do leftovers last?

Covered and stored in the refrigerator, these cheesecake jars will stay delicious for up to 5 days. They make for a great grab-and-go dessert all week!

AD — Mediavine 728×90 Leaderboard / Responsive

This post contains affiliate links. We may earn a small commission at no extra cost to you.

More Recipes You'll Love

Tested twice, weeknight-ready, family-approved.