Opens in a new tab

No-Bake Peach Cheesecake: Your Easy Summer Dessert!

TOTAL TIME
SERVES
COURSE
DIFFICULTY
Tested5× before publishing

Hey friends! Today, I’m so excited to share my absolute favorite `no bake peach cheesecake` recipe. Summer evenings can be a whirlwind with kids, sports, and trying to get dinner on the table, so the last thing I want to do is turn on the oven for dessert. That’s exactly why this recipe has become a total lifesaver for our family’s sweet cravings!

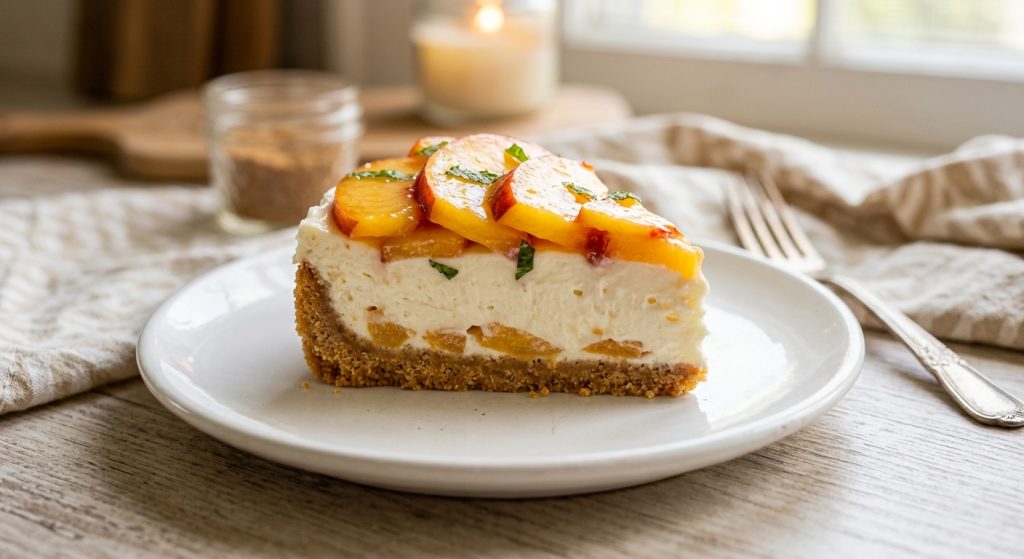
I’ve made this more times than I can count, tweaking it here and there until it was just right. What makes it so special is that surprising salty-sweet crust made from Wheat Thins, paired with a super creamy, light filling, and topped with juicy, fresh peaches. It’s a perfect blend of textures and flavors that makes everyone ask for seconds, and it feels a little fancy without any of the extra work.

Crafting the Unexpectedly Delicious Wheat Thins Crust

Alright, let’s talk crust! This isn’t your average graham cracker crust, and that’s what makes this `no bake peach cheesecake` recipe truly special. The Wheat Thins bring this fantastic salty-sweet balance that really complements the creamy filling and fresh peaches. To start, you’ll need to finely grind your Wheat Thins. I love using my food processor for this because it gets them super fine and uniform, almost like sand. This fine texture is key for a cohesive crust. If you don’t have a food processor, don’t worry! A large resealable plastic bag and a rolling pin work just as well – just make sure you really get those crackers crushed into tiny crumbs.

Once your crackers are finely ground, you’ll mix in a little granulated sugar and kosher salt. Don’t skip the salt here; it’s what gives that wonderful unexpected pop of flavor! Then, slowly drizzle in your melted butter while the food processor is running, or stir it in by hand until everything is combined. The mixture should resemble wet sand – crumbly, but when you press it between your fingers, it holds together. This consistency is your cue that it’s ready to be pressed into the pan.

Using a parchment paper round on the bottom of your pie dish or springform pan makes serving a breeze later on. Press the crumb mixture firmly into the bottom and about halfway up the sides. I find a flat-bottomed measuring cup or even a clean glass helps create a really compact and even crust. Once it’s pressed, a quick chill in the freezer for about 30 minutes gives the butter time to solidify, locking those crumbs into place. This firm base is crucial for a no-bake cheesecake, as it prevents crumbling when you add the filling.

Whipping Up the Silky Smooth Cheesecake Filling

Now for the star of the show: that incredibly smooth and creamy cheesecake filling. The key here is starting with cream cheese that’s truly at room temperature. If it’s too cold, you’ll end up with lumps, and nobody wants a lumpy cheesecake! So, take it out of the fridge at least an hour before you plan to start. Beat the softened cream cheese with the sour cream (or Greek yogurt for a slightly tangier, lighter option) until it’s perfectly smooth. This might take a few minutes on medium speed with an electric mixer, so be patient and scrape down the sides of the bowl often.

Next, you’ll add the powdered sugar, fresh lemon juice, vanilla, and a touch more salt. The powdered sugar helps keep the filling smooth, the lemon brightens everything up, and the vanilla adds that classic dessert warmth. Beat these ingredients until they are fully incorporated and the mixture is silky smooth. Take a moment to taste it – it should be sweet, a little tangy, and wonderfully rich.

The secret to that light, airy texture of this `no bake peach cheesecake` is folding in whipped heavy cream. In a separate, clean bowl, whip your chilled heavy cream until it forms stiff peaks. This means when you lift the beaters, the cream stands up in firm points. Be careful not to overbeat, or it might turn grainy. Finally, gently fold the whipped cream and your loosened peach or apricot jam into the cream cheese mixture. Folding rather than beating keeps all that lovely airiness you just created. You want just enough mixing to combine everything without deflating the cream, leaving you with a luscious, cloud-like filling.

Assembling and Chilling Your No-Bake Peach Cheesecake

With the crust chilling and the filling ready, assembly is the easiest part! Carefully spoon your creamy cheesecake filling into the now-firm cracker crust. Use a spatula to gently spread the filling into an even layer, making sure it fills all the way to the sides. You want a smooth, inviting surface that promises deliciousness.

Once your cheesecake is assembled, the hardest part is waiting! This dessert needs ample time to chill and set up properly. Cover it tightly with plastic wrap to prevent any fridge odors from seeping in and pop it into the refrigerator for at least eight hours, or ideally, overnight (up to 12 hours). This extended chill time isn’t just for cooling; it’s essential for the filling to firm up and for all those amazing flavors to meld together beautifully. Trust me, it’s worth the wait!

If you find yourself in a pinch and need to speed things up a bit, you do have an option for a quicker set. You can place the cheesecake in the freezer for about two hours, which will firm it up significantly. After its stint in the freezer, transfer it to the refrigerator for an additional three hours to fully chill and reach the perfect consistency. This method works well when you have an unexpected gathering, but I usually recommend the longer fridge chill if you have the time for the absolute best texture. This `no bake peach cheesecake` will be the perfect grand finale to your meal.

Preparing the Fresh Peach Topping

The fresh peach topping is the crowning glory of this cheesecake, adding a burst of bright, seasonal flavor and a gorgeous presentation. You’ll want three large, ripe peaches for this. The trick here is to slice them thinly. Thinner slices mean more surface area to absorb the brown sugar and vanilla, creating a more flavorful and tender topping. Aim for slices that are about an eighth of an inch thick – not so thin they fall apart, but thin enough to be delicate.

Once sliced, toss your peaches with a little light brown sugar. The brown sugar not only adds sweetness but also a lovely caramel note that really enhances the peaches. A touch more vanilla bean paste or extract goes in here, too, along with a final sprinkle of kosher salt. Again, the salt might seem odd for a dessert topping, but it truly balances and elevates the sweetness of the peaches and brown sugar.

After tossing, let the peaches sit in the bowl for about 30 to 40 minutes. This resting period is magic! The sugar will draw out the natural juices from the peaches, creating a wonderfully sweet, slightly syrupy mixture that coats each slice. You’ll end up with vibrant, glistening peaches that are incredibly tender and flavorful. This step makes a huge difference, so don’t skip it! Spoon this juicy topping generously over individual slices of cheesecake just before serving for that ultimate fresh finish.

AD — Mediavine Content 300×250 / Responsive

Why This Recipe Works

This cheesecake is a winner because it balances textures and flavors beautifully. The salty crunch of the Wheat Thins crust contrasts with the silky smooth, sweet-tangy cream cheese filling. Fresh, juicy peaches provide a bright, seasonal counterpoint, and the 'no-bake' aspect means less stress and a cooler kitchen during warm months.

Summer dessert dreams come true with this no-bake wonder – so easy, so refreshing!— Charlotte
AD — Mediavine Native / 728×90 Leaderboard

Prep 35 minutesCook 0 minutesYield 8–10 servings
Ingredients
  • 3 cups Wheat Thins (about 6½ ounces)
  • 1 tablespoon granulated sugar
  • 1 teaspoon Diamond Crystal kosher salt (or ½ teaspoon Morton kosher salt)
  • ½ cup (1 stick) unsalted butter, melted and slightly cooled
  • 12 ounces cream cheese, softened to room temperature
  • 6 tablespoons sour cream or plain whole-milk Greek yogurt
  • 6 tablespoons powdered sugar
  • 2 teaspoons fresh lemon juice
  • 1 teaspoon vanilla bean paste or vanilla extract (for filling)
  • ½ teaspoon Diamond Crystal kosher salt (or ¼ teaspoon Morton kosher salt, for filling)
  • 6 tablespoons chilled heavy cream
  • ½ cup peach or apricot jam, stirred to loosen
  • 3 large peaches, thinly sliced
  • ¼ cup (packed) light brown sugar
  • ½ teaspoon vanilla bean paste or vanilla extract (for topping)
  • ½ teaspoon Diamond Crystal kosher salt (or ¼ teaspoon Morton kosher salt, for topping)
Instructions
  1. For the Crust Line the bottom of a 9-inch pie dish or springform pan with a round of parchment paper. In a food processor, pulse the Wheat Thins until they are very finely ground into crumbs. Add the granulated sugar and one teaspoon of Diamond Crystal kosher salt (or ½ teaspoon Morton kosher salt) and pulse again until combined. With the motor running, slowly drizzle in the melted and slightly cooled unsalted butter, processing until the mixture is combined and looks crumbly. Alternatively, you can crush the crackers in a large resealable plastic bag with a rolling pin, then transfer to a medium bowl and stir in the sugar, salt, and butter.
  2. Form the Crust & Chill Transfer the crumb mixture to your prepared pan. Press it firmly and evenly into the bottom and about halfway up the sides of the pan. A flat-bottomed measuring cup or glass works really well for this. Pop the crust into the freezer to chill for at least 30 minutes while you prepare the filling. This helps it set up nicely.
  3. Make the Cream Cheese Filling In a large bowl, use an electric mixer on medium speed (or a large whisk) to beat the room temperature cream cheese and six tablespoons of sour cream or plain whole-milk Greek yogurt until the mixture is very smooth and free of lumps. Add the six tablespoons of powdered sugar, two teaspoons of fresh lemon juice, one teaspoon of vanilla bean paste or extract, and ½ teaspoon of Diamond Crystal kosher salt (or ¼ teaspoon Morton kosher salt). Beat again until everything is fully incorporated and smooth.
  4. Whip the Cream & Fold In Jam Using clean beaters or a fresh whisk, beat the six tablespoons of chilled heavy cream in a separate small bowl until stiff peaks form. In another small bowl, vigorously stir the ½ cup of peach or apricot jam with a spoon to loosen it up. Gently fold the whipped cream and the loosened jam into the cream cheese mixture using a rubber spatula. Mix just until combined; try not to overmix, so the filling stays light and airy.
  5. Assemble & Chill the Cheesecake Spoon the finished filling into the chilled crust and carefully spread it into an even layer. Cover the cheesecake tightly with plastic wrap and chill it in the refrigerator for at least 8 hours, and ideally up to 12 hours. If you’re really in a hurry, you can freeze it for 2 hours, then transfer it to the refrigerator for another 3 hours to finish chilling.
  6. Prepare the Peach Topping Just before you’re ready to serve, toss the three large thinly sliced peaches with ¼ cup of packed light brown sugar, the remaining ½ teaspoon of vanilla bean paste or extract, and the remaining ½ teaspoon of Diamond Crystal kosher salt (or ¼ teaspoon Morton kosher salt) in a medium bowl. Let this mixture sit for 30–40 minutes at room temperature until the peaches become wonderfully juicy.
  7. Serve Your Cheesecake To serve, slice the cheesecake into wedges. For clean cuts, wipe your knife clean between each slice. Spoon the fresh, juicy peach topping generously over each slice and enjoy!
Tested Tip

For the cleanest slices of cheesecake, run a sharp knife under hot water, wipe it clean, and then make your cut. Repeat this process for each slice to get those picture-perfect wedges!

AD — Mediavine Content 300×250 / Responsive

Crafting the Unexpectedly Delicious Wheat Thins Crust

Whipping Up the Silky Smooth Cheesecake Filling

Assembling and Chilling Your No-Bake Peach Cheesecake

Preparing the Fresh Peach Topping

Make It Yours

  • Berry Bliss — Instead of peaches, try thinly sliced fresh strawberries, raspberries, or a mix of summer berries for the topping. Toss them with brown sugar and vanilla just as you would the peaches.
  • Apricot Adventure — If peaches aren't in season, or you just prefer them, fresh apricots (thinly sliced) make a fantastic alternative for the topping. They have a similar tart-sweet profile that works wonderfully.
  • Spice It Up — For a cozy twist, add a pinch of ground cinnamon or nutmeg to your Wheat Thins crust mixture. It adds a subtle warmth that can be really nice, especially as summer transitions to fall.
  • Chocolate Swirl — Fold a quarter cup of melted and cooled semi-sweet chocolate into half of the cream cheese filling before layering it into the crust for a subtle chocolate swirl throughout your cheesecake.
AD — Mediavine Content / Native

FAQ

Can I make this cheesecake ahead of time?

Absolutely! The cheesecake (without the fresh peach topping) can be made up to three days in advance and kept chilled in the refrigerator. You can even freeze it for up to two weeks! Just remember to prepare the fresh peach topping right before you plan to serve it for the best taste and texture.

What if I don't have Wheat Thins?

While Wheat Thins give this cheesecake its unique salty-sweet crust, you can certainly use other crackers! Graham crackers are a classic choice for a sweeter crust. For another savory option, try Ritz crackers or even a combination of two different types for a custom flavor.

My cream cheese isn't softening at room temperature. What should I do?

If you're short on time, you can carefully soften cream cheese in the microwave. Remove it from its foil wrapper, place it in a microwave-safe bowl, and microwave on high for 15-20 seconds. It should be soft but not melted or hot. Just keep a close eye on it!

How do I know when the heavy cream has 'stiff peaks'?

When you lift your whisk or beaters out of the bowl, the whipped cream should stand up firmly in peaks without flopping over. If they're soft and slump, keep beating for another minute or so. Just be careful not to overbeat, or it can quickly turn into butter!

Why is chilling the cheesecake so important?

Chilling is crucial for a no-bake cheesecake because it allows the fats in the cream cheese and whipped cream to solidify, firming up the filling so it can be sliced cleanly. It also gives all the flavors time to meld and develop, making the cheesecake taste even better!

AD — Mediavine 728×90 Leaderboard / Responsive

What To Serve With This

  • Iced Tea
  • Sparkling Lemonade
  • Vanilla Bean Ice Cream
  • Fresh Mint Sprig Garnish
  • A light Sauvignon Blanc

This post contains affiliate links. We may earn a small commission at no extra cost to you.

More Recipes You'll Love

Tested twice, weeknight-ready, family-approved.