Easy Honey Nut No Bake Cookies: Your New Favorite Treat!

TOTAL TIME
SERVES
COURSE
DIFFICULTY
Close-up photo of several cylindrical honey nut no bake cookies covered in white powdered sugar on a piece of parchment paper.
Tested5× before publishing

If you’re anything like me, finding quick and tasty treats that don’t involve turning on the oven is a lifesaver, especially during busy weeks. That’s why I’m so excited to share my go-to recipe for these amazing honey nut no bake cookies! They’re inspired by traditional Andalusian alfajores, but seriously, they are just a joy to make and eat. You’ll love how the warm spices blend with the toasted nuts and sweet honey. Making these no bake cookies is also surprisingly simple, and they come together faster than you’d think.

I’ve tested this recipe a bunch of times to make sure it’s foolproof, even for those hectic evenings. You get that satisfying crunch from the nuts and the delicate chewiness from the honey dough, all wrapped in a sweet, powdery coating. Plus, they keep really well, so you can make a batch and enjoy them throughout the week. Let’s get baking (or, well, not baking!) and make some delicious memories!

Crafting the Aromatic Dough for Your No Bake Cookies

Alright, let’s get into the heart of these amazing treats! The first step is all about building those incredible flavor layers. We start by toasting the nuts – almonds and hazelnuts first, then the sesame seeds. This isn’t just a suggestion; it really makes a difference. Toasting brings out their natural oils and deepens their flavor profile significantly. You’ll smell it when they’re done – a wonderfully warm, nutty aroma will fill your kitchen. Be sure to spread them out in a single layer on your baking sheet for even toasting. Once they’re cool, we pulse them in a food processor until they’re a coarse meal. You don’t want nut butter here, just a sandy texture. Nut butter is too fine for these cookies, as we want to retain some texture.

Next up, we combine those ground nuts with all the dry spices: cinnamon, coriander, and cloves. Seriously, these spices together create such a comforting, exotic warmth. The breadcrumbs also play a crucial role, helping to absorb moisture and give the cookies their unique density. Plus, a little bit of flour and salt just balances everything out. Give it a good whisk to make sure every spoonful of dough will be perfectly seasoned.

The Honey Infusion: Bringing It All Together

Now for the fun part – turning those dry ingredients into a glorious dough! In a saucepan, we’re bringing honey to a boil. Honey is our main binder and flavor base here. Once it’s bubbling nicely, you’ll stir in all your dry mixed ingredients. This step happens pretty quickly, so be ready with your heat-proof spatula. You’ll see the mixture transform from crumbly bits into a thick, cohesive dough right before your eyes. Once it’s all combined, immediately take it off the heat. It’s hot, so be careful!

Scrape the dough out onto a parchment-lined baking sheet and spread it out. Making it thinner helps it cool down faster, which is key for shaping. You want it cool enough to handle comfortably, but still warm and pliable. If it cools too much, it gets harder to roll. This particular technique, combining dry ingredients with hot honey, is what gives these no bake cookies their signature texture and means no oven time for the dough itself!

Coating and Setting Your Delightful No Bake Cookies

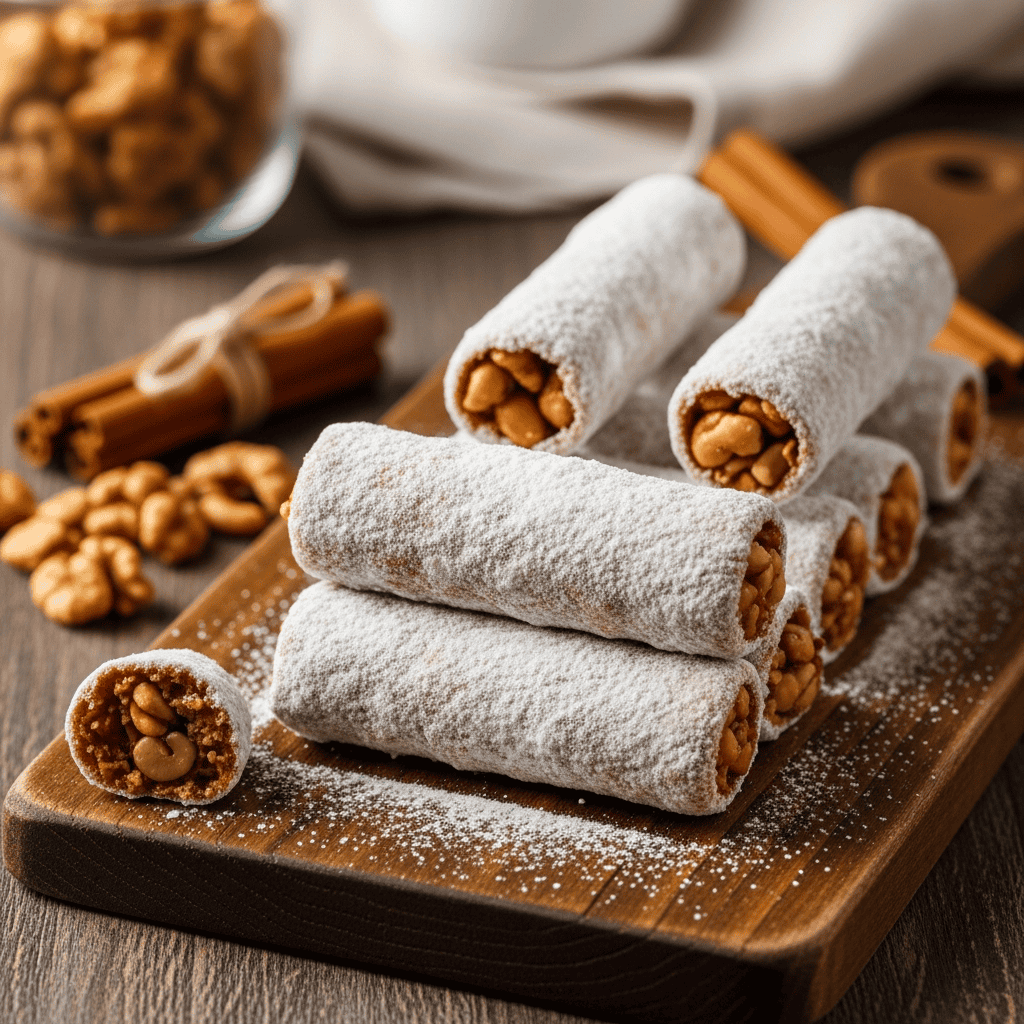
Once your dough has cooled to a comfortable temperature, it’s time to shape these beauties. Divide the dough into roughly 20-24 equal pieces. I like to use a kitchen scale for this to get them really uniform, about 30g each, but eyeballing it is totally fine too. Then, roll each piece between your palms to form small cylinders, around 2 1/2 inches long. They should look like perfect little logs ready for their sweet coat. This is a great step to get little helpers involved, if you have any! They love rolling things.

Now for the magical coating! Remember that simple syrup we made earlier? It should be completely cool by now. We also need a bowl of powdered sugar. Set up a little assembly line: shaped cookies, cooled syrup, powdered sugar, and a clean piece of parchment paper for the finished ones. Dip each cookie into the syrup, rotating it to get a thin, even coat. I often use a couple of forks here – one to dunk and one to gently lift and drain any excess syrup. This keeps your fingers from getting too sticky!

The Final Sugar Dust & Patience

Right after the syrup bath, transfer the cookie directly into the bowl of powdered sugar. Gently toss it around until it’s thoroughly coated on all sides. The powdered sugar sticks beautifully to the syrupy exterior, creating a soft, sweet shell. Place each sugar-dusted cookie onto the fresh parchment paper. Repeat this process for all your cookies. You’ll notice there will be some syrup and powdered sugar left over; that’s totally normal. These homemade **no bake cookies** are going to be a hit!

The hardest part? Waiting for them to set! Leave your coated cookies uncovered at room temperature. They need at least 4 hours to dry, but honestly, leaving them overnight is ideal. This drying time allows the powdered sugar coating to firm up and create that distinctive, slightly crunchy crust. Once set, they’re ready to be devoured or packed away for later. They hold up incredibly well, so they’re perfect for prepping ahead for a party or just having a sweet treat on hand for the week.

AD — Mediavine Content 300×250 / Responsive

Why This Recipe Works

The combination of boiling honey and finely ground nuts creates a dense, chewy interior, while the simple syrup and powdered sugar coating provides a protective, sweet crust. The spices are fat-soluble, allowing their flavors to infuse deeply into the nuts and honey, making each bite incredibly aromatic. The breadcrumbs add bulk and help bind everything without making the cookies heavy.

These honey nut no bake cookies are my secret weapon for a quick, delicious treat!— Charlotte
AD — Mediavine Native / 728×90 Leaderboard

Prep 1 hourCook 15 minutesYield 20-24 cookies
Ingredients
  • 3/4 cup blanched almonds (107g)
  • 1/2 cup blanched hazelnuts (71g)
  • 2 tablespoons sesame seeds (18g)
  • 1 cup fine breadcrumbs (168g)
  • 1 tablespoon all-purpose flour
  • 2 teaspoons ground cinnamon
  • 1/2 teaspoon ground coriander
  • 1/2 teaspoon ground cloves
  • 1/2 teaspoon kosher salt
  • 1 cup honey (340g)
  • 2/3 cup granulated sugar (133g)
  • 1/2 cup water (120ml)
  • 1 cup powdered sugar (113g)
Instructions
  1. Prep Your Nuts & Oven First, preheat your oven to 350°F (175°C). Spread the blanched almonds and hazelnuts in a single layer on a rimmed baking sheet. Roasting these nuts briefly brings out so much flavor, believe me on this! Place them in the oven for about 6 minutes. Then, pull the sheet out, add the sesame seeds, and pop it back in for another 4 minutes. You want them fragrant and lightly toasted. Keep an eye on them, as nuts can burn quickly! Once done, set them aside to cool.
  2. Whip Up the Simple Syrup Meanwhile, combine the granulated sugar and water in a small saucepan. Bring this mixture to a boil over medium-high heat. Don't stir it while it's boiling – just let it do its thing for about 3 minutes, or until a candy thermometer reads 225°F (107°C). Take it off the heat and let it cool completely. This syrup is going to be your 'glue' later, so it needs to be cool.
  3. Grind Nuts & Mix Dry Ingredients Once your toasted nuts are cool enough, transfer the almonds and hazelnuts to a food processor. Pulse them until they form a coarse meal, a bit like sandy crumbs. Be careful not to over-process them into a paste. Transfer these ground nuts to a mixing bowl. Now, add the toasted sesame seeds, breadcrumbs, flour, cinnamon, coriander, cloves, and salt. Whisk everything together really well to ensure all those lovely spices are evenly distributed.
  4. Create the Cookie Dough Line a baking sheet with parchment paper and set it aside. In a medium saucepan, bring the honey to a rolling boil over medium-high heat. Once it's bubbling, add your mixed dry ingredients all at once. Stir everything with a heat-proof spatula until it's totally combined and forms a thick, cohesive dough. Then, immediately take the pan off the heat.
  5. Cool & Shape Your No Bake Cookies Scrape the warm dough out onto your parchment-lined baking sheet. Spread it into a thin layer, around 1/2 to 1 inch thick. This helps it cool down faster. Let it cool until it's comfortable to handle but still a bit warm – usually 5 to 10 minutes. Once it's workable, divide the dough into 20 to 24 roughly equal pieces (about 30g each). Using the palm of your hand, roll each piece into a neat cylinder, about 2 1/2 inches long. They should look like little logs.
  6. Coat & Finish Pour the powdered sugar into a wide, shallow bowl. Set up your 'dredging station': your shaped cookies, the cooled syrup, the powdered sugar, and a fresh piece of parchment paper. Working one at a time, dip a cookie into the cooled syrup, rotating it until it's coated with a thin, even layer. I find using a couple of forks helps drain off excess syrup and keeps your hands cleaner. Then, transfer the syrupy cookie to the powdered sugar and toss it gently until it's fully coated. Place the finished cookie on the clean parchment paper. Continue this process with all the remaining cookies. There will be some syrup and powdered sugar leftover.
  7. Allow to Set Leave your beautiful honey nut no bake cookies uncovered at room temperature. Give them at least 4 hours to dry and set, though overnight is even better. This drying time allows that sugar coating to form a lovely, hard crust. Then, they're ready to enjoy! Store them in an airtight container once fully set.
Tested Tip

If your dough gets too sticky while shaping, chill it for 10-15 minutes. If it becomes too hard, warm it slightly in the microwave for a few seconds. The perfect dough is pliable but doesn't stick to your hands.

AD — Mediavine Content 300×250 / Responsive

Crafting the Aromatic Dough for Your No Bake Cookies

Coating and Setting Your Delightful No Bake Cookies

Make It Yours

  • Nut Variations — Feel free to experiment with other blanched nuts like pistachios or walnuts. Just make sure they're blanched for the best texture and toast them similarly.
  • Spice It Up — If you love a little extra kick, try adding a pinch of freshly ground black pepper or a tiny bit of cardamom to the dry mix for an even more complex flavor.
  • Citrus Zest Boost — For a brighter note, add a teaspoon of finely grated orange or lemon zest to the dry ingredients. It really livens up the warm spices!
  • Chocolate Drizzle — Once the cookies are fully set, you can melt some dark chocolate and drizzle it over them for an extra layer of decadence. Let the chocolate harden before serving.
AD — Mediavine Content / Native

FAQ

Can I make these no bake cookies ahead of time?

Absolutely! These cookies are fantastic for making ahead. In fact, they need at least 4 hours to set up, and I find they're even better the next day once the flavors have really melded. Store them in an airtight container at room temperature for up to a week.

What if my dough is too crumbly or too sticky?

If your dough is too crumbly, it might need a tiny bit more liquid. You could try adding a teaspoon of warm honey or water. If it's too sticky, you can knead in a tiny bit more flour or breadcrumbs, or chill it for a bit to firm up. Temperature plays a big role with these **no bake cookies**!

Do I have to use blanched nuts?

I highly recommend blanched nuts for the best texture and flavor here. The skins of unblanched nuts can sometimes add a slightly bitter note and make the texture less smooth. If you only have unblanched, you can blanch them yourself by boiling them for a minute, draining, and then rubbing off the skins with a clean towel.

Can I skip the simple syrup bath?

The simple syrup bath is pretty crucial for getting the powdered sugar to stick evenly and form that signature crust. Without it, the powdered sugar might just dust off, and the texture won't be quite the same. It's an extra step, but totally worth it for these elegant **no bake cookies**!

AD — Mediavine 728×90 Leaderboard / Responsive

This post contains affiliate links. We may earn a small commission at no extra cost to you.

More Recipes You'll Love

Tested twice, weeknight-ready, family-approved.