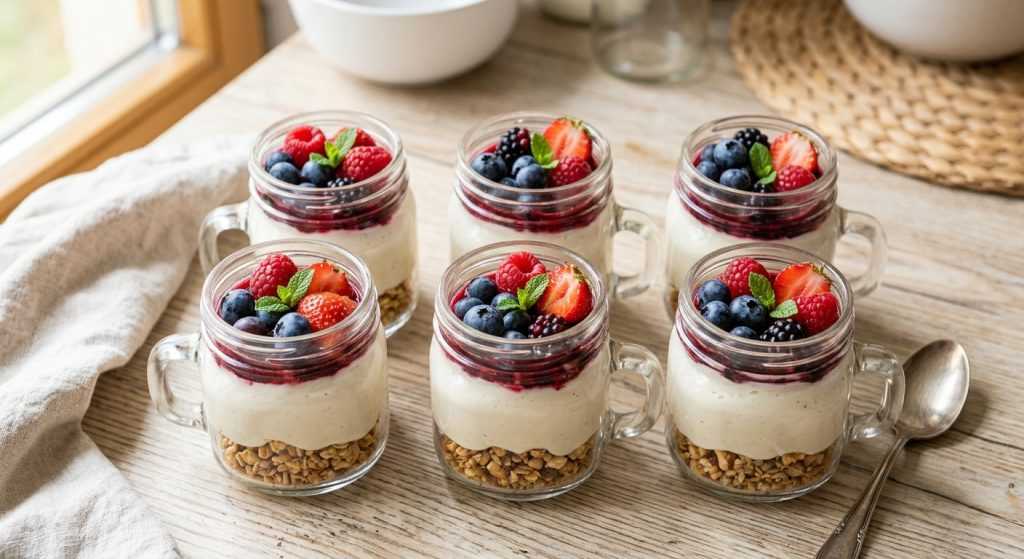
Okay, friends, I am SO excited to share these no-bake vegan cheesecake cups with you! Seriously, if you’re like me and need something sweet that comes together in a flash, but still feels a little special, then you’re going to want to save this recipe. I’ve been making versions of these for a while now, and this one hits all the right notes for a quick dessert or even a satisfying snack. Imagine a creamy, tangy “cheesecake” layer, a little crunchy granola, and fresh berries – all without turning on your oven. It’s truly a lifesaver on those hectic weeknights!
The best part is how adaptable they are. You can use pretty much any berries you have on hand, and that granola base? It’s the perfect canvas for whatever you’re craving. I’ve tested this recipe a few times to get the texture just right – creamy, but still sturdy enough to hold its shape. They come together in what feels like five minutes of actual work, then just need a little chill time. Ideal for when you need a little treat without a lot of fuss. Give them a try, I think you’ll love them!
Getting Those Cashews Ready for Ultra-Creamy Texture
The secret to that amazingly smooth, rich texture in these no-bake vegan cheesecake cups really starts with the cashews. Raw cashews are incredible for creating creamy sauces and fillings because they soften beautifully and blend into a dream. Now, the original recipe says nothing about soaking, but I’ve found that giving them a little head start makes all the difference, especially if your blender isn’t super high-powered. If you have time, soak your cashews in hot water for about 30 minutes, or in cold water for a few hours, or even overnight. This softens them up, so your blender doesn’t have to work quite as hard to get that silky smooth consistency we’re aiming for. Make sure to drain and rinse them well before adding them to the blender. You want them to be plump and ready to mingle with the other ingredients, not watery.
If you’re in a real time crunch and don’t have time to soak, don’t worry! A high-speed blender can still handle raw, unsoaked cashews. You might just need to blend for an extra minute or two, and definitely scrape down the sides of the blender jar more frequently to ensure everything gets incorporated. The goal is to see absolutely no cashew bits or grittiness – just pure, smooth deliciousness. A grainy texture means the cashews haven’t broken down enough, and while it will still taste good, it won’t have that signature cheesecake mouthfeel. So, take your time with this step; it truly pays off in the final product!
Whipping Up the Tangy, Sweet Filling
Once your cashews are prepped, making the creamy filling for these no-bake vegan cheesecake cups is unbelievably simple. You’ll literally just toss all the “cheesecake” ingredients into your blender – those softened cashews, the plain coconut yogurt, maple syrup, fresh lemon juice, and a tiny pinch of sea salt. The coconut yogurt adds a lovely subtle tang and helps with the creaminess, while the maple syrup brings the perfect amount of natural sweetness without being cloying. Don’t skip the lemon juice! It’s crucial for that classic “cheesecake” brightness that cuts through the richness and makes your taste buds sing. The sea salt, even just a little bit, balances all the flavors and enhances the sweetness.
Now, blend, blend, blend! You’ll want to run your blender on high for at least 2-3 minutes. This isn’t just about combining ingredients; it’s about transforming them. As it blends, the mixture will thicken and become incredibly smooth and light. It’s important to stop and scrape down the sides of the blender with a spatula a few times. Sometimes ingredients can get stuck to the sides or beneath the blades, preventing them from fully incorporating. You’ll know it’s ready when it looks like a thick, pourable cream with no lumps or bumps. It should be uniformly silky. Taste a tiny bit – does it need a touch more lemon for zest, or another drizzle of maple syrup for sweetness? Now’s your chance to adjust before assembling your perfect little cups!
Assembling and Chilling Your Delicious No-Bake Vegan Cheesecake Cups
Alright, you’ve got your creamy filling, now comes the fun part: assembly! This is where you can totally personalize your no-bake vegan cheesecake cups. Start with the granola layer at the bottom of your jars or glasses. I love using clear glass jars because you can really see those beautiful layers. If you pulsed your granola, it creates a nice, even crumb base that’s reminiscent of a graham cracker crust. If you left it chunky, you get more texture and bite, which is also fantastic. Don’t overfill, about three tablespoons per cup is usually just right for a good proportion of crunch to creaminess.
Next, gently spoon your creamy cashew mixture over the granola. It should be thick enough that it doesn’t immediately seep into the granola. You’re aiming for about a third of a cup for each serving, which gives you a generous layer of that dreamy “cheesecake.” Finally, the berries! This is where you add a pop of color and fresh flavor. Any fresh berries work here – strawberries, blueberries, raspberries, a mix of all three. They provide a lovely tart contrast to the sweet, rich filling. While you can totally dig in right away, I highly recommend chilling them for at least 30 minutes, or even an hour. This firm up the filling just a bit, making it feel more like a traditional cheesecake. Plus, a cold dessert on a warm day? Pure bliss!