Opens in a new tab

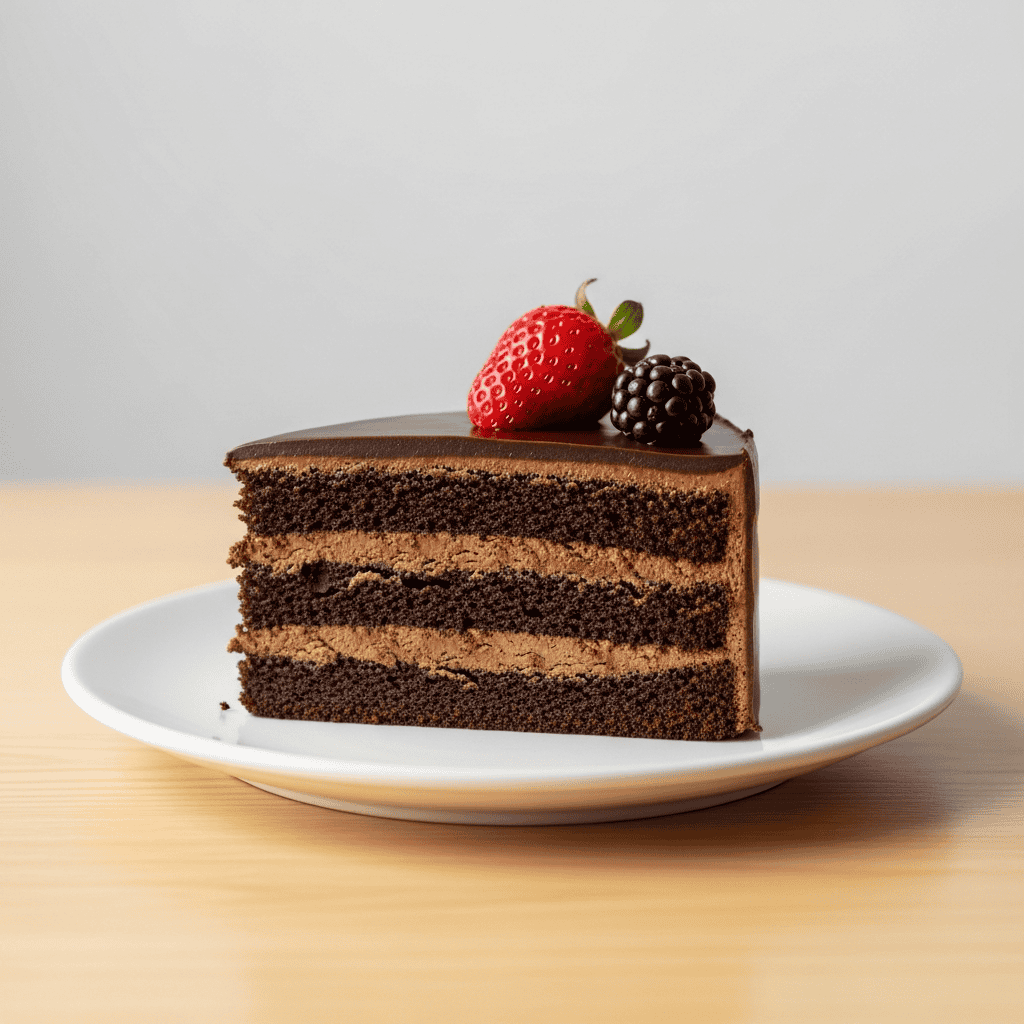
The BEST Moist Chocolate Layer Cake: A Decadent Treat for Busy Parents

TOTAL TIME
SERVES
COURSE
DIFFICULTY
Tested5× before publishing

Okay, so I just HAVE to tell you about this moist chocolate layer cake I whipped up last week! I’ve been on a mission to find *the* perfect chocolate cake recipe for a while now – one that’s truly fudgy and rich but still feels light enough that you can have a second slice without feeling totally overloaded. And friends, I think I’ve finally done it. This one is pure chocolate bliss, seriously.

I know what you’re thinking: a layer cake? For busy parents? But hear me out! While it might look fancy, the steps are super straightforward, and I’ve refined it so you can get that bakery-quality taste right in your own kitchen without spending all day on it. It’s perfect for birthdays, special occasions, or just when you need a decadent pick-me-up that’s guaranteed to make everyone happy. Every bite is soft, incredibly flavorful, and just melts in your mouth. You deserve this kind of deliciousness!

Tips for the BEST Moist Chocolate Layer Cake Batter

Getting that incredible fudgy crumb in this moist chocolate layer cake really comes down to a few key things. First, make sure your eggs and buttermilk are at room temperature. This helps them mix evenly with the other ingredients, leading to a smoother batter and a better texture in the final cake. Secondly, that espresso powder isn’t just for show! It seriously enhances the chocolate flavor without making the cake taste like coffee. It’s like a secret weapon for chocoholics!

And here’s another pro-tip: when you’re combining your wet and dry ingredients, along with the hot coffee, mix it on low speed just until everything is combined. Overmixing can develop the gluten too much, leading to a tougher cake. We want tender, soft, melt-in-your-mouth goodness, so gentle mixing is key here.

Perfecting Your Chocolate Buttercream

A great chocolate cake deserves a great chocolate frosting, right? For this buttercream, make sure your butter is truly softened to room temperature – not melted, but easily indented with a finger. This helps it whip up light and creamy.

When you’re adding the heavy cream, start with the recommended 3 tablespoons, then add more slowly, one tablespoon at a time, until you get your desired consistency. Different cocoa powders can absorb liquid differently, so this allows you to adjust. You want a frosting that’s spreadable but still holds its shape. Also, once you’ve beaten it on high for a minute, resist the urge to keep whipping it. Overwhipping can incorporate too much air, making it less stable and sometimes grainy.

Assembling Your Beautiful Cake

Once your cake layers are completely cool, the first step is leveling them if they have a dome. A large serrated knife works wonders here. Just gently saw across the top to create a flat surface. This makes stacking so much easier and gives you a professional-looking cake.

For frosting, don’t be shy! Use a good amount between the layers and then generously all over the top and sides. If you have an icing spatula and a bench scraper, they’re super helpful for getting smooth edges. And don’t skip the chilling step after frosting! Refrigerating the cake, even for just 30-60 minutes, helps the frosting firm up, making for much cleaner slices and a more stable cake. Trust me, it’s worth the wait for that perfect presentation!

AD — Mediavine Content 300×250 / Responsive

Why This Recipe Works

The magic here is the combination of baking soda *and* baking powder, plus the hot coffee and buttermilk. The coffee really deepens the chocolate flavor without making it taste like coffee, and the buttermilk tenderizes the crumb. It’s science working for deliciousness! The oil also contributes to that lasting moistness, keeping the cake tender for days.

This cake is SO good, you'll want to lick the bowl. And maybe the spatula. No judgment here!— Charlotte
AD — Mediavine Native / 728×90 Leaderboard

Prep 30 minutesCook 25 minutesYield 12 servings
Ingredients
  • 1 3/4 cups all-purpose flour (219g), spooned & leveled
  • 3/4 cup unsweetened natural cocoa powder (64g)
  • 1 3/4 cups granulated sugar (350g)
  • 2 teaspoons baking soda
  • 1 teaspoon baking powder
  • 1 teaspoon salt
  • 2 teaspoons espresso powder (optional, but highly recommended!)
  • 1/2 cup vegetable oil (113g/120ml), or canola oil or melted coconut oil
  • 2 large eggs, at room temperature
  • 2 teaspoons pure vanilla extract
  • 1 cup buttermilk (240g/ml), at room temperature
  • 1 cup freshly brewed strong hot coffee or hot water (240g/ml)
  • 1 1/4 cups unsalted butter (282g), softened to room temperature
  • 3 1/2 cups confectioners’ sugar (420g)
  • 3/4 cup unsweetened cocoa powder (64g), natural or Dutch-process
  • 3–5 Tablespoons heavy cream (45–75g/ml), or half-and-half or milk, at room temperature
  • 1 teaspoon pure vanilla extract
  • 1/4 teaspoon salt
  • Optional: semi-sweet chocolate chips for decoration
Instructions
  1. Prep Your Pans & Dry Ingredients First things first, get your oven ready! Preheat it to 350°F (177°C). Grab two 9-inch cake pans, give them a good grease, then line the bottoms with parchment paper rounds. Grease the parchment too! This step makes sure your beautiful cakes pop out easily. In a big bowl, whisk together the flour, cocoa powder, granulated sugar, baking soda, baking powder, salt, and espresso powder (if you’re using it). Set this dry mix aside for a moment.
  2. Mix the Wet Ingredients & Combine Now, for the wet stuff! In a separate bowl (or your stand mixer), use a whisk attachment to mix the oil, eggs, and vanilla on medium-high speed until they’re nicely combined. Pour in the buttermilk and mix until everything is incorporated. Next, gradually add your dry ingredients into the wet mixture, then pour in the hot coffee or water. Whisk or beat on low speed just until the batter comes together. Don't overmix! The batter will be pretty thin, and that's totally okay.
  3. Bake & Cool Your Cake Layers Divide your batter evenly between the two prepared pans. Bake for 23–26 minutes. You’ll know they're done when a toothpick inserted into the center comes out clean. Heads up: chocolate cakes can sometimes sink a tiny bit in the middle after cooling, even when fully baked. It's just cocoa powder being less structurally robust than flour. Nothing to worry about! Let the cakes cool in their pans on a wire rack for 1 hour. Then, run a knife around the edges, carefully remove them from the pans, peel off the parchment, and let them finish cooling completely on the rack.
  4. Whip Up That Fudgy Buttercream While your cakes cool, let’s make the frosting! With a stand mixer fitted with a paddle attachment (or a handheld mixer), beat the softened butter on medium speed until it’s creamy, about 2 minutes. Now, add the confectioners’ sugar, cocoa powder, 3 tablespoons of heavy cream, vanilla extract, and salt. Beat on low speed for 30 seconds to combine, then crank it up to high speed and beat for a full minute until it's light and fluffy. Don't over-whip it! If your frosting is too thin, add a little more confectioners’ sugar; if it’s too thick, add a tiny bit more cream, 1 tablespoon at a time. Give it a taste and add another pinch of salt if you think it needs it.
  5. Assemble & Chill Your Masterpiece Once your cakes are completely cool, check for any domes on top. If they’re domed, use a serrated knife to carefully slice off a thin layer to make them flat – this is called leveling. Place one cake layer on your serving plate or cake stand, and spread an even layer of frosting over the top. Gently place the second cake layer on top, then spread the remaining frosting all over the top and sides. I like using an icing spatula and a bench scraper for a smooth finish! If you want, sprinkle some semi-sweet chocolate chips around the edges for decoration. To help the cake set beautifully before slicing, pop it into the refrigerator, uncovered, for at least 30–60 minutes. After that, you're good to serve, or keep it chilled for up to 4–6 hours before serving. You can enjoy it chilled or at room temperature!
  6. Storing Leftovers If you happen to have any cake left (a big *if*!), cover it tightly and store it in the refrigerator for up to 5 days. A cake carrier is super handy for this, keeping it fresh and easy to transport if you're taking it to a gathering.
Tested Tip

Don't skip the parchment paper circles in the pans! Seriously, they make taking the cakes out of the pan a total breeze. No sticking, no drama, just perfectly released cake layers every time.

AD — Mediavine Content 300×250 / Responsive

Tips for the BEST Moist Chocolate Layer Cake Batter

Perfecting Your Chocolate Buttercream

Assembling Your Beautiful Cake

Make It Yours

  • Chocolate Espresso Delight — For an even deeper, coffee-infused chocolate flavor, consider adding an extra teaspoon of espresso powder to the cake batter. You can also add a pinch to the frosting for a delightful mocha twist!
  • Mint Chocolate Dream — Add 1 to 1.5 teaspoons of pure peppermint extract to the buttercream frosting. A few drops of green food coloring can make it festive too, perfect for the holidays!
  • Raspberry Chocolate Swirl — Before placing the second cake layer, spread a thin, even layer of your favorite high-quality raspberry jam over the first frosted layer. The fruity tartness is amazing with the rich chocolate!
  • Sheet Cake Style — If you're not feeling a layer cake, you can bake this recipe in a 9x13 inch pan. The baking time will be slightly longer, usually around 30-35 minutes, so keep an eye on it with the toothpick test!
AD — Mediavine Content / Native

FAQ

Can I make this cake ahead of time?

Absolutely! You can bake the cake layers a day in advance, wrap them tightly in plastic wrap once completely cooled, and store them at room temperature. You can also make the frosting a day ahead and store it in the fridge; just let it come to room temp and re-whip it before using.

Why do my cakes sometimes sink in the middle?

Don't worry, it's pretty normal for chocolate cakes! Cocoa powder isn't as structurally strong as plain flour, so it can struggle a bit with all the moisture needed for a super moist crumb. As long as a toothpick comes out clean, your cake is done, and you can always level it if the dip is noticeable.

What kind of cocoa powder should I use?

The recipe calls for natural unsweetened cocoa powder in the cake. For the frosting, either natural or Dutch-process works fine. Natural cocoa powder gives a slightly redder hue and works with baking soda, while Dutch-process is darker and milder.

How do I store leftover cake?

Keep any leftover cake tightly covered in the refrigerator for up to 5 days. A cake carrier is great for this! You can serve it chilled or let it come closer to room temperature for the softest crumb.

AD — Mediavine 728×90 Leaderboard / Responsive

What To Serve With This

  • A scoop of vanilla bean ice cream
  • Fresh raspberries or strawberries
  • A dusting of powdered sugar
  • A warm mug of coffee or tea
  • A glass of cold milk

This post contains affiliate links. We may earn a small commission at no extra cost to you.

More Recipes You'll Love

Tested twice, weeknight-ready, family-approved.
