Light Rice Krispies Treats: A Quick & Easy Snack for Busy Parents

TOTAL TIME
SERVES
COURSE
DIFFICULTY
Tested5× before publishing

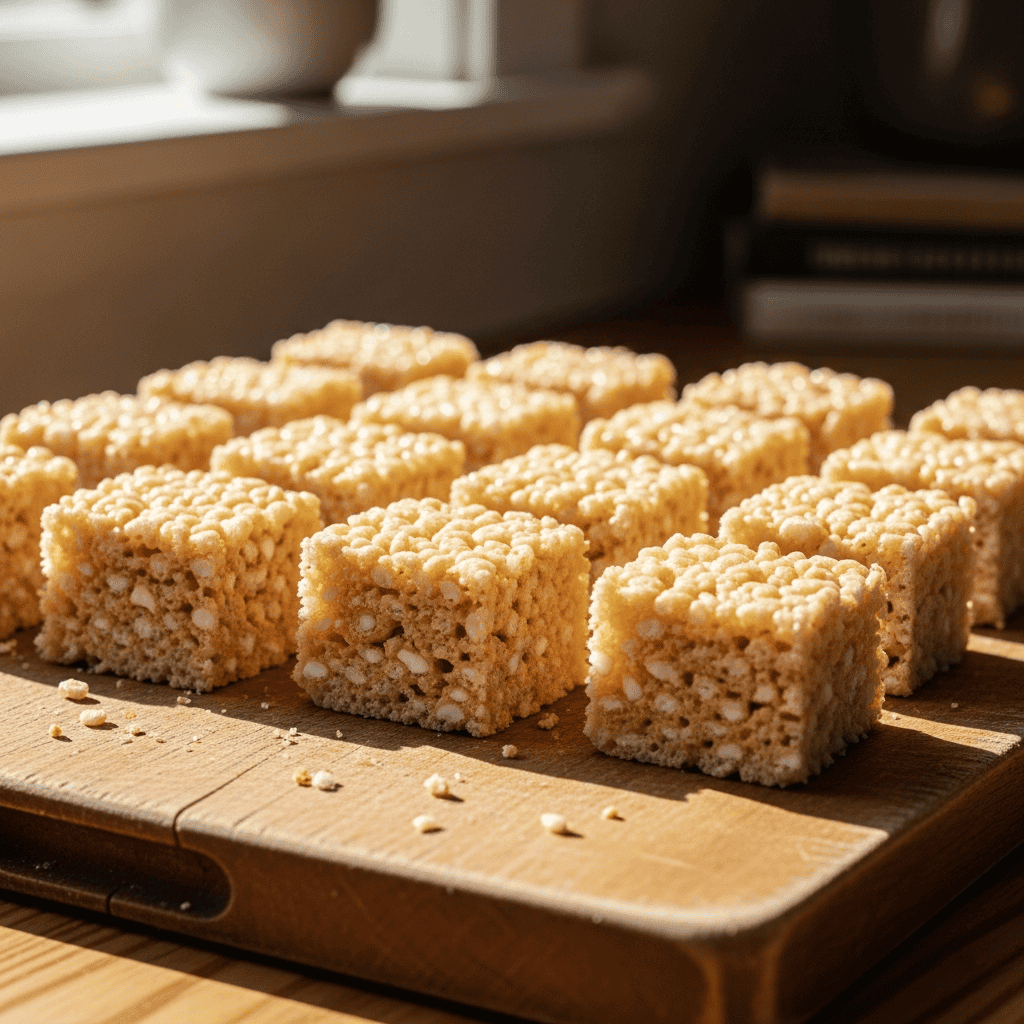
Hey friends! So, I just whipped up a batch of these light rice krispies treats, and let me tell you, they are a lifesaver. You know those days when you need something sweet, but you’re also trying to keep things a *little* lighter? Yep, I’m right there with you. This classic snack comes together so fast, which is perfect when you’re juggling a million things and just need a quick win. It’s truly one of those recipes you’ll keep in your back pocket for unexpected cravings or when you need a simple treat for the whole family without all the fuss. We’re talking minimal ingredients and maximum smiles here.

I’ve made these so many times, tweaking just a little to get that perfect balance of chewy and crispy without feeling heavy. I’m always looking for ways to enjoy our favorite sweets in a slightly more balanced way, and these treats absolutely deliver. They’re super easy, super quick, and honestly, taste just like the ones you remember, maybe even better because you made them yourself! Give them a try; you won’t regret it.

Getting Started: Your Essential Prep Steps

Alright, before we even think about melting marshmallows, let’s get our workspace ready. Seriously, this recipe moves fast once the heat is on, so having everything prepped makes a world of difference. First up, grab your trusty 9×12-inch baking pan. Give it a generous spray with cooking spray. Don’t skimp here! This step is your best friend when it comes to getting those squares out later without a sticky mess. Once your pan is prepped, set it aside. You’ll also want to measure out your Rice Krispies and have your light butter and marshmallows ready to go. Think of it as mise en place for busy parents – every second counts!

Making the Gooey Magic for Light Rice Krispies Treats

This is where the real transformation happens! You’ll need a large saucepan for this. Place it over a low flame. Low and slow is the name of the game here, friends. Add your light butter spread and let it melt gently. Swirl it around a bit so it coats the bottom of the pan; this helps create a non-stick surface for our marshmallow magic. Once the butter is melted, dump in all those mini marshmallows. Keep stirring them over that low heat until they’ve completely melted into a smooth, glossy, gooey wonderland. Be patient! It’s better for them to melt slowly than to burn. The moment they’re perfectly smooth, take the pan off the heat. The clock starts now!

The Quick Combine and Set Process

Okay, this part requires a little speed, so be ready! As soon as that marshmallow mixture is off the heat and perfectly melted, immediately pour in your Rice Krispies cereal. Now, stir, stir, stir! You want to coat every single piece of cereal with that warm, gooey marshmallow before it has a chance to cool and stiffen up. It might feel like a mini arm workout, but I promise it’s worth it for those evenly coated treats. Once combined, quickly press the mixture into your prepared pan. A neat trick is to use a piece of wax paper to press it down firmly and evenly without getting sticky hands. Then, it’s just a waiting game for them to cool down before slicing into perfect squares. I like to let them sit for about 30 minutes, or pop them in the fridge for 15-20 minutes if I’m in a hurry!
AD — Mediavine Content 300×250 / Responsive

Why This Recipe Works

This recipe works because it swaps in light butter spread for regular butter, cutting down on saturated fat while still giving you that classic, buttery flavor. Using mini marshmallows helps them melt faster and more evenly, which is great when you're short on time. It maintains the comforting taste and texture of a traditional Rice Krispies treat, making it a satisfying choice when you want a lighter sweet.

This recipe is my go-to for a quick, sweet craving that doesn't feel heavy. It's truly magic how fast it comes together!— Charlotte
AD — Mediavine Native / 728×90 Leaderboard

Prep 5 minutesCook 5 minutesYield 16 pieces
Ingredients
  • 2 tbsp light butter spread (like Smart Balance Light)
  • 4 cups (10 oz) mini marshmallows
  • 6 cups Rice Krispies cereal
  • as needed cooking spray
Instructions
  1. Prepare Your Pan Grab a 9x12-inch baking pan and give it a good spray with cooking spray. Set it aside, ready for action.
  2. Melt the Butter Place a large saucepan over low heat on your stovetop. Add the light butter spread and let it melt slowly. Make sure to swirl it around so it coats the bottom of the pan – this helps prevent sticking later on.
  3. Add Marshmallows Once the butter is melted, toss in all those mini marshmallows. Keep the heat low and stir gently. You want them to melt into a smooth, gooey cloud, not burn! This usually takes a few minutes.
  4. Stir Until Smooth Continue stirring the marshmallows until they're completely melted and lovely and smooth. As soon as they hit that point, take the pan off the heat.
  5. Combine with Cereal Now for the fun, fast part! Immediately pour all 6 cups of Rice Krispies cereal into the melted marshmallow mixture. Stir quickly and thoroughly until every single cereal piece is coated. The marshmallow will start to set up fast, so work efficiently!
  6. Press and Cool Transfer the mixture to your prepared 9x12-inch pan. For easy pressing without sticking, use a piece of wax paper or parchment paper to gently press the mixture down evenly into the pan. Let it cool completely, about 30 minutes, before cutting into 16 squares. Enjoy!
Tested Tip

For the best non-stick pressing experience, use a piece of wax paper or parchment paper over the mixture instead of your hands or a buttered spatula directly. It prevents tearing and sticky fingers!

AD — Mediavine Content 300×250 / Responsive

Getting Started: Your Essential Prep Steps

Making the Gooey Magic for Light Rice Krispies Treats

The Quick Combine and Set Process

Make It Yours

  • Chocolate Drizzle — Once cooled, melt a tablespoon of semi-sweet chocolate chips with a tiny bit of coconut oil and drizzle it over the top for a little extra richness.
  • Sprinkle Fun — Press some colorful sprinkles into the top right after pressing them into the pan, before they cool, for a festive touch that the kids will adore.
  • Vanilla Boost — Stir in a teaspoon of pure vanilla extract with the melted marshmallows just before adding the cereal. It really deepens the flavor!
  • Nutty Crunch — For an adult twist, mix in a quarter cup of chopped pecans or walnuts with the Rice Krispies. The added crunch and flavor are fantastic.
AD — Mediavine Content / Native

FAQ

How do I store light rice krispies treats?

Keep them in an airtight container at room temperature for up to 3 days. They tend to get a bit harder if refrigerated, so room temp is best for that soft chew.

Can I use regular butter instead of light butter spread?

Yes, absolutely! The recipe will just have slightly more fat, but it will still taste wonderful. Just make sure to use unsalted butter if you do.

My marshmallows got hard and sticky before I could mix in the cereal. What happened?

This usually means the heat was too high, or you took too long to add the cereal after removing from heat. Work quickly once the marshmallows are melted and keep the heat low during melting.

Are these treats gluten-free?

No, traditional Rice Krispies cereal contains malt flavoring which is derived from barley and contains gluten. For a gluten-free version, look for a certified gluten-free crisp rice cereal.

AD — Mediavine 728×90 Leaderboard / Responsive

What To Serve With This

  • A Tall Glass of Cold Milk
  • Fresh Fruit Skewers
  • Your Favorite Hot Coffee
  • A Scoop of Vanilla Bean Ice Cream
  • A Bowl of Berries and Whipped Cream

This post contains affiliate links. We may earn a small commission at no extra cost to you.

More Recipes You'll Love

Tested twice, weeknight-ready, family-approved.