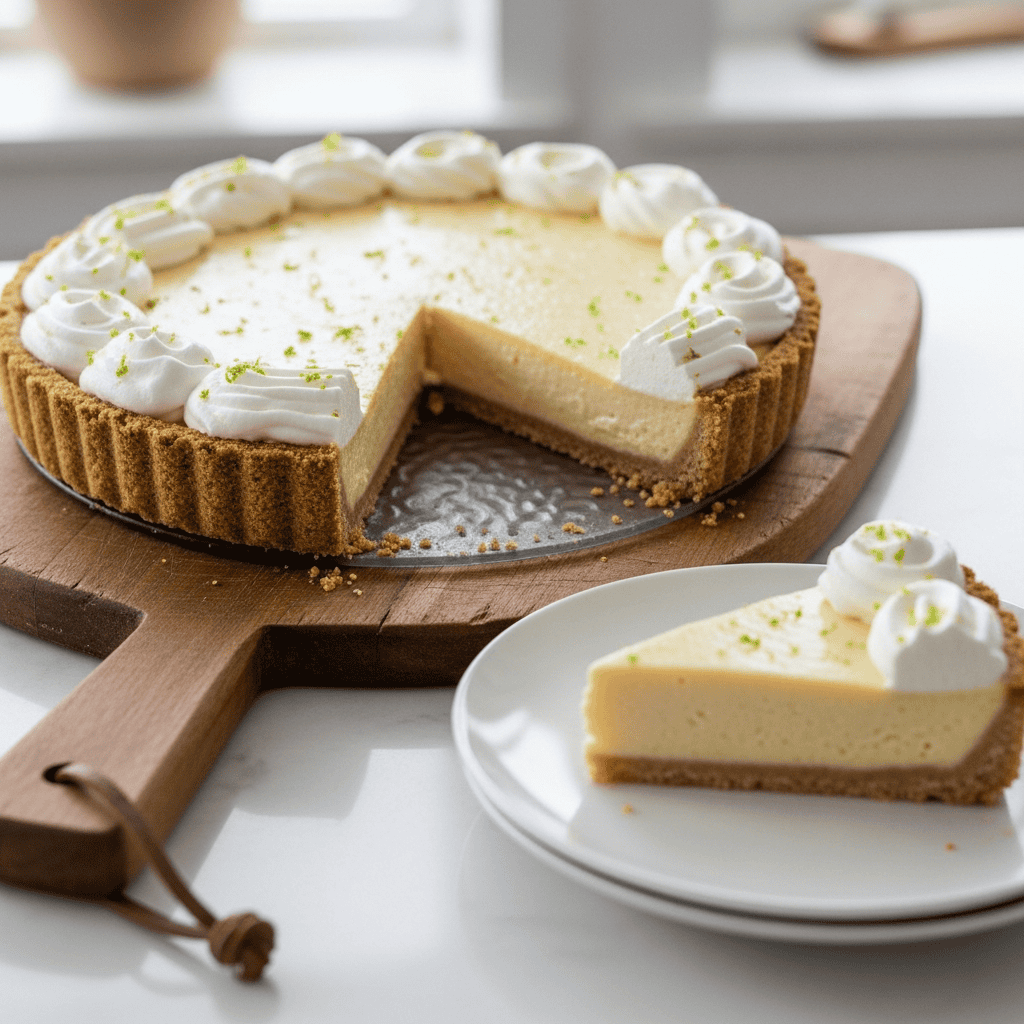
Effortless Classic Key Lime Pie Recipe for Busy Weeknights

TOTAL TIME
SERVES
COURSE
DIFFICULTY
Tested5× before publishing

If you’re craving a slice of sunshine, this classic key lime pie is about to become your new favorite dessert. I’ve made so many lime pies over the years, trying to get that perfect balance of tart and sweet. This version finally hit all the right notes for me, and I know it’ll be a hit at your house too. It’s surprisingly straightforward, even with that creamy, zesty filling.

I know how crazy evenings can get, especially when you’re trying to get a decent meal on the table. That’s why I love recipes that don’t add extra stress. This pie comes together with just a few ingredients and a couple of baking steps. The best part? You can totally make it ahead, so dinner time is just about dishing it out. It’s a wonderful treat for the whole family, and tastes like you spent hours on it!

Making the Perfect Crust for Your Classic Key Lime Pie

Okay, let’s talk crust! A good key lime pie starts with a stellar base. For this classic key lime pie, we’re using a simple graham cracker crust. It’s so much easier than pastry and has that amazing sweet-salty crunch that really makes the lime filling sing. I always go for about 1.5 sleeves of graham crackers, which typically gives me just enough for a 9-inch pie. Don’t worry about measuring exactly 300g; just eyeball it to about two cups of crumbs.

To get those perfect crumbs, a food processor is your best friend. Just a few pulses, and you’re good. If you don’t have one, pop the crackers into a sturdy plastic bag and go to town with a rolling pin. It’s actually pretty satisfying! Once you’ve got your crumbs, mix them with melted butter until everything looks like wet sand. Really press it into your tart tin – I use the bottom of a measuring cup to get it super firm. This keeps it from falling apart when you slice it later. A quick bake sets it beautifully, giving you that lovely golden edge. Make sure it cools down fully before the filling goes in!

Mixing Up That Zesty, Dreamy Filling

The filling is where the magic happens for this classic key lime pie. It’s surprisingly simple, with just a few key ingredients, but each step is important for that signature creamy, tangy texture. We start with egg yolks, which get a good whisking to lighten them up. This helps give the pie a rich, smooth mouthfeel without being too dense. Then comes the sweetened condensed milk – it’s crucial for both sweetness and that incredible custardy consistency. Don’t skimp on the whisking time after adding it; those three minutes really make a difference in how it sets.

And then, the limes! Whether you use tiny Key limes or regular Persian limes, fresh zest and juice are non-negotiable. The zest brings so much fragrant lime oil, and the juice, of course, provides all that wonderful tartness. When you add the lime juice to the condensed milk and egg yolk mixture, you’ll actually notice it thickening up right before your eyes. That’s the acid from the lime reacting with the milk, helping it to set. Another good whisking, and your filling is ready to pour into the cooled crust. Remember, a little jiggle after baking is a good thing – it means your pie will be perfectly creamy once it’s chilled.

The Essential Chilling and Whipped Cream Finish

Once your pie comes out of the oven, the hardest part is waiting! Seriously, chilling is absolutely non-negotiable for a key lime pie. It needs at least six hours in the fridge to fully set. If you can swing it, making it the night before and letting it chill overnight is truly the best way to go. It makes slicing so much cleaner and the flavors really get to meld together.

When it’s time to serve, pulling that tart out of a loose-bottomed pan is super satisfying. For the topping, simple whipped heavy cream with a touch of powdered sugar is all you need. Whip it until it forms soft peaks – you want it light and airy, not stiff like frosting. Dollop it generously over the top, or if you’re feeling fancy, pipe it on. A final sprinkle of fresh lime zest not only looks pretty but adds another layer of bright citrus aroma that really makes this dessert special. It’s such a bright and refreshing end to any meal!
AD — Mediavine Content 300×250 / Responsive

Why This Recipe Works

This recipe is a winner for busy parents because it uses simple, common ingredients and has a relatively short active prep and cook time. The ability to make it entirely ahead of time – even the day before – means you can tackle dessert without adding to the dinner rush stress. Plus, it’s a universally loved dessert that feels special without any complicated techniques, making it perfect for the whole family.

This pie is a little slice of sunshine, perfect for those days when you need something bright and sweet to look forward to.— Charlotte
AD — Mediavine Native / 728×90 Leaderboard

Prep 30 minutesCook 25 minutesYield 8 servings
Ingredients
  • 2 cups graham cracker crumbs (about 1.5 sleeves)
  • 7.5 tablespoons unsalted butter, melted
  • 1 (14-ounce) can sweetened condensed milk
  • 3 medium egg yolks
  • Finely grated zest and juice of 4 limes (Key limes are traditional, but regular limes work great!)
  • 1 ¼ cups heavy cream
  • 1 tablespoon powdered sugar
  • Extra lime zest, for decorating
Instructions
  1. Prep Your Oven & Pan Preheat your oven to 325°F (160°C). Grab a 9-inch loose-based tart tin and set it aside. This kind of pan makes it SO much easier to get the pie out later.
  2. Crush the Crackers If you don't have crumbs, it’s easy! Either pulse the graham crackers in a food processor until they're fine, or put them in a sturdy zip-top bag and smash them with a rolling pin. This is a great way to let out some stress, just saying!
  3. Make the Crust Pour the melted butter over the graham cracker crumbs in a medium bowl. Stir it really well until all the crumbs are moistened. Then, press this mixture firmly into the bottom and up the sides of your tart tin. Use the back of a spoon or the bottom of a glass to get it nice and compact. Bake the crust for 10 minutes, then take it out and let it cool completely on a wire rack.
  4. Start the Filling In a large mixing bowl, beat the three egg yolks with electric beaters for about a minute until they look pale and a little frothy. This gives your pie a nice, light texture.
  5. Add Sweetness & Whisk Pour in the entire can of sweetened condensed milk. Keep whisking with the electric beaters for a good 3 minutes. It should get noticeably thicker and lighter in color. Don’t rush this step; it really helps the pie set up beautifully.
  6. Bring on the Zest & Juice Now for the star of the show! Add the finely grated lime zest and all the fresh lime juice to the mixture. Whisk again for another 3 minutes. You’ll see it thicken even more and smell that amazing lime aroma. If you can find Key limes, great! If not, regular limes work perfectly.
  7. Bake the Pie Pour the luscious lime filling into your cooled graham cracker crust. Carefully transfer the tart tin back into the oven and bake for 15 minutes. The center should be mostly set, with just a slight jiggle. Don't overbake! A little wobble means it’ll be extra creamy. Let it cool completely on a wire rack, then pop it in the fridge for at least 6 hours, or even better, overnight. This chilling time is essential for it to firm up properly.
  8. Whip the Topping When you’re ready to serve, carefully remove the pie from its tin. In a clean bowl, whip the heavy cream and powdered sugar together until you have soft, billowy peaks. Be careful not to overmix; you want it light and airy, not stiff.
  9. Decorate & Serve Dollop spoonfuls of whipped cream onto the top of the pie. You can spread it, pipe it, or just make pretty little mounds. Finish with a generous sprinkle of fresh lime zest for that extra pop of color and flavor. Slice and enjoy!
Tested Tip

To get the most juice from your limes, microwave them for 10-15 seconds and then roll them firmly on the counter before slicing. You'll be surprised how much more juice you get!

AD — Mediavine Content 300×250 / Responsive

Making the Perfect Crust for Your Classic Key Lime Pie

Mixing Up That Zesty, Dreamy Filling

The Essential Chilling and Whipped Cream Finish

Make It Yours

  • Coconut Twist — Replace half of the graham cracker crumbs with shredded unsweetened coconut for a tropical crust. A sprinkle of toasted coconut on top of the whipped cream would be amazing too!
  • Spice It Up — Add a tiny pinch of ground ginger or cardamom to your graham cracker crumbs before mixing with butter. It gives the crust a subtle, warm flavor that pairs wonderfully with the lime.
  • Berry Fresh — Serve slices of the chilled pie with a side of fresh raspberries or sliced strawberries. Their tart sweetness complements the lime beautifully and adds a pop of color.
  • Meringue Topping — If you love a more traditional meringue, use the leftover egg whites from the filling to make a fluffy meringue. Pipe it onto the pie before serving and lightly toast it with a kitchen torch.
AD — Mediavine Content / Native

FAQ

Can I use bottled lime juice?

While fresh lime juice truly gives the best flavor for key lime pie, you can use bottled if you're in a pinch. Just make sure it's 100% lime juice, not from concentrate, for the closest taste. You'll still want to use fresh zest for flavor!

How long does key lime pie last in the fridge?

Properly stored in an airtight container, your key lime pie will last for 3-4 days in the refrigerator. It's usually best on day 2 or 3 once the flavors have really had a chance to meld.

Can I freeze key lime pie?

Yes! You can definitely freeze key lime pie. Wrap it tightly in plastic wrap, then aluminum foil, and it will keep in the freezer for up to a month. Thaw it in the refrigerator overnight before serving. It might lose a tiny bit of its crisp crust texture, but the filling will still be delicious.

What's the difference between Key limes and regular limes?

Key limes are smaller, more yellowish, and have a more aromatic, slightly tarter flavor than regular Persian limes. However, regular limes work perfectly well for this recipe, so don't feel like you have to hunt down Key limes specifically unless you want that authentic nuance.

AD — Mediavine 728×90 Leaderboard / Responsive

What To Serve With This

  • Grilled Chicken with Mango Salsa
  • Sheet Pan Shrimp and Veggies
  • Simple Roasted Pork Tenderloin
  • Easy Weeknight Salmon
  • Taco Night with All the Fixings

This post contains affiliate links. We may earn a small commission at no extra cost to you.

More Recipes You'll Love

Tested twice, weeknight-ready, family-approved.