Opens in a new tab

Easy No-Bake Pumpkin Pie Jars for Busy Weeknights

TOTAL TIME
SERVES
COURSE
DIFFICULTY
Tested5× before publishing

Alright, busy parents, if you’re looking for a dessert that feels fancy but is actually a breeze, these no bake pumpkin pie jars are about to become your new best friend. Seriously, I get it – weeknights are chaos, and sometimes you just want a little something sweet at the end of the day without a huge production. This recipe is exactly that: a simple, make-ahead treat that brings all the cozy fall vibes without ever turning on your oven for the pie part!

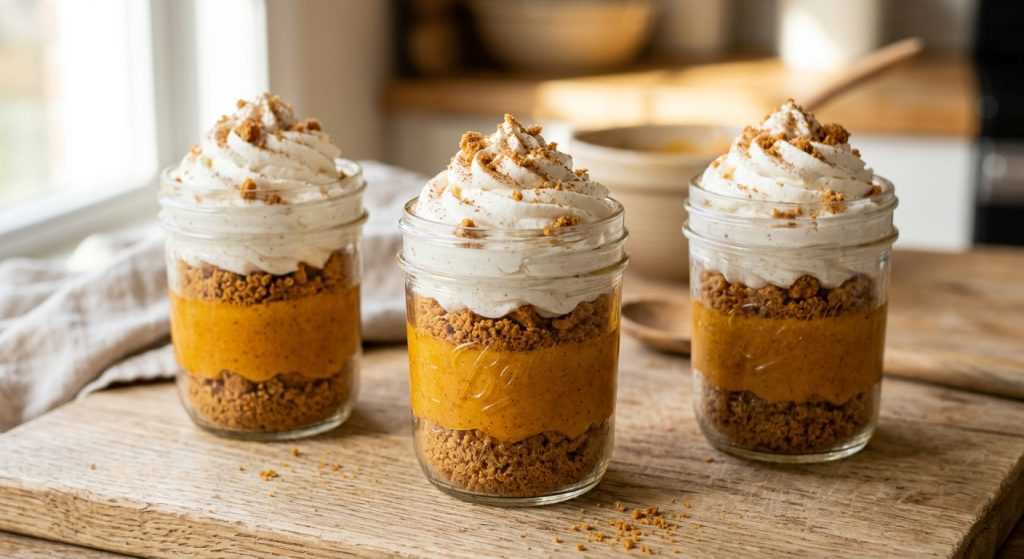
I’ve tested this one so many times to make sure it’s absolutely foolproof. We’re talking layers of buttery, spiced cookie crumbs, a rich and creamy homemade pumpkin custard that just melts in your mouth, and a big dollop of fluffy, spiced whipped cream. It’s perfect for the whole family, and honestly, assembling them is kind of fun. You’ll love how quickly these come together and how happy everyone is to dig into their own individual pumpkin pie in a jar!

Crafting the Creamy Pumpkin Custard Base

Making a homemade custard might sound a little intimidating, but I promise you, it’s totally manageable, even on a busy evening. The key here is all in the whisking! You’ll start by making a thick paste with egg yolks and cornstarch. Don’t worry if it feels a little stiff; just keep at it until it’s smooth. This paste is what gives our custard its lovely, rich body. Then comes the tempering – that’s when you slowly add the warm milk and sugar to the egg mixture. It’s like gently introducing them so the eggs don’t freak out and scramble. Pour slowly and whisk, whisk, whisk! It’s super important to keep those eggs moving.

After that, you’ll pour it all back into the saucepan and cook it until it thickens. This stage is magical because you’ll see it transform from a liquid to a luscious, spoonable pudding right before your eyes. Keep whisking the entire time to prevent any lumps from forming on the bottom. When it’s done, it will be velvety smooth and beautifully fragrant with pumpkin and spice. The butter, vanilla, and extra spice get whisked in at the end, adding that extra layer of richness and flavor. Finally, a good long chill in the fridge is a must! This lets all those wonderful flavors meld together and gets the custard perfectly set. Don’t forget to press plastic wrap directly onto the surface to avoid any skin forming – nobody wants a rubbery custard top!

The Secret to Amazing No Bake Pumpkin Pie Jars: Toasted Cookie Crumbs

Okay, so let’s talk about the crust for these no bake pumpkin pie jars. Forget about rolling out pie dough – we’re going with a super simple, yet incredibly flavorful, cookie crumble. I love ginger snaps or Biscoff cookies for this because their warm, spiced notes just pair so perfectly with pumpkin. You’ll crush them up; I just pop them in a freezer bag and use a rolling pin. It’s actually a pretty satisfying stress reliever!

But here’s the little trick that makes all the difference: toasting the crumbs in a skillet with butter and a touch of brown sugar. This isn’t just about mixing them; it’s about giving them a quick little sauté over medium-low heat. As they cook, the butter permeates the crumbs, and the sugar caramelizes slightly, deepening their flavor and giving them an amazing, crisp texture that holds up beautifully against the creamy custard. They smell absolutely incredible as they toast, filling your kitchen with a cozy aroma. Don’t rush this step – just a few minutes of gentle stirring makes these crumbs go from good to truly fantastic. Let them cool completely before layering, as this will help them get nice and crunchy.

Whipping Up the Perfect Spiced Cream and Assembly

The whipped cream on top of these jars is not just any whipped cream; it’s our fluffy, spiced crowning glory! Starting with very cold heavy cream is key here – it whips up much faster and holds its shape better. Adding a touch of sugar and, of course, a little more pumpkin pie spice and vanilla extract ensures that every single layer of these jars sings with flavor. You’re looking for medium peaks, which means the cream will hold its shape when you lift the whisk, but it still looks soft and luscious, not stiff or granular. Over-whipping can make it curdled, so keep an eye on it!

Assembling these is probably the most fun part. First, spoon in those amazing toasted cookie crumbs. They form a delightful, slightly crunchy foundation. Next, add a generous layer of that velvety smooth, chilled pumpkin custard. You can use a spoon for a rustic look or pipe it in for something a bit neater. Finally, top it all off with a beautiful swirl of your spiced whipped cream. I love garnishing with a sprinkle of extra spice or a few more cookie crumbs – it just makes them look extra special. The best part? You can totally make these ahead of time, which is a lifesaver for busy schedules!

AD — Mediavine Content 300×250 / Responsive

Why This Recipe Works

This recipe works because it combines classic fall flavors with smart no-bake techniques. Tempering the eggs creates a stable, silky custard without baking. Toasting the cookie crumbs adds depth and texture, preventing a soggy base, and using individual jars makes for easy portioning and convenient make-ahead dessert options, perfect for grab-and-go treats.

These pumpkin pie jars bring all the cozy fall vibes to your table, without ever touching the oven!— Charlotte
AD — Mediavine Native / 728×90 Leaderboard

Prep 45 minutesCook 20 minutesYield 6 servings
Ingredients
  • 5 large egg yolks, cold or room temperature
  • 3 1/2 Tablespoons cornstarch
  • 1 2/3 cups whole milk (do not use low-fat or nondairy)
  • 2/3 cup granulated sugar
  • 2 Tablespoons unsalted butter, softened to room temperature
  • 1 cup canned pumpkin puree
  • 1 teaspoon pure vanilla extract
  • 1 1/4 teaspoons pumpkin pie spice
  • Pinch salt (less than 1/8 teaspoon)
  • 24–28 ginger snap or Biscoff cookies (about 6.7 ounces)
  • 1 Tablespoon unsalted butter
  • 1 teaspoon light or dark brown sugar
  • 1 cup heavy cream, very cold
  • 2 Tablespoons light or dark brown sugar or granulated sugar
  • 1/2 teaspoon pure vanilla extract
  • 1/2 teaspoon pumpkin pie spice
  • Optional: crushed ginger snap/Biscoff crumbs, for topping
Instructions
  1. Prep the Custard Base In a large heatproof bowl (one with a pour spout is easiest!), whisk together the egg yolks and cornstarch. It might look a little dry or stiff at first, but keep whisking until it’s fully combined and thick. If it's really not coming together, add a few drops of the milk from the next step to help it along. Set this bowl aside for now.
  2. Temper the Milk and Sugar Pour the milk and granulated sugar into a medium saucepan. Place it over medium heat and whisk until all the sugar has completely dissolved. Let the mixture come to a gentle simmer; if you have an instant-read thermometer, it should reach 210°F. Take it off the heat. Now, slowly and steadily pour this warm milk mixture into your egg yolk bowl, whisking constantly the whole time. This is super important to prevent the eggs from scrambling! Once combined, stir in the pumpkin puree. Pour the entire mixture back into the saucepan, but this time, pour it through a fine-mesh sieve. This catches any bits of cooked egg yolk or pumpkin fibers, making your custard extra smooth. Use a spatula to gently press any remaining pumpkin through the sieve.
  3. Cook the Pumpkin Custard Return the saucepan with the strained pumpkin mixture to medium heat. Whisk continuously – don't stop! – until the mixture thickens up to a beautiful pudding-like consistency. This usually takes about 5 minutes. You'll know it's ready when it coats the back of a spoon and holds its shape. For extra accuracy, it should reach 185-190°F on a thermometer. Remove from the heat and immediately whisk in the softened butter, vanilla extract, pumpkin pie spice, and that pinch of salt until everything is smooth and incorporated.
  4. Chill the Custard Transfer the hot pumpkin custard to a clean heatproof bowl. To prevent a skin from forming, press a piece of plastic wrap directly onto the surface of the custard. Let it cool on your counter for about 10 minutes, then move the bowl to the refrigerator. It needs at least 3 hours to chill completely and thicken, but you can make it up to 2 days ahead. Once chilled, the custard will be very thick; give it a good whisk or stir before assembling to get it silky smooth again.
  5. Make the Toasted Cookie Crumbs While the custard chills, crush your ginger snaps or Biscoff cookies. You can put them in a zip-top bag and smash them with a rolling pin until you have small crumbs with a few slightly larger pieces for texture. In a large nonstick skillet, melt the tablespoon of butter with the teaspoon of brown sugar over medium-low heat. Add the crushed cookie crumbs to the skillet and cook, stirring frequently with a silicone spatula or wooden spoon, until they smell fragrant and look lightly toasted, about 3 minutes. Take them off the heat and let them cool completely – they'll get crispier as they cool.
  6. Whip the Cream In a large bowl, using either a handheld or stand mixer with a whisk attachment, combine the very cold heavy cream, the 2 tablespoons of sugar (brown or granulated), the vanilla extract, and the 1/2 teaspoon of pumpkin pie spice. Whip on medium-high speed until you see medium peaks form. This typically takes around 3 minutes. Medium peaks are just right for topping and piping – they hold their shape but still look soft and billowy. If you accidentally whip it too much and it looks a little curdled, slowly fold in a tiny bit more cold heavy cream by hand until it smooths out.
  7. Assemble Your Jars Grab six 8-ounce jars or small glasses. Spoon about 1/4 cup of the cooled toasted cookie crumbs into the bottom of each jar. Next, spoon or pipe about 1/2 cup of the chilled pumpkin custard over the cookie layer. (If you want to pipe it, a Wilton 2A tip works great for the custard!). Finally, top each jar generously with a spoonful or piped swirl of the spiced whipped cream. (A Wilton 8B tip makes for pretty whipped cream swirls!).
  8. Serve and Store You can serve these beauties right away, or loosely cover the jars and pop them back in the refrigerator for up to 2 days. If you like, sprinkle a little extra pumpkin pie spice or a few crushed cookie crumbs on top just before serving for a lovely finish!
Tested Tip

When making the pumpkin custard, if you're worried about lumps, pour the warm milk through a sieve right into your egg mixture as you whisk. This double-strains the milk and helps ensure a super smooth start for your custard base!

AD — Mediavine Content 300×250 / Responsive

Crafting the Creamy Pumpkin Custard Base

The Secret to Amazing No Bake Pumpkin Pie Jars: Toasted Cookie Crumbs

Whipping Up the Perfect Spiced Cream and Assembly

Make It Yours

  • Swap the Cookies — Not a fan of ginger snaps or Biscoff? No problem! You could totally use graham cracker crumbs, vanilla wafers, or even chocolate wafer cookies for a different take on the crust. Just make sure to still toast them with butter and brown sugar for that amazing texture.
  • Add a Nutty Crunch — For an extra layer of texture and flavor, try sprinkling some finely chopped pecans or walnuts into your cookie crumb layer. You could even toast them lightly with the cookies for a deeper, more robust taste. It adds a lovely contrasting crunch!
  • Boozy Pumpkin — If these are just for the grown-ups, consider adding a tablespoon of rum, brandy, or bourbon to the pumpkin custard right when you whisk in the vanilla and butter. It adds a wonderful depth and warmth that complements the pumpkin spice beautifully.
  • Change Up the Spice — While pumpkin pie spice is iconic, feel free to play with the spices! A touch of extra cinnamon, a hint of cardamom, or even a tiny pinch of black pepper (seriously, it's good!) can bring a unique twist to your custard and whipped cream.
AD — Mediavine Content / Native

FAQ

Can I make the pumpkin custard ahead of time?

Absolutely! The pumpkin custard is perfect for making in advance. You can prepare it up to two days ahead and store it covered in the refrigerator. Just give it a good whisk before layering it into the jars to bring back that smooth, creamy texture.

How long do these pumpkin pie jars last in the fridge?

Once assembled, these pumpkin pie jars will stay fresh and delicious in the refrigerator for up to 2 days when loosely covered. They're excellent for prepping a few days of desserts or for a party!

What if my whipped cream looks curdled?

Don't panic! If you accidentally over-whip your cream and it starts to look a bit grainy or curdled, simply stop whipping. Then, gently fold in a tablespoon or two of extra cold heavy cream by hand with a spatula until it smooths out again. It's an easy fix!

Can I use low-fat milk for the custard?

I strongly recommend using whole milk for the custard. Low-fat or non-dairy milks might not thicken properly or give you that rich, creamy texture we're aiming for. The fat content in whole milk is key for a truly luscious custard.

AD — Mediavine 728×90 Leaderboard / Responsive

What To Serve With This

  • A warm mug of coffee
  • Hot apple cider
  • A scoop of vanilla ice cream
  • After a cozy family dinner
  • With a sprinkle of toasted pecans

This post contains affiliate links. We may earn a small commission at no extra cost to you.

More Recipes You'll Love

Tested twice, weeknight-ready, family-approved.
