Opens in a new tab

Easy No Bake Peach Cheesecake with a Crunchy Wheat Thin Crust

TOTAL TIME
SERVES
COURSE
DIFFICULTY
Tested5× before publishing

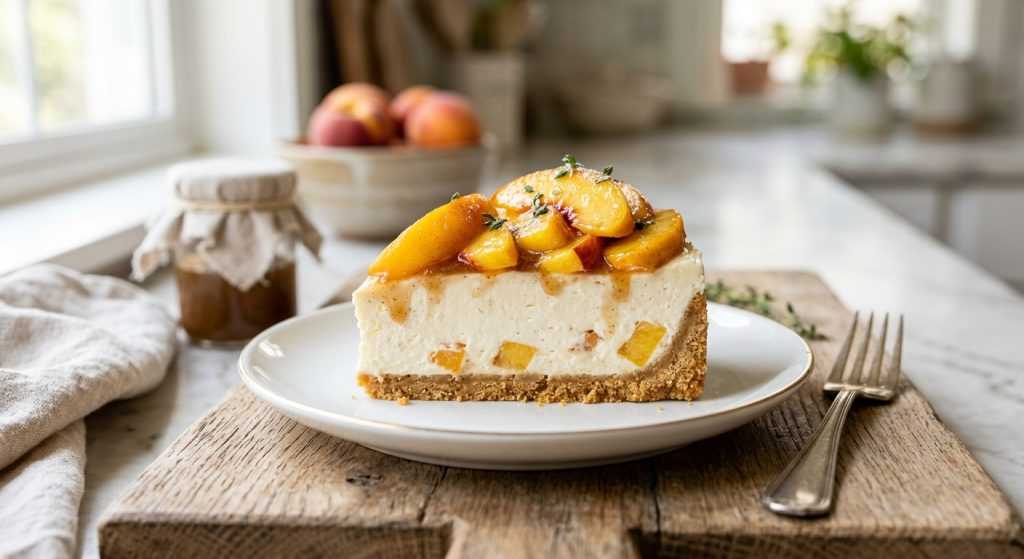
Hey friend! If you’re anything like me, you’re always on the hunt for delicious desserts that don’t require turning on the oven, especially when it’s warm outside. Well, get ready because I have THE best no bake peach cheesecake for you. Seriously, I’ve made this one so many times, tweaking it to perfection, and it’s become a family favorite. The peaches are just bursting with summer flavor, and the creamy filling is pure bliss. It’s truly a winner for any gathering or just a quiet evening at home.

What makes this no bake peach cheesecake extra special is the crust. Forget traditional graham crackers for a minute; we’re using Wheat Thins! That little hint of saltiness against the sweet, tangy peaches and rich cream cheese? It’s a flavor combination you absolutely have to experience. This recipe is designed to be super easy to put together, so you can spend less time cooking and more time enjoying those precious moments.

Creating the Unique Wheat Thin Crust

Alright, let’s talk about this crust! When I first tried a cheesecake with Wheat Thins, I was a little skeptical, but oh my goodness, it’s a revelation. That slightly savory, nutty flavor from the crackers perfectly cuts through the richness of the cheesecake filling. It’s truly something special, giving you a salty-sweet moment with every bite that traditional graham crackers just don’t deliver. The texture is also amazing, providing a satisfying crunch that makes this no bake peach cheesecake really stand out.

Making the crust is pretty straightforward. You’ll want to get those Wheat Thins finely ground. A food processor makes quick work of it, turning them into a uniform crumb in no time. If you don’t have one, no big deal! Just pop them into a sturdy plastic bag and use a rolling pin. Just make sure you really get them as fine as you can; nobody wants big chunky bits in their cheesecake crust! Then, you’ll mix in a bit of granulated sugar for sweetness and, crucially, some kosher salt. That salt helps enhance all the flavors, balancing the sweet and savory. Finally, melted butter brings it all together, binding the crumbs into a beautiful, pressable mixture that should feel like wet sand. Press it firmly into your pan, making sure it goes up the sides to create a nice, sturdy base. Then, a quick chill in the freezer helps it set up, so it’s perfectly ready for the creamy filling.

Making the Best No Bake Peach Cheesecake Filling

Now for the star of the show: that dreamy, creamy filling! This is where the magic happens, and getting it right is all about technique and temperature. The biggest tip I can give you here is to make sure your cream cheese is truly at room temperature. Seriously, it’s a game-changer. If it’s cold, you’ll end up with stubborn lumps, and we want a silky-smooth filling, right? So, pull that cream cheese out of the fridge an hour or two before you plan to start.

You’ll start by beating the softened cream cheese with sour cream until it’s perfectly smooth. This initial step ensures a lovely, consistent base. Then, you’ll add the powdered sugar, fresh lemon juice, vanilla extract, and a touch more kosher salt. The lemon juice is fantastic because it brightens the whole cheesecake, cutting through the richness and making it feel so fresh. Vanilla adds that classic comforting flavor, and the little bit of salt just wakes up all the other tastes. Once that’s smooth, it’s time for the heavy cream. You’ll whip it in a separate bowl until it forms stiff peaks – you want it nice and fluffy. And don’t forget to loosen up your peach or apricot jam before gently folding it into the cream cheese mixture along with the whipped cream. This creates beautiful swirls of fruit flavor and keeps the filling light and airy. It’s all about creating layers of flavor and texture that make this no bake peach cheesecake truly special.

The Grand Finale: Assembling Your Cheesecake and Perfecting the Peach Topping

With your crust chilled and your filling whipped to perfection, it’s time to bring it all together! Carefully spoon the creamy, peachy filling into your prepared crust, spreading it out evenly with a spatula. You want a nice, smooth surface, ready for its long beauty rest in the fridge. This no bake peach cheesecake needs a good, long chill to firm up properly, so resist the urge to peek too often! At least eight hours is ideal, giving it time to set into that classic cheesecake texture we all adore. If you’re really in a pinch, there’s a freezer shortcut, but don’t skimp on the follow-up chill time in the refrigerator.

The peach topping is what really seals the deal, bringing a burst of fresh summer flavor right before serving. The key is to prepare it just before you plan to slice and serve. Thinly slice your fresh peaches and gently toss them with a little light brown sugar, a hint of vanilla, and a tiny bit of kosher salt. As they sit for 30-40 minutes, the peaches will release their natural juices, creating a beautiful, glossy, and incredibly flavorful topping. When it’s time to serve, slice your chilled cheesecake (a clean knife wiped between cuts makes for the prettiest slices!) and pile on that juicy peach mixture. The vibrant color and fresh taste of the peaches are the perfect complement to the rich, creamy filling and that unique crunchy crust. It’s a gorgeous dessert that tastes as good as it looks!


AD — Mediavine Content 300×250 / Responsive

Why This Recipe Works

This recipe shines because it balances creamy sweetness with that unexpected salty crunch from the Wheat Thin crust. The lemon juice and peaches cut through the richness beautifully, making each bite bright and refreshing. Plus, no oven means less fuss, which is always a win!

That little hint of saltiness against the sweet, tangy peaches and rich cream cheese? You absolutely have to experience it.— Charlotte
AD — Mediavine Native / 728×90 Leaderboard

Prep 30 minutesCook 0 minutesYield 8–10 servings
Ingredients
  • 3 cups Wheat Thins (about 6½ ounces)
  • 1 tablespoon granulated sugar
  • 1 teaspoon kosher salt (for crust)
  • ½ cup (1 stick) unsalted butter, melted, slightly cooled
  • 12 ounces cream cheese, room temperature
  • 6 tablespoons sour cream or plain whole-milk Greek yogurt
  • 6 tablespoons powdered sugar
  • 2 teaspoons fresh lemon juice
  • 1½ teaspoons vanilla extract, divided
  • 1 teaspoon kosher salt, divided (for filling and peaches)
  • 6 tablespoons chilled heavy cream
  • ½ cup peach or apricot jam
  • 3 large peaches, thinly sliced
  • ¼ cup (packed) light brown sugar
Instructions
  1. Prepare the Crust Line the bottom of a 9-inch pie dish or springform pan with a round of parchment paper. If using a food processor, pulse the Wheat Thins until they are finely ground into crumbs. Add the granulated sugar and the first 1 teaspoon of kosher salt, then pulse again to combine. With the motor running, slowly drizzle in the ½ cup of melted, slightly cooled unsalted butter and process until the mixture is well combined and has a crumbly, wet sand texture. If you don't have a food processor, you can crush the crackers in a large sealable plastic bag with a rolling pin until finely ground. Transfer to a medium bowl and stir in the sugar, salt, and melted butter until combined.
  2. Form and Chill the Crust Transfer the crumb mixture to your prepared pan. Using the flat bottom of a measuring cup or a glass, firmly press the mixture into an even layer on the bottom of the pan and halfway up the sides. This step is key for a sturdy crust! Once pressed, place the pan in the freezer to chill for at least 30 minutes while you prepare the filling. You can make the crust up to 2 days ahead and keep it frozen.
  3. Make the Creamy Filling In a large bowl, using an electric mixer on medium speed (or a large whisk if you're feeling energetic!), beat the 12 ounces of room temperature cream cheese and 6 tablespoons of sour cream (or Greek yogurt) until the mixture is very smooth and completely lump-free. Next, add the 6 tablespoons of powdered sugar, 2 teaspoons of fresh lemon juice, 1 teaspoon of the vanilla extract, and ½ teaspoon of the divided kosher salt. Continue to beat until all ingredients are fully incorporated and the filling is uniform.
  4. Whip the Cream and Fold in Jam In a separate small bowl, use clean beaters or a whisk to beat the 6 tablespoons of chilled heavy cream until stiff peaks form. The cream should hold its shape when the whisk is lifted. In another small bowl, use a spoon to vigorously stir and loosen the ½ cup of peach or apricot jam. Gently fold the whipped cream and the loosened jam into the cream cheese mixture using a rubber spatula. Aim for a pretty swirl, or mix it in completely – whatever you prefer!
  5. Assemble and Chill the Cheesecake Spoon the prepared filling into your chilled crust, spreading it into an even layer. Cover the cheesecake tightly with plastic wrap and chill it in the refrigerator for at least 8 hours, or ideally up to 12 hours. This long chill time is crucial for the cheesecake to firm up properly. If you're really in a hurry, you can freeze it for 2 hours, then transfer it to the refrigerator for at least 3 hours.
  6. Prepare and Top with Peaches Just before you're ready to serve, combine the 3 thinly sliced large peaches, ¼ cup of packed light brown sugar, the remaining ½ teaspoon of vanilla extract, and the remaining ½ teaspoon of kosher salt in a medium bowl. Gently toss everything together. Let this mixture sit for 30–40 minutes; the peaches will soften and release their delicious juices, creating a lovely glaze. Slice the cheesecake into wedges, wiping your knife clean between each cut for neat servings, and top each slice generously with the juicy peach mixture. The cheesecake (without the peach topping) can be made 3 days ahead and kept chilled, or frozen for up to 2 weeks.
Tested Tip

For the smoothest cheesecake filling, make sure your cream cheese is truly at room temperature. It makes a world of difference in preventing lumps and getting that dreamy texture. Just leave it out on the counter for about an hour before you start!

AD — Mediavine Content 300×250 / Responsive

Creating the Unique Wheat Thin Crust

Making the Best No Bake Peach Cheesecake Filling

The Grand Finale: Assembling Your Cheesecake and Perfecting the Peach Topping

Make It Yours

  • Fruit Swaps — Not a peach fan? Try sliced strawberries, mixed berries, or even a different jam like raspberry or blueberry for the swirl. Just make sure to adjust the sugar for fresh fruit if it's super tart.
  • Crust Variations — If Wheat Thins aren't your thing, you can absolutely use graham cracker crumbs or even shortbread cookies. Just follow the same measurements for butter and sugar to get a similar consistency.
  • Jam Flavor — Switch up the jam! Strawberry, raspberry, or even a mixed berry jam would be delicious swirled into the filling. Match it to your fresh fruit topping for extra harmony and a cohesive flavor profile.
  • Spice It Up — A tiny pinch of cinnamon or a whisper of nutmeg in the peach topping can add a lovely warmth and depth of flavor, especially if your peaches aren't super sweet or you want a slightly cozier vibe.
AD — Mediavine Content / Native

FAQ

Can I make this cheesecake ahead of time?

Yes! The crust can be made up to two days in advance and kept frozen. The cheesecake itself (without the peach topping) can chill in the fridge for up to three days, or you can freeze it for up to two weeks. Just thaw it in the fridge overnight before serving.

Why do I need room temperature cream cheese?

Using room temperature cream cheese is super important for getting a perfectly smooth filling. Cold cream cheese won't beat properly and will likely leave you with stubborn lumps, which nobody wants in a creamy cheesecake! It just won't incorporate as smoothly with the other ingredients.

What if I don't have a food processor for the crust?

No worries at all! Just put your Wheat Thins in a large, sealable plastic bag and crush them with a rolling pin. Make sure they're finely ground – the finer, the better for a solid crust. Then transfer them to a bowl and mix with the other ingredients as directed.

My cheesecake isn't setting. What went wrong?

The most common culprit is not chilling it long enough. This no-bake recipe relies heavily on that extensive chill time (at least 8 hours!) for everything to firm up. If you're short on time, the initial two-hour freeze can help, but don't skimp on the refrigerator time afterward. Also, ensure your heavy cream was whipped to stiff peaks; that adds crucial stability.

AD — Mediavine 728×90 Leaderboard / Responsive

What To Serve With This

  • A scoop of vanilla bean ice cream
  • A dollop of extra homemade whipped cream
  • Fresh mint leaves for garnish
  • A light, sparkling lemonade
  • A hot cup of coffee or herbal tea

This post contains affiliate links. We may earn a small commission at no extra cost to you.

More Recipes You'll Love

Tested twice, weeknight-ready, family-approved.
