Opens in a new tab

Easy No-Bake Chocolate Cheesecake Cups for Busy Weeknights

TOTAL TIME
SERVES
COURSE
DIFFICULTY
Tested5× before publishing

You guys, I just whipped up the most amazing dessert that literally takes minutes to put together: these fantastic no-bake chocolate cheesecake cups! As a busy parent, sometimes you just need a little something sweet at the end of a long day, but who has time for baking and complicated recipes? This recipe is seriously simple, and the results are incredibly satisfying.

I’ve been experimenting with vegan desserts lately, trying to find options that feel indulgent but are still pretty simple, and this one is a winner. Seriously, a few simple ingredients, one blender, and a quick chill, and you have these adorable, creamy, chocolatey cups ready to go. They hit all the right notes for a satisfying sweet treat, and everyone I’ve shared them with has absolutely loved them. These are perfect for the whole family, and everyone will be asking for seconds!

Getting that Creamy, Dreamy No-Bake Chocolate Cheesecake Cup Filling

This part is really where the magic happens, transforming simple ingredients into something so rich and smooth. First off, those cashews are key. To get them perfectly blendable, you really need to soak them. I usually just cover them with hot water and let them sit for at least 30 minutes, or even better, overnight in cold water. This softens them up so your blender can work its magic without leaving any gritty bits behind. When you’re blending, don’t be afraid to use the tamper that comes with your high-speed blender. It helps push everything down into the blades, making sure you get that velvety consistency we’re aiming for. If your blender is struggling a bit, pause, scrape down the sides, and give it another go. Sometimes a tiny splash more coconut yogurt can really help things along if it’s too thick. We’re going for a texture that’s thick enough to hold its shape but still wonderfully spreadable. You’ll notice the mixture starts to warm up a bit from the blending, which is totally normal. Just make sure your melted chocolate has had a chance to cool down slightly before you add it in, otherwise, it can make the cashew mixture seize up and become lumpy – nobody wants that! The blending might take a minute or two, but believe me, it’s worth it for that perfect cheesecake texture.

The Perfect Cookie Crust for Your No-Bake Chocolate Cheesecake Cups

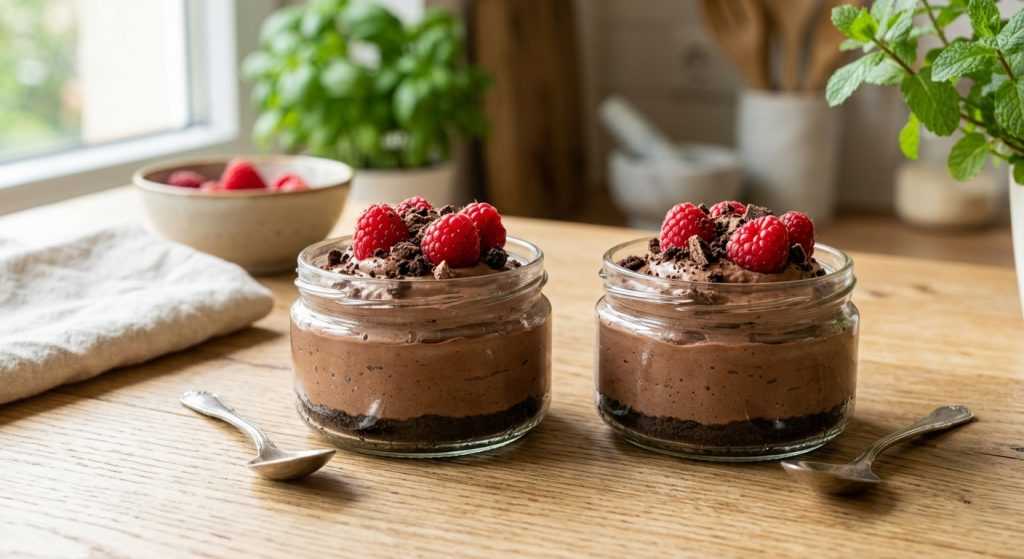
Okay, let’s talk about the crust! While it’s totally optional, adding a simple chocolate cookie crust really makes these no-bake chocolate cheesecake cups feel extra special. It adds a lovely textural contrast to the creamy filling and just makes them feel a bit more indulgent. I usually grab a bag of classic chocolate sandwich cookies – you know, the ones that are accidentally vegan anyway! Just pop them into your blender or food processor. You want to pulse them until they’re fine crumbs. Don’t overdo it and turn them into a paste; we’re going for a crumbly texture here, like coarse sand. Each cup gets about 2-3 tablespoons of these delicious crumbs. I like to press them down lightly with the back of a spoon to form a somewhat compact layer. This isn’t a firm, baked crust, so it won’t be super solid, but a gentle press just helps it stay together a bit better when you’re spooning the cheesecake filling on top. If you’re really pressed for time or prefer a gluten-free option, you can absolutely skip the crust altogether. The cheesecake filling itself is plenty good, but that little layer of chocolate cookie just makes it feel a bit more decadent, you know? It’s a small step that adds a big flavor payoff.

Assembly, Chilling, and Storing Your Delicious Dessert

Once your cheesecake filling is perfectly smooth and creamy, and your crusts (if you’re using them!) are ready in their jars or glasses, it’s time to assemble! This is the quick and easy part. Just spoon about ¼ cup of the cheesecake mixture into each container. You can smooth the tops with the back of your spoon or even give the jar a gentle tap on the counter to settle the filling evenly. Now, while these are technically ready to eat right away, I highly, highly recommend a little chill time. Pop them in the refrigerator for at least 30 minutes, but an hour is even better. This chilling period isn’t just about getting them cold; it helps the filling firm up and allows all those flavors to really meld together. You’ll find the texture becomes much more like a traditional cheesecake – rich, dense, and wonderfully creamy. For serving, I love to top them with fresh, bright red raspberries. The tartness of the berries is such a perfect contrast to the sweet, rich chocolate cheesecake. If you’re planning ahead, it’s best to add the fresh berries just before serving so they stay perfectly plump and don’t get mushy. If you have any leftovers (which is rare in my house!), simply cover them and keep them in the fridge for up to 2-3 days. They also freeze really well for longer storage, up to a month. Just let them thaw in the fridge for a few hours before you dig in.

AD — Mediavine Content 300×250 / Responsive

Why This Recipe Works

The magic behind this no-bake cheesecake lies in the cashews. When soaked and blended, they emulsify and create a rich, creamy base that mimics the texture of dairy cream cheese without any dairy at all. The coconut yogurt adds a subtle tang and helps with the fluffy texture, while lemon juice provides that classic "cheesecake" brightness. Melted chocolate provides structure and a decadent flavor, making this a stable yet luxurious dessert that sets beautifully in the fridge.

Who knew such a decadent dessert could come together so quickly? These no-bake chocolate cheesecake cups are pure bliss!— Charlotte
AD — Mediavine Native / 728×90 Leaderboard

Prep 15 minutesCook 0 minutesYield 6 servings
Ingredients
  • 1 heaping cup chocolate sandwich cookies (like Oreos)
  • 1 1/2 cups raw cashews, soaked
  • 3/4 cup unsweetened plain coconut yogurt (can add up to 1 cup if needed)
  • 1/3 cup maple syrup
  • 2 teaspoons fresh lemon juice (can add up to 3 teaspoons if needed)
  • 1/8 teaspoon sea salt
  • 1/2 cup dark chocolate chips, melted
  •  Fresh raspberries, for serving
Instructions
  1. Prepare the Crust (Optional) If you're using the cookie crust, toss the chocolate sandwich cookies into a high-speed blender or food processor. Pulse until they’re fine crumbs – you don’t want any big chunks left. Divide these crumbs evenly among about six 6-ounce jars or glasses, using about 2-3 tablespoons per container. Set these aside. Give your blender a quick rinse if it's got a lot of crumbs sticking around.
  2. Melt the Chocolate Grab a heat-proof bowl and add your dark chocolate chips. You can melt them in the microwave in 15-second bursts, stirring in between, until smooth. Or, set the bowl over a small saucepan with simmering water on the stovetop (make sure the bowl doesn't touch the water). Stir occasionally until the chocolate is fully melted and glossy, which usually takes about 5 minutes. Let it cool a bit.
  3. Make the Cheesecake Filling Once your blender is clean, add the soaked cashews, ¾ cup of coconut yogurt (we'll adjust if needed!), maple syrup, 2 teaspoons of lemon juice, and sea salt. Power up your blender on high for 1-2 minutes. Make sure to use the tamper to keep everything moving and stop to scrape down the sides and underneath the blades so it all gets perfectly smooth. If your mixture is having trouble blending and staying chunky, try adding the melted (and slightly cooled) chocolate now. Adding it to super cold ingredients can make it seize up, so letting the other ingredients warm up a bit in the blender first can help. If it's still thick, add a little more coconut yogurt, maple syrup, or lemon juice, just a teaspoon at a time. You're aiming for a super smooth, creamy texture here.
  4. Finish the Filling and Assemble Once the cashew mixture is smooth, blend in the slightly cooled melted chocolate until everything is fully combined and creamy. Taste it! Does it need more tang (lemon juice)? More sweetness (maple syrup)? More fluffiness (a tiny bit more coconut yogurt)? Adjust as you like.
  5. Assemble the Cups Spoon about ¼ cup of the cheesecake mixture over the cookie crust in each jar or glass (if using a crust). If you're skipping the crust, just spoon the cheesecake directly into your containers.
  6. Chill and Serve You can serve these right away at room temperature, but honestly, they get even better after chilling. Pop them in the refrigerator for at least 30 minutes to an hour. The filling will firm up beautifully as it cools. When you're ready to enjoy, top each cup with a handful of fresh raspberries.
  7. Storage Keep any leftover cheesecake cups covered in the refrigerator for up to 2-3 days. If you want to make them further ahead, you can freeze them for up to a month. Just remember to let them thaw before serving. The texture might be a little less creamy after freezing, but still completely delicious! If adding berries to store, add them just before serving so they don't get mushy.
Tested Tip

To ensure your cashews blend into the silkiest cheesecake filling, soak them in hot water for at least 30 minutes before blending. If you've got more time, an overnight soak in cold water works even better! This step makes all the difference for a truly smooth texture.

AD — Mediavine Content 300×250 / Responsive

Getting that Creamy, Dreamy No-Bake Chocolate Cheesecake Cup Filling

The Perfect Cookie Crust for Your No-Bake Chocolate Cheesecake Cups

Assembly, Chilling, and Storing Your Delicious Dessert

Make It Yours

  • Nutty Crust — Instead of chocolate sandwich cookies, try crushing graham crackers mixed with a tablespoon of melted vegan butter or coconut oil for a more traditional crust flavor.
  • Mocha Swirl — Add a teaspoon of instant espresso powder to the cashew mixture before blending for a subtle coffee note that enhances the chocolate.
  • Mint Chocolate — Stir in ½ teaspoon of peppermint extract with the melted chocolate for a refreshing twist. Top with a sprig of fresh mint!
  • Fruit Fiesta — While raspberries are fantastic, try topping with sliced strawberries, blueberries, or even a dollop of cherry pie filling for a different fruity flair.
AD — Mediavine Content / Native

FAQ

Do I really need a high-speed blender?

A high-speed blender definitely makes it easier to get that super smooth, creamy texture. If you only have a regular blender, you might need to blend for a little longer, scraping down the sides more often, and you might want to soak your cashews for an extra hour or two to help them break down.

Can I use a different kind of yogurt?

I recommend sticking with a thick, plain, unsweetened coconut yogurt for the best results. Other vegan yogurts might have a different consistency or flavor that could alter the cheesecake texture or taste too much.

How long do these need to chill?

While you can eat them right away, I find they're best after chilling for at least 30 minutes to an hour. This really lets the filling firm up and makes them feel more like a proper cheesecake.

Can I make these ahead of time?

Absolutely! These are fantastic for meal prepping. You can make them 2-3 days in advance and store them covered in the fridge. Just add the fresh berries right before serving. They also freeze well for up to a month!

AD — Mediavine 728×90 Leaderboard / Responsive

What To Serve With This

  • A steaming mug of decaf coffee
  • A glass of sparkling water with lemon
  • A scoop of vanilla bean ice cream (dairy-free if preferred!)
  • Fresh berries (always a good idea!)
  • A sprig of fresh mint
  • A sprinkle of cocoa powder

This post contains affiliate links. We may earn a small commission at no extra cost to you.

More Recipes You'll Love

Tested twice, weeknight-ready, family-approved.
