Opens in a new tab

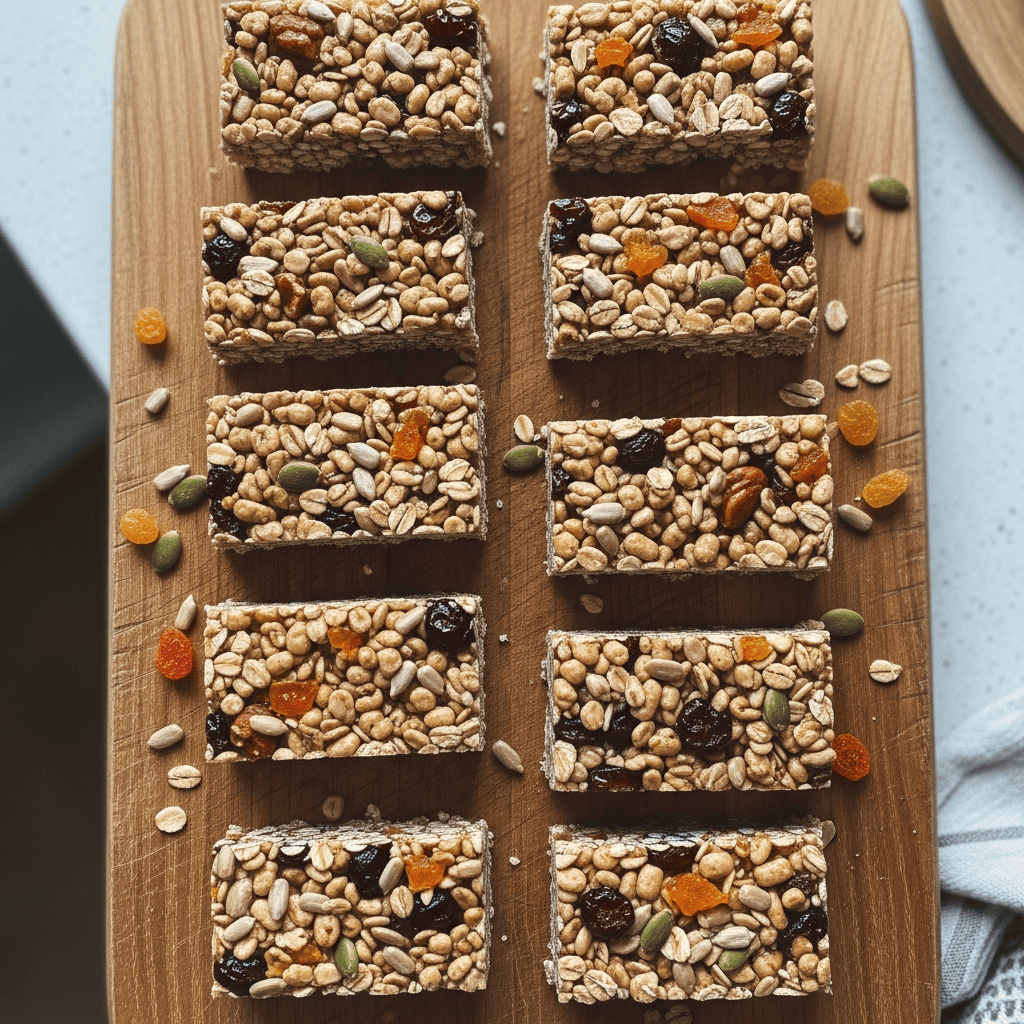
Easy No-Bake Cereal Bars: A Quick Snack for Busy Days

TOTAL TIME
SERVES
COURSE
DIFFICULTY
Tested5× before publishing

Okay, friends, I’ve got something for you that will make your life just a little bit easier: these super easy no-bake cereal bars. If your house is anything like mine, snack emergencies happen daily. Someone is always hungry, and sometimes you just need something quick and grab-and-go that isn’t from a wrapper. I get it. The afternoons can be chaos, and having a healthy option ready makes a huge difference.

I’ve made these bars more times than I can count, tweaking them until they’re just right. They come together so fast, and the ingredients are probably already in your pantry. Plus, no oven required! That’s a win in my book, especially when the kitchen is already a madhouse. These are going to be your new favorite for school lunches or that 3 PM slump.

Why These Easy No-Bake Cereal Bars Are a Weekly Staple

Seriously, these bars are a lifesaver for busy parents. We’re all trying to juggle a million things, and knowing you have a wholesome, homemade snack on hand makes a huge difference. These come together in practically no time – we’re talking about 15 minutes of active kitchen time before they hit the fridge. The hardest part is truly just waiting for them to chill, and even that is totally hands-off! You get to skip the oven, which is perfect for hot days or when you just don’t want another pan to wash after a long day. They’re packed with good stuff like nutrient-rich seeds, fiber from dried fruit, and a little healthy fat and protein from the nut butter. This combination really helps keep everyone feeling satisfied and energized until the next meal, preventing those dreaded hangry moments. Plus, they’re super portable! I mean, truly grab-and-go. That makes them ideal for lunchboxes, quick car rides, or tackling those intense after-school hunger pangs without reaching for something less healthy. Making a batch on Sunday afternoon sets you up for snack success all week long!

Making Your No-Bake Cereal Bars Perfect Every Time

I’ve made these bars enough to pick up a few tricks that I really want to share with you. First off, don’t skip toasting the seeds! It’s a small step, but it brings out such a deep, nutty flavor and adds a fantastic crunch that really elevates the whole bar. Just keep a close eye on them, because they can go from perfectly golden to burnt in a flash – believe me, I’ve done it. When you’re gently melting the nut butter and honey, keep the heat on the low side. You just want it warm and pliable enough to mix, not boiling. This ensures it coats everything beautifully without getting overly sticky or burning. And here’s a big one that makes all the difference for structure: press the mixture down into the pan *really* firmly. I mean, put some muscle into it! Use the back of a sturdy spoon, or even lay another piece of parchment paper on top and use your hands to apply strong, even pressure across the whole surface. This compression helps the bars hold their shape perfectly when you slice them. If, after chilling, they still seem a little loose or crumbly, try popping them back in the fridge for an extra 15-20 minutes. Finally, a sharp knife is truly your best friend for clean, neat cuts!

Storing and Enjoying Your No-Bake Cereal Bars

You’ve put in the minimal effort to make these amazing no-bake cereal bars, so let’s make sure they last! Once they’re sliced, I like to wrap individual bars in small strips of baking parchment. It keeps them from sticking together and makes them super easy to grab. Store them in an airtight container at room temperature for about 3-4 days. If your kitchen runs a little warm, or you want them to last longer, popping them in the fridge extends their freshness up to a week. They get a little chewier when cold, which I actually love! For even longer storage, these bars freeze beautifully. Just wrap each bar tightly in plastic wrap before putting them in a freezer-safe bag or container. They’ll be good for about a month. When you’re ready for a snack, just pull one out and let it thaw at room temperature for 15-20 minutes. It’s truly like having a little stash of goodness ready whenever hunger strikes!

AD — Mediavine Content 300×250 / Responsive

Why This Recipe Works

The warmed nut butter and honey create a sticky, natural 'glue' that binds all the ingredients together. As the mixture cools in the fridge, this binder firms up, making the bars solid and sliceable without needing any baking.

Homemade snacks don't have to be complicated. These bars are proof!— Charlotte
AD — Mediavine Native / 728×90 Leaderboard

Prep 10 minutesCook 5 minutesYield 8 bars
Ingredients
  • 1/2 cup (about 75g) mixed seeds (like sunflower, pumpkin, chia)
  • 1/4 cup (about 50g) nut butter or peanut butter
  • 1/4 cup (about 50g) clear honey or agave syrup
  • 1/2 teaspoon ground cinnamon
  • 1 teaspoon unsweetened cocoa powder
  • 1/4 cup (about 50g) chopped dried prunes
  • 1/4 cup (about 50g) chopped dried figs
  • 1 cup (about 25g) puffed brown rice cereal
Instructions
  1. Prep the Pan & Toast Seeds Line the bottom of an 8x8 inch (20x20cm) baking tin with baking parchment, leaving a slight overhang on the sides for easy lifting. Place the mixed seeds in a dry, non-stick pan over medium heat. Cook them, stirring often, until they start to pop and get lightly golden, about 2-3 minutes. Don't walk away! Transfer the toasted seeds to a small bowl to cool down a bit.
  2. Melt the Base In a medium saucepan, gently warm the nut butter and honey (or agave syrup) over a low heat. Stir continuously for about 2 minutes until the mixture is nice and warm, and a little smoother. It shouldn't boil, just soften up.
  3. Mix Everything In Take the pan off the heat. Stir in the ground cinnamon and cocoa powder until well combined. Then, add the chopped prunes, dried figs, and the cooled toasted seeds. Finally, pour in the puffed brown rice cereal. Stir everything really well, making sure all the cereal and fruit pieces are coated in that sticky, delicious mixture. Work quickly here!
  4. Press & Chill Immediately transfer the mixture to your prepared baking tin. Spread it out evenly and press down firmly with the back of a spoon or a piece of parchment paper. You want a really compact, even surface so your bars hold together. Let it chill in the fridge for at least 45 minutes to 1 hour, or until it's completely firm. Once firm, use a sharp knife to slice it into 8 bars. Wrap each bar in a strip of baking parchment and secure with tape or string if you're feeling fancy. Store them in an airtight container for 3-4 days.
Tested Tip

Make sure you press the mixture down into the pan as firmly as you possibly can! This is the secret to bars that hold together and don't crumble when you slice them.

AD — Mediavine Content 300×250 / Responsive

Why These Easy No-Bake Cereal Bars Are a Weekly Staple

Making Your No-Bake Cereal Bars Perfect Every Time

Storing and Enjoying Your No-Bake Cereal Bars

Make It Yours

  • Different Dried Fruits — Instead of prunes and figs, try chopped dried apricots, cranberries, cherries, or even raisins. Just make sure they're finely chopped so they mix in well.
  • Nut Butter Swaps — Almond butter, cashew butter, or even sunflower seed butter (for a nut-free option) work wonderfully here. Just choose one you love the taste of!
  • Add-ins for Fun — Stir in a handful of mini chocolate chips, shredded coconut, or a tablespoon of finely chopped nuts (like walnuts or pecans) for extra flavor and texture. Just don't add too much, or they might not bind properly.
  • Protein Boost — For an extra punch, mix in a tablespoon of unflavored or vanilla protein powder with the cocoa and cinnamon. You might need a tiny splash more honey if the mixture gets too stiff.
AD — Mediavine Content / Native

FAQ

Can I use a different type of cereal?

Yes, absolutely! Puffed wheat, puffed millet, or even a crispy rice cereal would work. Just make sure it's a 'puffed' variety and not a flake or cluster, as those won't bind as well.

How long do these bars last?

When stored in an airtight container at room temperature, they’ll stay fresh for 3-4 days. You can also keep them in the fridge for up to a week for extra chewiness and longevity.

Can I freeze these no-bake cereal bars?

Yes! Wrap individual bars tightly in plastic wrap, then store them in a freezer-safe bag or container for up to 1 month. Thaw at room temperature for about 15-20 minutes before enjoying.

What if my mixture isn't sticky enough?

If your mixture feels too dry to press, gently warm it back up in the saucepan over very low heat for 30 seconds, and stir in another teaspoon or two of honey or nut butter until it’s more pliable. This usually does the trick!

AD — Mediavine 728×90 Leaderboard / Responsive

What To Serve With This

  • A tall glass of milk
  • A fresh piece of fruit
  • Your morning coffee or tea
  • A small cup of yogurt
  • Alongside a quick smoothie

This post contains affiliate links. We may earn a small commission at no extra cost to you.

More Recipes You'll Love

Tested twice, weeknight-ready, family-approved.
