Okay, friends, let’s talk about those nights when you *really* want something special for dinner, but the thought of spending hours in the kitchen just isn’t happening. As a busy parent, I totally get it. That’s why I’m so excited to share my go-to recipe for the most amazing instant pot grilled ribs! This isn’t just a recipe; it’s a smart way to get tender, fall-off-the-bone ribs that still get that incredible smoky char from the grill, all without the all-day commitment.
I’ve tested this recipe countless times, tweaking the spices and timing until it was absolutely perfect. The beauty here is that most of the heavy lifting happens in your Instant Pot, making the ribs incredibly tender and full of flavor *before* they even hit the grill. You can even do the Instant Pot part days ahead! You’ll love how easy these ribs make entertaining or just having a fantastic meal on a weeknight. Your family is going to love these!
Instant Pot Magic: Getting Ribs Tender and Flavorful
One of the biggest hurdles with making ribs is getting them perfectly tender without overcooking. That’s where the Instant Pot really shines with these instant pot grilled ribs. Seriously, it’s a smart way to get dinner on the table faster! We start by creating a super aromatic rub with peppercorns, cumin, red pepper flakes, brown sugar, salt, and cinnamon. Crushing the whole spices in a mortar and pestle just before you use them really wakes up those flavors. If you don’t have a mortar and pestle, a spice grinder works too, or even putting them in a baggie and gently smashing with a rolling pin. Just don’t grind them into a fine powder; we want a little texture here.
Once your ribs are seasoned, they go into the Instant Pot with a splash of dry white wine. The wine adds a subtle layer of complexity to the liquid that the ribs braise in. Arranging them vertically, standing on their bones, might seem a bit Tetris-like, but it ensures they cook evenly. This method prevents them from getting squished or steaming unevenly. A short 9-minute high-pressure cook, followed by a 10-minute natural pressure release, is all it takes to get them incredibly tender. This natural release step is crucial! It allows the internal temperature to drop slowly, preventing the meat from becoming tough. When you open that lid, they’ll look pale, but don’t worry—the magic happens next!
From Cooking Liquid to Killer Glaze
After your ribs are tender and resting, don’t even *think* about tossing out that liquid left in the Instant Pot! That flavorful broth is pure gold, packed with all the deliciousness that cooked off the ribs and mingled with the spices and wine. We’re going to transform it into a gorgeous, sticky glaze that will bring everything together when we hit the grill. First, put your Instant Pot back on Sauté mode and let that liquid bubble away for about 10 minutes. This concentrates all those amazing flavors.
Once it’s reduced, strain it through a fine-mesh sieve. This step removes any small bits of spice or sediment, leaving you with a silky-smooth base for your glaze. If you’re making these ahead (which I totally recommend!), let this liquid cool completely, then cover and chill it. When it’s cold, any fat will congeal on top, making it super easy to spoon off. This ensures your glaze isn’t greasy. Then, just a quick boil with some red or white wine vinegar and a couple of crushed garlic cloves, and you’ve got a glaze that’s tangy, savory, and ready to caramelize beautifully on the grill. The vinegar adds a bright counterpoint to the richness of the pork, and the garlic, well, everything is better with garlic, right?
Grilling for That Perfect Char and Finish
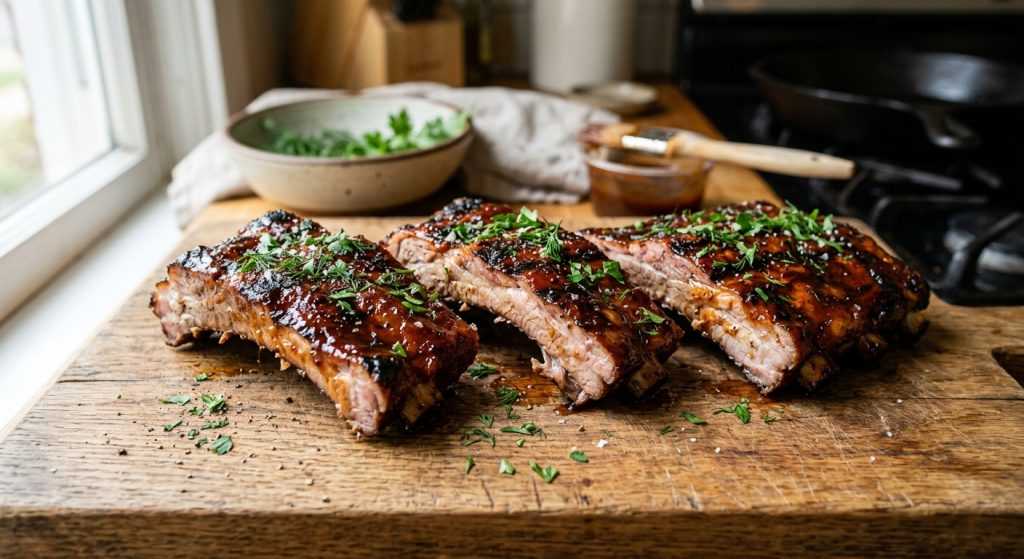
Okay, so your ribs are tender from the Instant Pot, and your glaze is ready. Now it’s time for the fun part: hitting the grill! This is where those ribs get their signature smoky flavor and those irresistible crispy, charred edges. Make sure your grill is preheated to medium-high. You want it hot enough to develop a nice crust quickly, but not so scorching that it burns the glaze before it has a chance to caramelize. Cleaning and oiling the grates before you start is a non-negotiable step—it prevents sticking and ensures those beautiful grill marks.
A little brush of vegetable oil on the ribs themselves also helps with browning and keeps them from drying out on the outside. Start with the meaty side down, just a couple of minutes to get that initial sear. Then, it’s a flip-and-brush dance! Turn the ribs, slather on some of that glorious glaze, then grill for a few more minutes. Keep turning and brushing until you’ve built up layers of sticky, charred goodness. This process takes about 6 minutes total, but watch your ribs closely. You’re looking for deep golden-brown areas with some slightly blackened bits, not a burnt mess. The outside should be slightly crisp, contrasting wonderfully with the tender meat inside. The smell alone as they char on the grill will make your neighbors jealous!