Opens in a new tab

Easy Freezer Breakfast Burritos: Your Weekday Morning Win!

TOTAL TIME
SERVES
COURSE
DIFFICULTY
Tested5× before publishing

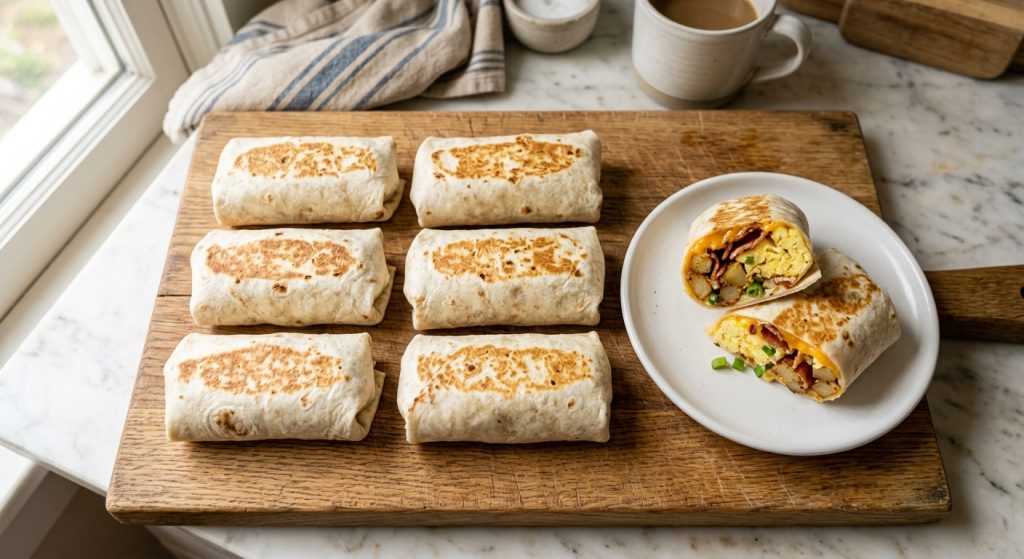
Hey there, busy parent! If your mornings are anything like mine, they probably involve a whirlwind of getting everyone ready, finding matching socks, and trying to remember if you packed a lunch. That’s why I’m so excited to share my go-to recipe for the absolute best freezer breakfast burritos. Seriously, these things have been a total lifesaver for our household, turning frantic mornings into surprisingly calm ones where everyone gets a hot, homemade breakfast.

I’ve tested this recipe countless times, making sure it’s super easy to assemble and reheats perfectly from the freezer. We’re talking fluffy scrambled eggs, savory bacon, a pop of fresh veggies, and melty cheese all wrapped up in a perfectly toasted tortilla. They’re super customizable too, so you can tweak them to fit whatever ingredients you have on hand or what your crew likes. Ready to reclaim your mornings?

Why These Freezer Breakfast Burritos Are a Total Lifesaver

Okay, let’s be real. Mornings can be hectic. If I can shave off even five minutes from the morning scramble, I consider that a victory. And that’s exactly what these freezer breakfast burritos do! I love them because they take a little bit of effort on a weekend afternoon, and then they completely pay off all week long. Instead of grabbing something unhealthy or spending too much at a drive-thru, you have a wholesome, protein-packed meal ready in minutes. It’s like future-you is thanking past-you for being so smart.

The beauty of this recipe is how simple the ingredients are. Eggs, bacon, a couple of veggies, and cheese – all things you probably have on hand or can easily grab at the grocery store. Plus, they’re not just for breakfast. A burrito from the freezer is a fantastic quick lunch when you’re working from home or need something satisfying after school drop-off. I’ve found that the key to a good freezer burrito is making sure the filling isn’t too wet, which we handle by cooking the eggs just right. This prevents any sogginess when reheating. The other big win? Everyone gets a hot breakfast they actually like, tailored to their own taste if you get creative with toppings inside!

Perfecting Your Burrito Assembly Line for Freezing

The secret to a great burrito, especially one you’re going to freeze and reheat, really starts with the tortilla. Don’t skip that step of charring them! Heating the tortillas over a dry griddle or an open flame (carefully, please!) makes them incredibly flexible. This means they won’t crack when you roll them up, and it also adds a depth of flavor that a plain, soft tortilla just doesn’t have. It gives them a little bit of a smoky, bakery-fresh vibe. Once they’re charred, keeping them warm in a low oven briefly can make them even more pliable, but letting them cool a bit is fine if you’re freezing.

When it comes to the filling, we’re aiming for delicious but not overstuffed. A generous half-cup of the egg mixture, one strip of bacon, and about two tablespoons of cheese per burrito is the sweet spot. Too much filling, and you risk a blow-out when rolling or reheating. I like to lay out all my tortillas, then distribute the egg, bacon, and cheese in an assembly line fashion. It just makes the whole process so much faster and more efficient! For rolling, picture a neat package. Fold the bottom up over the filling, then bring in the sides, and finally, roll tightly from the bottom to the top. This technique keeps everything snug and secure, which is exactly what you want for freezing and easy handling later.

Reheating Your Freezer Breakfast Burritos Like a Pro

Alright, so you’ve got a freezer full of these beauties – now, how do you get them hot and delicious without turning them into a sad, soggy mess? I’ve tried all the methods, and honestly, the oven or air fryer are the clear winners for texture. If you have time, thawing them in the fridge overnight is a fantastic first step; it really helps them reheat more evenly. For oven reheating, whether thawed or frozen, wrapping them in foil for most of the cooking time keeps them from drying out. The final few minutes unwrapped, or a quick broil, gives you that gorgeous, slightly crispy tortilla.

If you’re going from frozen straight to the oven, remember it takes a bit longer, so plan for about 45 minutes. The air fryer method, for a thawed burrito, is lightning fast and delivers the crispiest shell – perfect if you love that toasted exterior! Just remember to unwrap it and give it a little spritz of oil. The microwave is definitely the quickest option if you’re seriously pressed for time, but it won’t give you the same crispy texture. If you do microwave, take the extra minute or two to brown it in a skillet or pop it under the broiler afterwards. It makes a huge difference in taste and experience. No matter which method you choose, always let your burrito stand for a couple of minutes after heating; it helps the temperature equalize and keeps you from burning your mouth!

AD — Mediavine Content 300×250 / Responsive

Why This Recipe Works

This recipe truly works because it balances convenience with homemade goodness. Charring the tortillas adds flavor and prevents cracking, while a well-seasoned, slightly undercooked egg filling reheats beautifully without becoming dry. Pre-assembling and freezing saves precious time on busy mornings, giving you a nutritious, delicious breakfast with minimal effort.

Mornings just got a whole lot smoother with these make-ahead burritos!— Charlotte
AD — Mediavine Native / 728×90 Leaderboard

Prep 20 minutesCook 10 minutesYield 6 burritos
Ingredients
  • 6 strips center-cut bacon
  • 10 large eggs, beaten
  • 4 green onions, chopped
  • 1/2 red bell pepper, diced
  • 1/2 teaspoon salt
  • 3/4 cup shredded cheddar or pepper jack cheese
  • 6 8-inch flour tortillas
  • 6 pieces heavy-duty foil
  •  Hot sauce, for serving (optional)
Instructions
  1. Toast Your Tortillas Heat a dry griddle or skillet over medium-high heat, or carefully use an open flame. Quickly char both sides of each tortilla until you see little browned spots. This makes them super pliable and boosts the flavor! If you’re eating right away, keep them warm in a low oven. Otherwise, set aside.
  2. Crisp the Bacon Grab a large non-stick skillet and heat it over medium heat. Add your center-cut bacon and cook for about 4 to 5 minutes, until it’s perfectly cooked through. Use a slotted spoon to transfer the bacon to a plate lined with paper towels so it can drain while you finish up the eggs. Leave just about one teaspoon of bacon grease in the skillet for flavor, then discard the rest.
  3. Whip Up the Eggs In a big bowl, whisk your 10 large eggs with the salt. Then, stir in the chopped green onions and diced red bell pepper. These add so much fresh flavor and a nice pop of color to your burritos!
  4. Scramble 'Em Pour the egg mixture into the skillet with that tiny bit of reserved bacon grease. Let the eggs set on the bottom for a moment, then gently stir them a few times until they are cooked through but still soft and fluffy. Don't overcook them! Transfer the scrambled eggs to a clean bowl and set aside.
  5. Assemble the Burritos Lay out your toasted tortillas on a clean work surface. For each burrito, spoon a generous half-cup of the egg mixture onto the bottom third of the tortilla. Top that with one strip of cooked bacon and about 2 tablespoons of shredded cheese. Now for the rolling! Fold the bottom edge up over the filling, then fold in the left and right sides. Continue rolling tightly from the bottom up into a neat cylinder. Place it seam-side down and repeat for the rest.
  6. Serve Fresh (Optional) If you're digging into one right away, heat a clean skillet over medium heat. Lightly spray with oil, then add a burrito seam-side down. Cook, covered, for about 2 minutes per side until golden brown and heated through. Serve immediately with hot sauce or salsa if you like!
  7. Wrap for Freezing For freezing, lay a piece of heavy-duty foil vertically on your counter. Place a rolled burrito in the bottom third of the foil. Roll it partially, then fold the sides of the foil inward over the burrito, and continue rolling it up tightly. This ensures a good seal against freezer burn.
  8. Store for Later Once wrapped in foil, place the burritos into a large freezer bag. Squeeze out as much air as possible before sealing. It's super helpful to label the bag with the date and recipe name – maybe even a quick note about reheating times! These will keep well for up to 3 months.
  9. Reheat from Refrigerator (Oven - Best Method) For the best texture, transfer a wrapped burrito from the freezer to the refrigerator the night before to thaw. When ready to eat, preheat your oven to 425°F. Bake the burrito, still in its foil, for 20 minutes, flipping it halfway through. Unwrap it, then bake uncovered for another 5 minutes until the tortilla starts to crisp. For an extra toasted finish, you can broil it for 2 to 3 minutes at the end. Let it stand for 2 minutes before enjoying!
  10. Reheat from Frozen (Oven - Great Option) Preheat your oven to 425°F. Place the foil-wrapped burrito directly from the freezer onto a baking sheet. Bake for 45 minutes, turning it halfway through. Unwrap the foil and bake for an additional 5 minutes, uncovered, to get that lovely toasted exterior. Again, a quick broil for 2 to 3 minutes can add a nice crisp! Let it stand for 2 minutes before eating.
  11. Reheat from Frozen (Microwave - Quickest Method) This is the fastest method if you're in a real rush! Remove the burrito from the foil and place it on a microwave-safe dish. Cover it with a paper towel and microwave on high for 1 minute. Flip it, then cook for an additional 1 to 1 1/2 minutes until heated through. For a nicer texture, you can quickly brown it in a skillet for 2 minutes per side or broil for 2 to 3 minutes after microwaving. Let stand for 2 minutes.
  12. Reheat from Refrigerator (Air Fryer - Crispy Choice) For a super crispy result, thaw your burrito overnight in the refrigerator. Unwrap and discard the foil. Lightly spritz the burrito with a little cooking oil. Preheat your air fryer to 400°F. Air fry the burrito for 8 to 9 minutes, turning it halfway, until it's perfectly heated through and crispy on the outside. Serve it up!
Tested Tip

When scrambling your eggs, slightly undercook them compared to how you'd normally eat them. They'll finish cooking during the reheating process, keeping them super soft and preventing that rubbery texture.

AD — Mediavine Content 300×250 / Responsive

Why These Freezer Breakfast Burritos Are a Total Lifesaver

Perfecting Your Burrito Assembly Line for Freezing

Reheating Your Freezer Breakfast Burritos Like a Pro

Make It Yours

  • Spice It Up — Add a pinch of red pepper flakes to your eggs, or mix in some diced jalapeño with the bell pepper for a little kick. A dash of hot sauce right before serving is always a winner too!
  • Veggie Boost — Feel free to toss in other diced veggies to the egg mixture! Spinach, mushrooms, or even some leftover roasted sweet potatoes would be delicious additions. Just make sure they're cooked down a bit so they don't add too much moisture.
  • Protein Swap — Not a bacon fan? No problem! You could use cooked crumbled sausage, diced ham, or even some black beans for a vegetarian option. Just make sure any meat is fully cooked before adding it to the burritos.
  • Cheese Please — While cheddar and pepper jack are classics, don't be afraid to experiment with other cheeses. Monterey Jack, a Mexican blend, or even a little bit of crumbled cotija would be fantastic in these burritos.
AD — Mediavine Content / Native

FAQ

How long do these freezer breakfast burritos last in the freezer?

When wrapped properly in foil and then stored in a freezer bag, these burritos will stay delicious for up to 3 months. Always label them with the date so you know!

Can I make these vegetarian?

Absolutely! Just skip the bacon and add more veggies like spinach, mushrooms, or black beans. You could also use a plant-based sausage crumble instead of bacon for extra protein.

My tortillas keep cracking when I roll them. Any tips?

The key is to heat them first! Charring them on a dry griddle or over an open flame makes them much more pliable. Also, don't overfill the burritos – a generous half-cup of filling is usually plenty for an 8-inch tortilla.

What's the best way to prevent soggy burritos when reheating?

The oven or air fryer methods (especially when thawed first) yield the best results for a crispy tortilla. If using the microwave, always remove the foil, and consider giving it a quick toast in a skillet or under the broiler afterward to crisp it up.

AD — Mediavine 728×90 Leaderboard / Responsive

What To Serve With This

  • Fresh Salsa
  • Avocado Slices or Guacamole
  • Sour Cream or Plain Greek Yogurt
  • A side of Fresh Fruit
  • Your favorite hot sauce
  • A warm cup of coffee

This post contains affiliate links. We may earn a small commission at no extra cost to you.

More Recipes You'll Love

Tested twice, weeknight-ready, family-approved.
