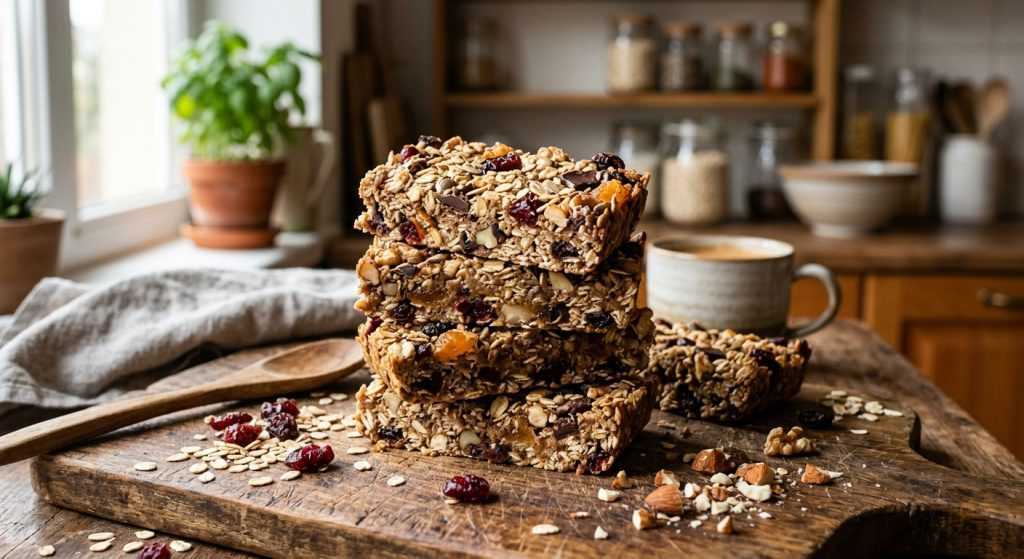
Easy Chewy No Bake Oat Bars: Your New Go-To Snack!

TOTAL TIME
SERVES
COURSE
DIFFICULTY
Tested5× before publishing

Okay, friends, let’s talk about the constant snack struggle. As a busy parent, I’m always on the hunt for something easy, satisfying, and not loaded with weird ingredients that everyone in the house will actually eat. Well, I have found THE ONE: these chewy no bake oat bars. Seriously, when I tell you these are a lifesaver, I mean it. You can whip up a batch on a Sunday afternoon, and boom – wholesome snacks are ready for the entire week. They’re soft, they’re chewy, and they hold together perfectly.

What I love most about these bars is how customizable they are. You can practically clean out your pantry with the mix-ins! Nuts, seeds, dried fruit, even chocolate chips – whatever you have on hand. It’s a super simple process that takes hardly any time, and the results are consistently amazing. Every time I make these, they disappear fast, and I’m left feeling like I actually conquered the snack mountain for a little while.

Gathering Your Goods & Prepping for Success

Okay, so before we even think about turning on the stove, let’s get organized! This is a no-bake recipe, but that doesn’t mean we can skip the prep work. The first thing I do is butter my 13×9 inch baking dish. Don’t be shy with the butter – a thin, even coat helps so much when it’s time to press the mixture in, and it makes cutting the bars later a breeze. You don’t want anything sticking!

Next up, get a really big bowl. I mean, bigger than you think you’ll need, because we’re going to be tossing a lot of stuff in there. Into that bowl goes your puffed grain cereal and old-fashioned oats. For the puffed cereal, I usually go for a mix of corn and rice puffs because they have a nice light texture, but use what you love! Then come the fun additions: dried fruit, chopped nuts, seeds, or shredded coconut. Take a moment to chop any larger pieces of dried fruit or nuts so they distribute evenly. Give everything a good, gentle mix with your hands. You want all those dry ingredients to be buddies, spread out nicely before the wet ingredients come in. This ensures every bite has a little bit of everything. Just remember to hold back those chocolate chips for a bit!

The Secret to Perfect Chewy No Bake Oat Bars: The Sticky Syrup

This next step is where the magic really happens for our chewy no bake oat bars. The syrup acts as our binder, so getting it just right is key to bars that hold together without being rock-hard. In a small saucepan, you’ll combine your light brown sugar, honey, the unsalted butter, and a tiny bit of kosher salt. The salt really helps balance the sweetness here, so don’t skip it!

Place your saucepan over medium heat and bring it to a boil. Once it’s bubbling all over, let it cook for exactly one minute. I usually set a timer because that minute flies by! This quick boil helps the sugar dissolve completely and creates that perfect sticky texture. Right after that minute, take the pan off the heat. Immediately stir in your creamy nut butter – I love using almond butter for a richer flavor, but peanut butter works wonderfully too! Add the vanilla extract at this stage. Whisk it all until it’s super smooth and glossy. You’ll see it thicken slightly and become this beautiful, cohesive sauce. This is what’s going to glue all those yummy dry ingredients together, giving us that signature chewy texture we’re aiming for. Make sure there are no lumps of nut butter left!

Bringing It All Together and The Final Chill

Now for the fun part – combining everything! Pour that warm, delicious syrup mixture over your dry ingredients in the big bowl. Grab a sturdy rubber spatula. This stuff is sticky, so a good, firm spatula is your friend here. Stir everything really well, making sure every single oat, puffed grain, and mix-in gets a generous coat of that sticky goodness. You might think it’s not enough syrup at first, but keep stirring, and it will eventually come together. You want an even coating throughout.

If you’re using chocolate chips, now’s the time to gently fold them in. Waiting about five minutes after coating the mixture helps prevent them from melting into a chocolate swirl, keeping those distinct chip shapes which I love! Once everything is beautifully mixed, scrape it all into your prepared 13×9 inch baking dish. This is where your buttered hands come in handy! Lightly butter your palms or wear some food-safe gloves. Press the mixture down firmly and evenly across the entire pan. The firmer you press, the more compact and less crumbly your bars will be. This step is super important for them to hold their shape once cut. Finally, let them cool down completely at room temperature for at least an hour. This cooling period lets the binder truly set, giving you those perfect, sliceable chewy bars. Then, grab your sharpest knife and cut them into squares or rectangles, however you like! They’re ready to enjoy.
AD — Mediavine Content 300×250 / Responsive

Why This Recipe Works

These bars work their magic because the hot sugar and honey mixture creates a sticky, stable binder. When it cools, this binder locks all your delicious grains and add-ins together. The nut butter adds richness and extra adhesion, making sure every bite holds up without crumbling, giving you that perfect chewy texture.

Seriously, these chewy no bake oat bars are a lifesaver for busy weeknights. So quick, so good!— Charlotte
AD — Mediavine Native / 728×90 Leaderboard

Prep 15 minutesCook 1 minuteYield 15 bars
Ingredients
  • 4 tablespoons unsalted butter, cut into pieces, plus more for the dish
  • 4 cups mixed unsweetened puffed grain cereal (such as corn, rice, and/or millet)
  • 1 cup old-fashioned oats
  • 1 ½ cups dried fruit, nuts, seeds, unsweetened shredded coconut or flakes, and/or chocolate chips, chopped if large
  • ⅓ cup (packed) light brown sugar
  • ⅓ cup honey
  • ½ teaspoon kosher salt
  • ⅓ cup creamy nut butter (such as cashew, almond, or peanut)
  • 1 teaspoon vanilla extract
Instructions
  1. Prep Your Pan & Dry Mix First things first, grab a 13x9 inch baking dish and lightly butter it. Then, in a really big bowl, toss together all your puffed cereals, the old-fashioned oats, and all your chosen mix-ins – EXCEPT for any chocolate chips. Use your hands to make sure everything is evenly distributed. This step helps ensure every bar gets a good mix of goodies!
  2. Cook the Sticky Binder In a small saucepan, combine the light brown sugar, honey, the 4 tablespoons of butter, and the kosher salt. Bring this mixture to a rolling boil over medium heat and let it bubble for just 1 minute. Seriously, set a timer for that minute! Then, take the pan off the heat immediately. Whisk in the creamy nut butter and vanilla extract until everything is smooth and fully combined. It’ll be thick and glossy – that’s what you want!
  3. Combine & Press Pour that warm, sticky sauce over your cereal and oat mixture in the large bowl. Grab a sturdy rubber spatula and stir everything until every single puff and oat is coated. If you're adding chocolate chips, let the mixture cool for about 5 minutes before you stir them in, so they don't melt completely. Once everything is mixed, scrape it all into your prepared baking dish. Lightly butter your hands (this is key!) and press the mixture down firmly and evenly into the pan. You want it really compact so the bars hold together.
  4. Chill & Cut Now for the hardest part: waiting! Let the bars cool completely at room temperature for at least 1 hour. This chilling time is super important for them to set up nicely. Once fully cooled, use a sharp knife to cut them into about 15 bars. Store any leftovers in an airtight container at room temperature for up to a week. They’re great for grab-and-go snacks all week long!
Tested Tip

A little trick I found: if your hands are getting sticky while pressing the mixture, lightly butter them again or wear some food-safe gloves. It makes it so much easier to get that smooth, even layer without a huge mess on your hands!

AD — Mediavine Content 300×250 / Responsive

Gathering Your Goods & Prepping for Success

The Secret to Perfect Chewy No Bake Oat Bars: The Sticky Syrup

Bringing It All Together and The Final Chill

Make It Yours

  • Nut Butter Swaps — Don't have cashew butter? Peanut butter or almond butter work just as well! For an allergy-friendly option, try sunflower seed butter. Just make sure it’s a creamy variety, not the crunchy kind, for the best texture in the binder.
  • Mix-In Adventures — Get creative with your add-ins! Beyond chocolate chips, try mini marshmallows (add with the chocolate chips), a mix of dried cranberries and chopped pecans, or even a sprinkle of cinnamon with golden raisins. Toasted coconut flakes add a lovely aroma and crunch.
  • Sweetness Control — If you prefer less sweet, you can slightly reduce the brown sugar by a tablespoon or two, but don't cut too much or the bars might not bind as well. The honey is crucial for the chewy texture, so keep that amount consistent.
  • Spice it Up! — A pinch of ground cinnamon or a tiny dash of nutmeg added to the syrup mixture can really warm up the flavor, especially if you're using apples or fall-themed dried fruits. Just a quarter teaspoon is usually enough to make a difference.
AD — Mediavine Content / Native

FAQ

How should I store these no-bake bars?

You can store these bars in an airtight container at room temperature for up to a week. If your kitchen gets really warm, or you want them to last a little longer, popping them in the fridge is also an option. They might get a bit firmer when chilled, but still delicious!

Can I make these bars gluten-free?

Absolutely! Just make sure to use certified gluten-free old-fashioned oats. Most puffed grain cereals are naturally gluten-free, but it’s always a good idea to double-check the labels on those too, especially for any cross-contamination warnings.

Why aren't my bars sticking together?

There are a couple of common culprits! Make sure you boiled the sugar and honey mixture for the full minute – this is crucial for activating its binding power. Also, really press the mixture down firmly into the pan; compacting it helps it set. And don't rush the chilling time; they need at least an hour to properly firm up.

Can I use quick oats instead of old-fashioned oats?

I wouldn't recommend it. Old-fashioned oats give these bars their signature chewy texture and hold up well. Quick oats tend to break down more easily and can result in a softer, less satisfying bar that might not bind as effectively.

Can I freeze these no-bake bars?

Yes, you totally can! Once the bars are completely cooled and cut, wrap individual bars tightly in plastic wrap, then place them in an airtight freezer-safe container or bag. They'll keep well for up to 3 months. Just thaw them at room temperature for a bit before enjoying.

AD — Mediavine 728×90 Leaderboard / Responsive

What To Serve With This

  • A hot cup of coffee or tea
  • Alongside a fresh fruit salad
  • With a dollop of plain Greek yogurt
  • A tall glass of cold milk
  • As a quick pre-workout bite

This post contains affiliate links. We may earn a small commission at no extra cost to you.

More Recipes You'll Love

Tested twice, weeknight-ready, family-approved.