Easy Air Fryer Whole Chicken for Busy Weeknights

TOTAL TIME
SERVES
COURSE
DIFFICULTY
Tested5× before publishing

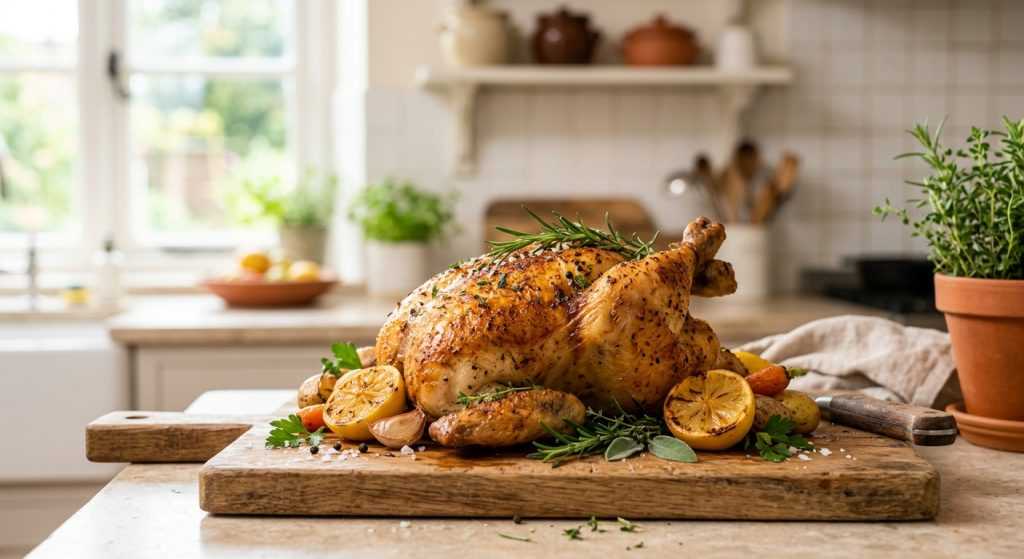
Okay, busy parents, let’s talk about dinner. Specifically, how to get a delicious air fryer whole chicken on the table with minimal fuss! I know the thought of roasting a whole chicken can feel like a big project, especially after a long day, but the air fryer completely changes that. This method gives you incredibly crispy skin and super juicy meat every single time, all while keeping things wonderfully hands-off.

I’ve made this recipe more times than I can count, tweaking it until it was just right. It’s become a staple in my rotation for those nights when I want something satisfying and flavorful, but really don’t have hours to spend in the kitchen. Plus, the whole family always seems happy with it, which is a win in my book. Get ready for a weeknight hero!

Prepping Your Chicken for Success

Alright, let’s get down to business with prepping our star: the whole chicken! This first step is absolutely vital for that incredible, crackly skin you’re dreaming of. You’ll want to gently remove any giblets or the neck from inside the chicken’s cavity – sometimes they’re tucked in a little bag. After that, grab a stack of paper towels and pat that chicken dry. And I mean really dry. Every single crevice, top, bottom, and sides. Any moisture left on the skin will essentially steam in the air fryer instead of crisping up, so a bone-dry bird is your ticket to a golden, irresistible crust. It might feel like you’re using a lot of paper towels, but the results are absolutely worth the effort.

Next up, let’s give those little wings a hug. Gently tuck the wing tips behind the chicken’s back. This isn’t just for aesthetics; it serves a couple of important purposes. First, it helps to create a more uniform shape for cooking, which means the hot air in your air fryer can circulate evenly around the whole bird. Second, and maybe more importantly, those delicate wing tips are prone to getting scorched in the intense heat of the air fryer if left exposed. Tucking them protects them, ensuring they cook through without getting brittle or overly dark. It’s a small step that pays off big time in the final texture and appearance of your beautifully cooked chicken.

The Perfect Seasoning Blend and Air Fryer Placement

Once your chicken is prepped and perfectly dry, it’s time for the flavor! This simple spice blend is one I always come back to. It’s a classic mix that really enhances the chicken without being overpowering. In a small bowl, just mix together your salt, black pepper, paprika, garlic powder, dried oregano, and dried thyme. The paprika gives it a lovely warmth and color, while the garlic and herbs bring that comforting, savory aroma that fills your kitchen as it cooks.

Now, for applying it: brush your whole chicken generously with olive oil all over. This helps the seasonings stick, but also aids in getting that gorgeous, golden-brown skin. Then, take half of your mixed spices and sprinkle them evenly over the breast side of the chicken. Make sure to get into all the nooks and crannies. Once that’s done, carefully place the chicken breast-side down in your air fryer basket. This might feel counterintuitive, but starting breast-side down allows the breast meat, which is usually thicker, to cook a bit more gently at first, bathed in the chicken’s own juices, preventing it from drying out. Now, sprinkle the remaining spice mixture over the back of the chicken. Don’t forget those thighs and drumsticks!

Air Frying Your Whole Chicken to Golden Perfection

With our chicken seasoned and nestled into the air fryer basket, it’s time to get cooking! You’ll want to preheat your air fryer to 350°F (about 175°C). Don’t skip the preheat! Just like with an oven, getting the air fryer up to temperature beforehand ensures your chicken starts cooking immediately and consistently, which is key for that beautiful crispy skin. Once it’s hot, slide that basket in and let it cook for 30 minutes. You’ll start to smell those amazing spices and the chicken will begin to turn golden.

After the initial 30 minutes, it’s flip time! Carefully open the air fryer, and using tongs or heat-safe spatulas, gently turn the chicken breast-side up. This allows the breast to get direct exposure to the circulating hot air, crisping up that seasoned skin to a beautiful, deep golden color. Continue cooking for another 30 to 35 minutes. The real test for doneness, though, is temperature. You’re looking for an internal temperature of 165°F (74°C) in the thickest part of the thigh, away from the bone. A good instant-read thermometer is your best friend here! When it hits the mark, pull it out and let it rest for at least 5 minutes before you slice into it. This resting period is super important; it lets the juices redistribute throughout the meat, keeping it wonderfully tender and moist.
AD — Mediavine Content 300×250 / Responsive

Why This Recipe Works

The air fryer excels at cooking whole chicken because its powerful convection fan creates an incredibly even and dry heat environment. This hot, circulating air crisps the skin beautifully, much like deep frying but with far less oil, while also cooking the meat thoroughly and efficiently. Starting breast-side down also helps shield the leaner breast meat from direct heat, keeping it juicy as the rest of the chicken cooks.

This air fryer whole chicken delivers that perfect golden skin and juicy meat you crave, without all the fuss!— Charlotte
AD — Mediavine Native / 728×90 Leaderboard

Prep 10 minutesCook 60-65 minutesYield 4 servings
Ingredients
  • 1 (3½ - 4-pound) whole chicken
  • 1 tablespoon olive oil
  •  teaspoons salt
  • ½ teaspoon ground black pepper
  • ½ teaspoon paprika
  • ¼ teaspoon garlic powder
  • ¼ teaspoon dried oregano
  • ¼ teaspoon dried thyme
Instructions
  1. Prepare the Chicken Place the chicken on a clean plate. Remove any giblets or the neck from the cavity. Use paper towels to pat the skin very dry, getting into all the crevices. Tuck the wings behind the back of the chicken to protect the tips.
  2. Season the Chicken Brush the chicken all over with olive oil. In a small bowl, combine the salt, pepper, paprika, garlic powder, oregano, and thyme. Sprinkle the breast side of the chicken with half of the seasoning mixture.
  3. Air Fry Initial Cook Preheat your air fryer to 350°F (175°C). Carefully place the chicken, seasoning side down (breast-side down), into the basket of the preheated air fryer. Sprinkle the remaining seasoning all over the other side (the back and legs) of the chicken. Cook for 30 minutes.
  4. Flip and Finish Cooking After 30 minutes, carefully flip the chicken so it is breast-side up. Continue to cook for another 30 to 35 minutes, or until the internal temperature reaches 165°F (74°C) when measured in the thickest part of the thigh, away from the bone. The skin should be deeply golden and crispy.
  5. Rest and Serve Once cooked, carefully remove the chicken from the air fryer basket and let it rest on a cutting board for at least 5 minutes before slicing. This resting period allows the juices to redistribute, ensuring the meat stays wonderfully tender and moist.
Tested Tip

Always, always, ALWAYS use a meat thermometer! Eyeballing doneness with a whole chicken is tricky, and a thermometer ensures you get perfectly cooked, safe chicken every time. Insert it into the thickest part of the thigh, avoiding the bone, for the most accurate reading.

AD — Mediavine Content 300×250 / Responsive

Prepping Your Chicken for Success

The Perfect Seasoning Blend and Air Fryer Placement

Air Frying Your Whole Chicken to Golden Perfection

Make It Yours

  • Smoky Flavor — Add a teaspoon of smoked paprika to the spice rub for a deeper, richer, smoky note. It's a subtle change that really transforms the flavor profile.
  • Herb Garden Fresh — Swap out the dried herbs for fresh ones! Use a tablespoon each of finely chopped fresh rosemary, thyme, and oregano instead of the dried versions. Mix them with the olive oil before rubbing on the chicken for an aromatic punch.
  • Citrus & Garlic Infusion — Stuff the chicken cavity with half a lemon and a few smashed garlic cloves before cooking. The aromatics will gently infuse the meat from the inside as it cooks, adding a bright, zesty undertone.
  • Spicy Kick — For those who love a bit of heat, mix in a quarter to half teaspoon of cayenne pepper to the spice blend. It gives the skin a lovely little kick!
AD — Mediavine Content / Native

FAQ

Can I use a larger chicken?

A 3.5 to 4-pound chicken fits most standard air fryer baskets well. If you use a larger chicken, you might need to increase the cooking time significantly and rotate it more often to ensure even cooking. Always check with a meat thermometer to confirm it reaches 165°F.

Do I need to brine the chicken?

Brining can definitely add extra moisture and flavor, but for this quick air fryer method, it's not strictly necessary. The way we cook it—starting breast down and resting—helps keep it super juicy without the extra step. If you have time and want to, a simple salt brine for a few hours will make it even more tender!

My chicken skin isn't getting crispy enough. What went wrong?

The most common culprit is moisture! Make sure you really pat the chicken skin completely dry before applying the oil and seasonings. Also, ensure your air fryer isn't overcrowded, allowing plenty of room for air circulation. A slightly higher temperature in the last 5-10 minutes can also help crisp it up.

How do I store leftovers?

Let any leftover chicken cool completely, then shred or slice the meat off the bone. Store it in an airtight container in the refrigerator for up to 3-4 days. It's fantastic for quick lunches, sandwiches, or even tossed into a soup or salad!

AD — Mediavine 728×90 Leaderboard / Responsive

What To Serve With This

  • Roasted Asparagus
  • Creamy Mashed Potatoes
  • Simple Green Salad with Vinaigrette
  • Garlic Parmesan Roasted Broccoli
  • Sweet Potato Fries

This post contains affiliate links. We may earn a small commission at no extra cost to you.

More Recipes You'll Love

Tested twice, weeknight-ready, family-approved.