Okay, friends, I’ve got to tell you about these air fryer stuffed peppers I made last night. As busy parents, we’re always looking for meals that feel special but don’t take forever, right? Well, this recipe absolutely hits all those sweet spots for a satisfying, comforting dinner that comes together faster than you’d expect.
I’ve tried a few stuffed pepper methods over the years, and let me tell you, the air fryer makes this classic dish incredibly simple. It’s my go-to now because it delivers perfectly tender peppers and a flavorful, hearty filling, all without heating up the whole kitchen or needing constant hovering. Seriously, this is a real weeknight winner, and I can’t wait for you to try it!
Prepping Your Bell Peppers for Air Fryer Stuffed Peppers
Start by picking out some beautiful bell peppers. Any color works, but I love a mix of red, yellow, and orange for a really vibrant plate! First, you want to make sure your peppers stand up straight without wobbling. A little trick I learned is to slice a very thin sliver off the bottom of each one. Not too much, just enough to give them a flat base. This prevents them from tipping over in the air fryer, which would be a messy disaster with all that delicious filling!
Next, carefully slice about half an inch off the top of each pepper. You’ll be left with a cap and the main pepper shell. Scoop out all the seeds and any white membrane inside – that part can be a little bitter. You want a clean, hollow shell ready for stuffing. Now, what about those tops? You can totally chop up the edible parts around the stem and add them to your filling later for extra veggie goodness, or just discard them if you prefer. I usually chop ’em up, because why waste good food?
Now for the air fryer magic! Pop those hollowed-out pepper shells right into your air fryer basket. Don’t worry about cramming them; they just need a little space. We’re going to pre-cook them for about 10 minutes. This step is key, seriously! It softens the peppers just enough so they’re tender when you bite into the finished dish, but not so soft that they fall apart. When they come out, they’ll be slightly wilted and you might find a little liquid inside – just pour that out. It ensures your final dish isn’t watery. This pre-cooking makes all the difference for that perfect texture.
Crafting the Hearty Filling
While your peppers are getting tender in the air fryer, you’ll whip up the star of the show: that incredibly flavorful filling. Grab a big skillet and warm your olive oil over medium heat. Toss in your diced yellow onion (and those chopped pepper tops, if you decided to use them!) and let them cook gently for about 5 minutes. You’re looking for them to soften and turn a bit translucent – that’s when they release all their sweet flavor.
Once the onions are ready, crank the heat up to medium-high and add your ground beef. Break it up with a spoon as it cooks, stirring often, until it’s beautifully browned and crumbly, with no pink left. This usually takes about 4 minutes. Then, stir in the minced garlic and Italian seasoning. Oh, the smell at this point is just wonderful! Let that cook for another minute, until the garlic is fragrant and the seasoning has had a chance to bloom in the heat.
Next, pour in your diced tomatoes and tomato sauce, along with the salt and pepper. Give it a good stir, bring it to a gentle boil, then let it simmer for about 5 minutes. You want the sauce to thicken slightly – it should coat the back of a spoon. Once it’s looking rich and saucy, take it off the heat. Stir in your cooked rice (this is a great way to use up leftover rice!) and let the whole mixture cool down just a bit. This little cooling step is important, because you’re about to fold in a cup of shredded Colby Jack cheese, and you don’t want it to melt into a stringy mess just yet. You want those lovely pockets of cheese!
Stuffing and Finishing Your Peppers
Now for the fun part – stuffing those perfectly pre-cooked peppers! Take a generous cup of that rich, meaty, cheesy filling and spoon it into each pepper shell. You want them full, but not overflowing so much that everything spills out when you move them. Gently press the filling down a little to make sure it’s packed in nicely. This is where you can admire your handiwork – colorful peppers, brimming with deliciousness!
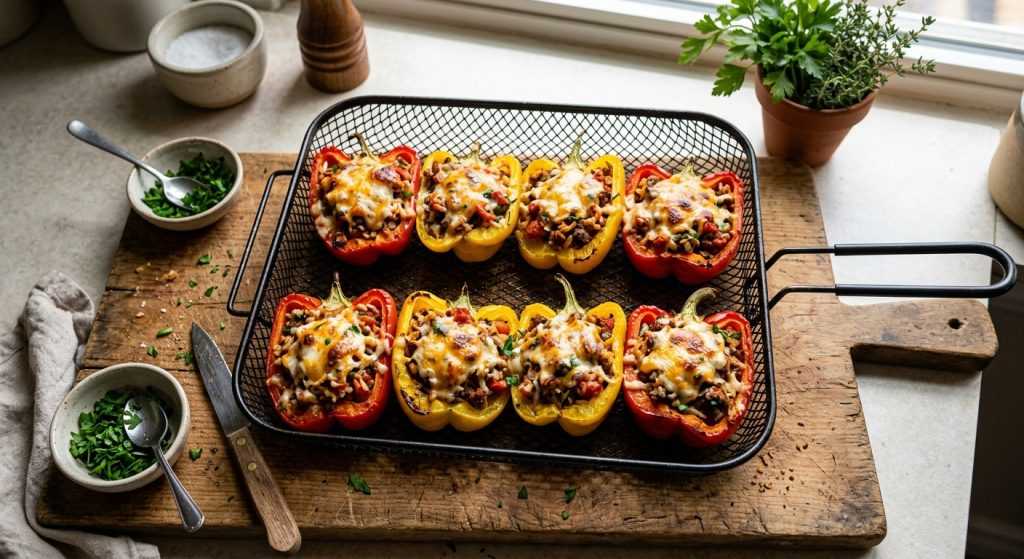
Once all four peppers are stuffed, it’s time for the final touch. Sprinkle the remaining quarter cup of shredded Colby Jack cheese evenly over the top of each one. That cheese topping is going to get gloriously melty and slightly browned, adding another layer of flavor and texture that’s just irresistible. It’s the crowning glory for your air fryer stuffed peppers!
Carefully place your stuffed peppers back into the air fryer basket. Don’t crowd them too much; air circulation is your friend for even cooking. Pop them in at 380°F for just about 2 minutes. The goal here is simply to melt that cheese until it’s bubbly and slightly golden. Watch it closely – air fryers work fast! When you pull them out, the cheese should be glossy and bubbling, and the filling piping hot. Serve them up right away for a satisfying dinner that truly feels like a warm hug.