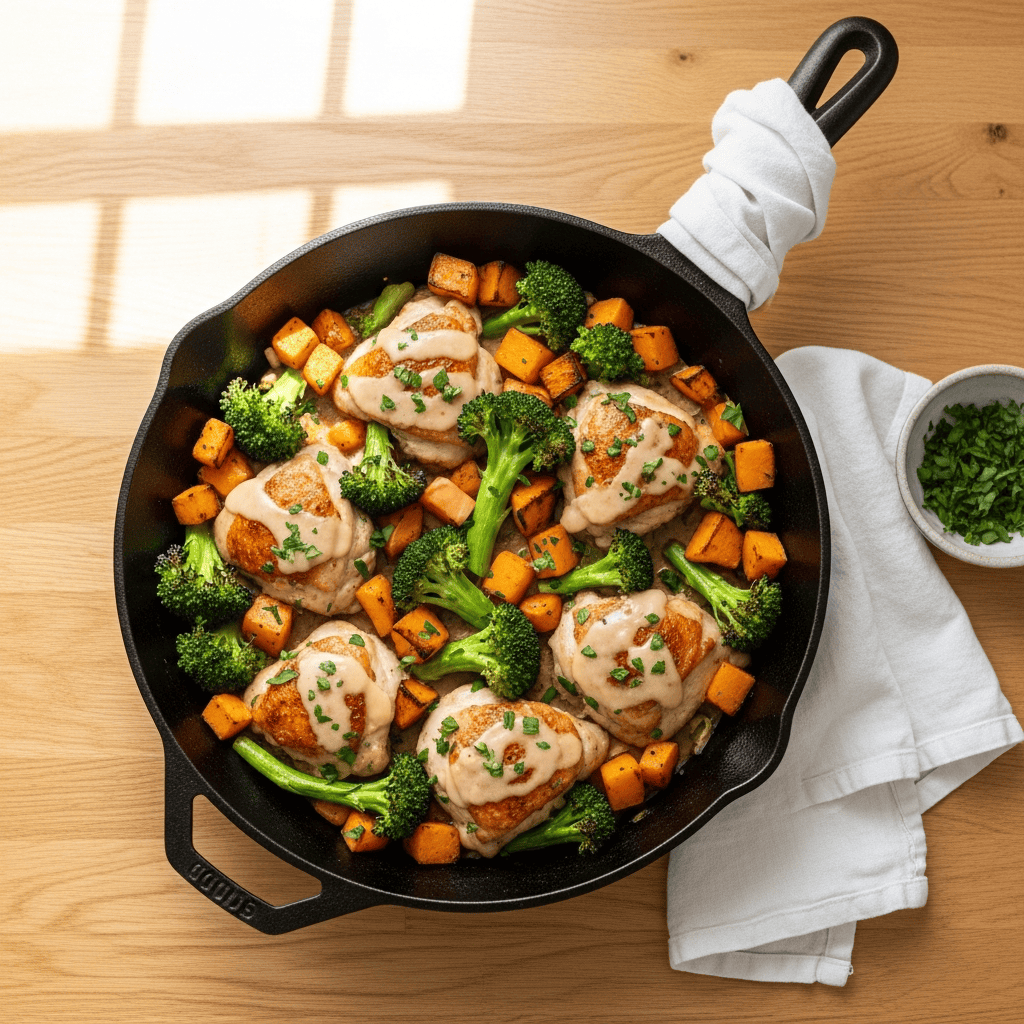
Creamy Garlic Chicken with Roasted Veggies: Your New Weeknight Hero!

TOTAL TIME
SERVES
COURSE
DIFFICULTY
Tested5× before publishing

Hey friends! I just had to share this amazing discovery: a super flavorful creamy garlic chicken that is absolutely going to save your weeknights. Seriously, I’ve made this one so many times in the past month, tweaking little things here and there, and every single time it disappears from the plate. It’s got tender, juicy chicken, perfectly roasted veggies, and a rich, creamy sauce that ties everything together beautifully. No complicated steps, just good food.

This recipe is one of those fantastic one-pan-ish meals that feels fancy but comes together with minimal fuss. You get a little bit of stovetop magic, a little bit of oven roasting, and before you know it, you’ve got a complete dinner ready for the whole family. I love that you can customize the veggies too, using whatever you have on hand or what’s seasonal. It’s comforting and hearty, but still feels fresh. Let’s get cooking!

Prepping for Success: Getting This Creamy Garlic Chicken On the Table Fast

Okay, busy parents, let’s talk prep. The beauty of this creamy garlic chicken recipe is how smoothly it comes together if you just take a few minutes to get organized. Before you even turn on the stove, chop your broccoli and butternut squash. Cubing that squash can feel like a little bit of a workout, but it’s so worth it for the sweetness it develops when roasted! Get those on the baking sheet and tossed with oil and seasoning right away so they can go into the oven first. While they’re roasting, you can turn your attention to the chicken. Slice your onion and mince all that glorious garlic. Having everything prepped and measured out makes the cooking process so much more enjoyable and less stressful, especially when you’re trying to multitask.

I always recommend using a large enough skillet here – a 12-inch cast iron works perfectly. The size lets you sear the chicken without overcrowding it, which is key for getting that beautiful golden-brown crust. If your skillet isn’t quite big enough for all the chicken at once, just sear it in two batches. It takes an extra couple of minutes but makes all the difference in flavor and texture. And don’t forget to have your chicken broth, half-and-half, and cornstarch ready to go; the sauce comes together quickly once you start!

Building Flavor: The Heart of Your Creamy Garlic Chicken

The flavor in this dish isn’t just from the creamy sauce; it starts way back with how you cook the chicken and what you do with the pan after. When you sear the chicken, you’re creating these amazing browned bits on the bottom of the skillet – that’s called fond, and it’s pure deliciousness! When you add the butter, onions, garlic, and broth, you get to scrape all that goodness up. This process, known as deglazing, adds incredible depth to your sauce. Don’t skip it!

Another tip for the sauce: don’t be shy with the garlic. I’ve noted 7-8 cloves, but if you’re a garlic lover, go for a few more! The fresh parsley at this stage also gives a nice herby warmth that really blooms as the sauce simmers. When you mix the half-and-half with cornstarch, make sure it’s completely smooth before pouring it in. This prevents lumps and ensures your sauce gets that lovely, velvety texture. Pour it in slowly while stirring, and you’ll see it thicken right before your eyes. It’s a little bit of kitchen magic that makes the sauce cling perfectly to the chicken and vegetables.
AD — Mediavine Content 300×250 / Responsive

Why This Recipe Works

This recipe perfectly balances stovetop searing for maximum chicken flavor and a rich pan base, with oven finishing for tender, fully cooked chicken and beautifully roasted, slightly caramelized vegetables. The cornstarch-thickened sauce becomes velvety smooth, coating every component without being overly heavy. Plus, using the same pan builds layers of flavor from start to finish, ensuring a cohesive and incredibly tasty meal.

This creamy garlic chicken is seriously good. It’s a total winner for busy nights when you still want a hearty, flavorful meal!— Charlotte
AD — Mediavine Native / 728×90 Leaderboard

Prep 10 minutesCook 35 minutesYield 4 servings
Ingredients
  • 2 cups fresh broccoli florets (about 150g)
  • 2 cups cubed butternut squash (about 300g)
  • 2 Tablespoons olive oil, divided
  • 1.5 pounds boneless, skinless chicken thighs or breasts (about 680g)
  • 1 Tablespoon unsalted butter (14g)
  • 1/4 teaspoon EACH salt & ground black pepper, plus more for vegetables & chicken
  • 1/4 cup diced onion (about 33g)
  • 7–8 garlic cloves, minced
  • 2 teaspoons dried parsley
  • 1 and 1/4 cups chicken broth (300ml, low-sodium is great)
  • 3/4 cup half-and-half or whole milk (180ml)
  • 1 Tablespoon cornstarch (8g)
  • optional: chopped fresh parsley, for garnish
Instructions
  1. Prep the Veggies Preheat your oven to 400°F (204°C). Grab a big baking sheet and line it with parchment paper – clean-up is a breeze this way! Spread your broccoli florets and butternut squash cubes in a single layer. Drizzle them with 1 Tablespoon of olive oil, give them a good toss to coat, and sprinkle with salt and pepper. Bake these for 20 minutes while you get the chicken ready.
  2. Sear the Chicken While the veggies roast, heat the remaining 1 Tablespoon of olive oil in a large 12-inch skillet over medium heat. A cast iron skillet is amazing here, but any large skillet or Dutch oven works. Place your chicken thighs or breasts in the hot pan, season with salt and pepper. Cook for about 4 minutes on each side until they're lightly browned. Don't worry about cooking them all the way through; they’ll finish in the oven later. Transfer the chicken to a plate and loosely cover with foil.
  3. Build the Creamy Sauce Don't wipe out that pan! Add the butter to the hot skillet, let it melt and swirl around. Toss in the 1/4 teaspoon salt, 1/4 teaspoon pepper, diced onion, minced garlic, and dried parsley. Cook and stir, scraping up all those delicious browned bits from the bottom of the pan – that’s pure flavor! Pour in the chicken broth and let it simmer for 5 minutes, stirring occasionally. In a small bowl, whisk together the half-and-half (or whole milk) and cornstarch until smooth. Slowly pour this mixture into the simmering skillet, stirring constantly. Cook for just 1 minute more, stirring until the sauce thickens slightly. Give it a taste and add a little more salt or pepper if it needs it.
  4. Finish in the Oven Bring the chicken back to the skillet, along with your roasted vegetables. Stir gently to coat everything in that glorious creamy sauce. Carefully transfer the entire skillet to the preheated oven. Bake for another 5–10 minutes, or until the chicken is completely cooked through and reaches an internal temperature of at least 165°F (74°C).
  5. Serve it Up! Remove the skillet from the oven. If you like, sprinkle with some fresh chopped parsley for a pop of color and freshness. Serve immediately and watch it disappear! Leftovers are great for a few days in the fridge; just reheat gently on the stove or in the microwave.
Tested Tip

Don't overcrowd your pan when searing the chicken, or it won't get that lovely golden crust. If your skillet isn't huge, do it in two batches for the best browning! Also, taste your sauce before the final bake – a quick tweak of salt or pepper can make all the difference.

AD — Mediavine Content 300×250 / Responsive

Prepping for Success: Getting This Creamy Garlic Chicken On the Table Fast

Building Flavor: The Heart of Your Creamy Garlic Chicken

Make It Yours

  • Vary the Veggies — Feel free to swap out the broccoli and butternut squash for whatever vegetables you love or have on hand. Bell peppers, zucchini, green beans, or even some chopped asparagus would be delicious. Just make sure to cut them into similar-sized pieces so they cook evenly.
  • Add a Little Spice — If you like a bit of a kick, a pinch of red pepper flakes added with the garlic and onion would be fantastic. It gives a subtle warmth without overpowering the creamy sauce.
  • Herb Swaps — While dried parsley is great, you could also try dried thyme or Italian seasoning in the sauce. If you have fresh herbs, add them at the very end for a brighter flavor burst. Rosemary would also be lovely with the chicken.
  • Make it Cheesy — For an extra layer of comfort, stir in a handful of grated Parmesan cheese into the sauce right before adding the chicken and veggies back. It makes the sauce even richer and more indulgent.
AD — Mediavine Content / Native

FAQ

Can I use chicken breasts instead of thighs?

Absolutely! Chicken breasts work great in this recipe. I recommend cutting them into similar-sized pieces or pounding them slightly to an even thickness so they cook uniformly. Just keep an eye on the cooking time in the oven, as breasts might cook a little faster than thighs to reach 165°F.

How long do leftovers last?

Leftovers store beautifully in an airtight container in the refrigerator for 3-4 days. It makes for a fantastic lunch the next day!

Can I prepare any parts of this recipe ahead of time?

Yes! You can chop all your vegetables and dice your onion and mince your garlic ahead of time and store them in separate containers in the fridge. This really speeds up the cooking process when it's dinner time.

What's the best way to reheat leftovers?

To reheat, gently warm the dish on the stovetop over medium-low heat, adding a splash of chicken broth or milk if the sauce seems too thick. You can also reheat it in the microwave in short bursts, stirring in between, until heated through.

AD — Mediavine 728×90 Leaderboard / Responsive

What To Serve With This

  • Crusty French bread
  • Fluffy white or brown rice
  • A simple green salad with vinaigrette
  • Quinoa
  • Creamy mashed potatoes
  • Steamed green beans

This post contains affiliate links. We may earn a small commission at no extra cost to you.

More Recipes You'll Love

Tested twice, weeknight-ready, family-approved.