Baked Chicken Rolls: Easy Dinner for Busy Weeknights

TOTAL TIME
SERVES
COURSE
DIFFICULTY
Tested5× before publishing

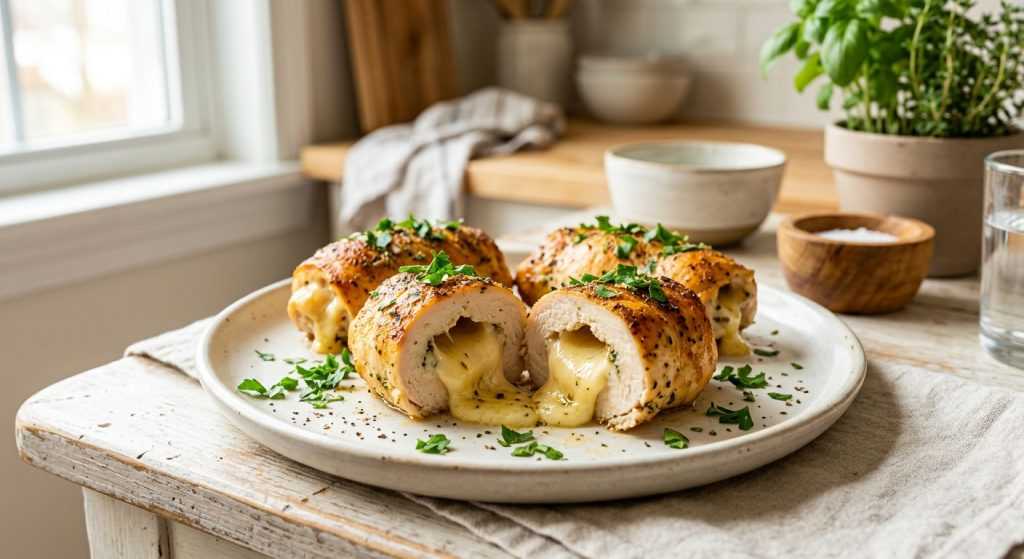
Okay, so you know those nights when you just stare into the fridge hoping dinner will magically appear? Yeah, me too. That’s why I’m so excited about these baked chicken rolls. I’ve made them probably a dozen times, tweaking little things here and there, and they’ve become a total lifesaver for our family. You get tender chicken, a gooey cheese center, and a perfectly crispy, herby coating – all baked in under 20 minutes! This recipe is a staple for busy parents who want something genuinely satisfying without a huge fuss. It’s truly a win-win.

Seriously, I’ve served these on chaotic school nights and even for casual get-togethers, and they always disappear. The best part? You can prep them ahead of time, which is huge for making dinner feel less like a sprint. Pound the chicken, roll in cheese, coat, and bake. It sounds simple because it IS simple, but the flavor payoff is incredible. It’s comforting, satisfying, and a dish I feel good about putting on the table.

Prepping Your Chicken for Perfect Baked Chicken Rolls

The secret to these tender, juicy baked chicken rolls starts with how you handle the chicken breasts. Don’t skip the pounding step! Placing the chicken between waxed paper or plastic wrap makes this a super clean task. Then, using a meat mallet or even a rolling pin, gently but firmly pound each breast to a uniform 1/4-inch thickness. This isn’t just about making them thin enough to roll; it also tenderizes the meat, ensuring that every bite is incredibly soft. Uniform thickness is important so they all cook at the same rate, preventing some from drying out while others are still catching up.

You want to aim for a consistent thickness across the entire breast. If one part is thicker, it will cook slower and could make your roll uneven. Seasoning at this stage is also crucial. A good sprinkle of salt and pepper on both sides permeates the chicken before it’s even rolled, laying a foundational layer of flavor. It’s a small step that makes a big difference in the final taste. Take your time here – a well-prepped chicken breast makes for a much easier rolling process later on, and a much more satisfying end result.

Rolling and Coating Your Cheese-Filled Chicken

Now for the fun part – assembling your cheesy chicken rolls! The Muenster cheese is a great choice here because it melts beautifully, but doesn’t get overly greasy. When you place the cheese stick at the short end of your pounded chicken breast, make sure there’s enough chicken around it to completely enclose the cheese. This is key to preventing those cheesy explosions in the oven. Roll it up tightly, tucking in the sides as you go, almost like you’re wrapping a tiny burrito. If your cheese stick is a little long, just trim it so it’s flush with the ends of the chicken. Nobody wants lost cheese!

Next, the coating! Before you dip, give each roll a quick brush with olive oil. This isn’t just for flavor; it acts like a delicious glue, helping those seasoned breadcrumbs really cling to the chicken. It also contributes to that gorgeous golden-brown color and crispy texture we’re aiming for. The breadcrumb mixture, with its paprika and thyme, gives such a comforting, savory aroma as it bakes. Press the crumbs onto the chicken gently but firmly from all sides to ensure an even coat. This forms a protective and flavorful crust that locks in moisture and adds a delightful crunch.

Baking Your Baked Chicken Rolls to Golden Perfection

Once your chicken rolls are neatly coated and lined up on your prepared baking sheet, they’re ready for their oven spa treatment! Into the preheated 400°F oven they go, seam-side down. This helps keep them from unrolling as they bake and gives the seam a chance to crisp up nicely. The baking time for these is incredibly quick – usually around 15 minutes. This is where the thinness of your pounded chicken really shines; it cooks through fast, keeping the chicken moist and tender.

Keep an eye on them towards the end. You’re looking for that perfect golden brown crust. It should look invitingly crisp, and when you gently press it, it should feel firm. If you’re unsure, you can always check the internal temperature of one of the rolls with a meat thermometer; it should register 165°F. Resist the urge to open the oven door too often, as this can drop the temperature and extend baking time. Once they’re done, pull them out and let them rest on the baking sheet for just a minute or two before serving. This allows the juices to redistribute, making for an even juicier bite. Enjoy the incredible aroma that fills your kitchen!
AD — Mediavine Content 300×250 / Responsive

Why This Recipe Works

This recipe works because pounding the chicken thin creates a tender, quick-cooking base that's easy to roll. The Muenster cheese melts into a delicious, gooey center, while the seasoned breadcrumb coating, aided by a brush of olive oil, bakes into a crisp, flavorful crust. It's a simple combination of textures and flavors that's incredibly satisfying.

These baked chicken rolls are a lifesaver for busy nights – cheesy, crispy, and seriously satisfying!— Charlotte
AD — Mediavine Native / 728×90 Leaderboard

Prep 15 minutesCook 15 minutesYield 4 servings
Ingredients
  • 4 boneless, skinless chicken breast halves (about 1 pound total)
  • 1 cup fresh white breadcrumbs
  • 1/3 cup grated Romano cheese
  • 1 1/2 teaspoons paprika
  • 1 1/2 teaspoons dried thyme, crumbled
  • 4 ounces Muenster cheese, cut into 1/2 x 4-inch sticks
  •  Olive oil
  •  Salt and freshly ground black pepper, to taste
Instructions
  1. Get Ready to Bake Preheat your oven to 400°F. Grab a small baking sheet and lightly grease it. This keeps the chicken from sticking and helps it crisp up beautifully!
  2. Pound and Season Place each chicken breast between two sheets of waxed paper (or plastic wrap works too!). Use a meat mallet or a rolling pin to pound them evenly to about 1/4-inch thickness. You want them thin enough to roll easily, but not so thin they tear. Season both sides of the pounded chicken lightly with salt and freshly ground black pepper.
  3. Mix the Coating In a shallow dish, combine the breadcrumbs, grated Romano cheese, paprika, and dried thyme. Give it a good stir to make sure everything is evenly mixed. This is where all that wonderful flavor for the crust comes from!
  4. Roll Them Up Take one of your Muenster cheese sticks and place it at the short end of a pounded chicken breast. Carefully roll up the chicken, making sure the cheese is fully enclosed. If any cheese sticks out too much, just trim it flush with the ends of the chicken. Repeat with the remaining chicken and cheese.
  5. Coat and Bake Lightly brush each rolled chicken breast with olive oil. This is key for getting that golden, crispy crust! Then, gently roll each chicken roll in the breadcrumb mixture, pressing lightly so the crumbs really stick. Arrange the coated chicken rolls seam-side down on your prepared baking sheet. Bake for about 15 minutes, or until the chicken is cooked through and the coating is beautifully golden brown and crisp. The internal temperature should reach 165°F. Let them rest for a minute or two before serving.
Tested Tip

Don't skip the olive oil before dipping in breadcrumbs! It's the secret to getting that perfect golden, crispy crust and making sure the coating really sticks.

AD — Mediavine Content 300×250 / Responsive

Prepping Your Chicken for Perfect Baked Chicken Rolls

Rolling and Coating Your Cheese-Filled Chicken

Baking Your Baked Chicken Rolls to Golden Perfection

Make It Yours

  • Spice it Up — For a little kick, add a pinch of cayenne pepper or red pepper flakes to your breadcrumb mixture. A dash of garlic powder in the crumbs also adds a nice savory depth.
  • Cheese Swap — While Muenster is fantastic, feel free to experiment with other meltable cheeses. Provolone, Monterey Jack, or even a mild cheddar would be delicious. Just make sure they're cut into similar stick shapes.
  • Herb Garden Fresh — If you have fresh herbs on hand, finely chop about a tablespoon of fresh thyme or parsley and mix it into the breadcrumbs. It brings a bright, aromatic freshness to the coating.
  • Veggie Boost — Before rolling, you could add a thin slice of sun-dried tomato or a few leaves of lightly sautéed spinach with the cheese. Just don't overfill so it still rolls tightly!
AD — Mediavine Content / Native

FAQ

Can I use different types of chicken?

Absolutely! Boneless, skinless chicken thighs would also work wonderfully here. Just be aware that they might need an extra few minutes in the oven since they tend to be a bit thicker. Always check for an internal temperature of 165°F.

How do I prevent the cheese from oozing out during baking?

The key is to pound your chicken to an even 1/4-inch thickness and roll it up very tightly, making sure the cheese is fully enclosed on all sides. Tuck the ends in as you roll, like a little package. Also, trim any cheese that's longer than the chicken before rolling.

Can I make these in an air fryer?

Yes, you can! Place the rolls in a single layer in your air fryer basket, making sure not to overcrowd it. Cook at about 375°F for 10-12 minutes, flipping halfway through, until golden brown and cooked through. Cooking times can vary, so keep an eye on them!

How long do leftovers last, and how should I reheat them?

Leftover chicken rolls can be stored in an airtight container in the refrigerator for up to 3 days. To reheat, I like to use a toaster oven or air fryer at 350°F for about 5-8 minutes to help crisp up the coating again. A microwave works, but the crust won't be as crispy.

AD — Mediavine 728×90 Leaderboard / Responsive

What To Serve With This

  • Steamed green beans with a squeeze of lemon
  • Creamy garlic mashed potatoes
  • A simple garden salad with a light vinaigrette
  • Roasted asparagus spears
  • Fluffy white rice
  • Quick tomato soup

This post contains affiliate links. We may earn a small commission at no extra cost to you.

More Recipes You'll Love

Tested twice, weeknight-ready, family-approved.