The Best Air Fryer Chicken Breast for Busy Weeknights

TOTAL TIME
SERVES
COURSE
DIFFICULTY
Perfectly cooked, seasoned air fryer chicken breast with a golden crust, served on a plate.
Tested5× before publishing

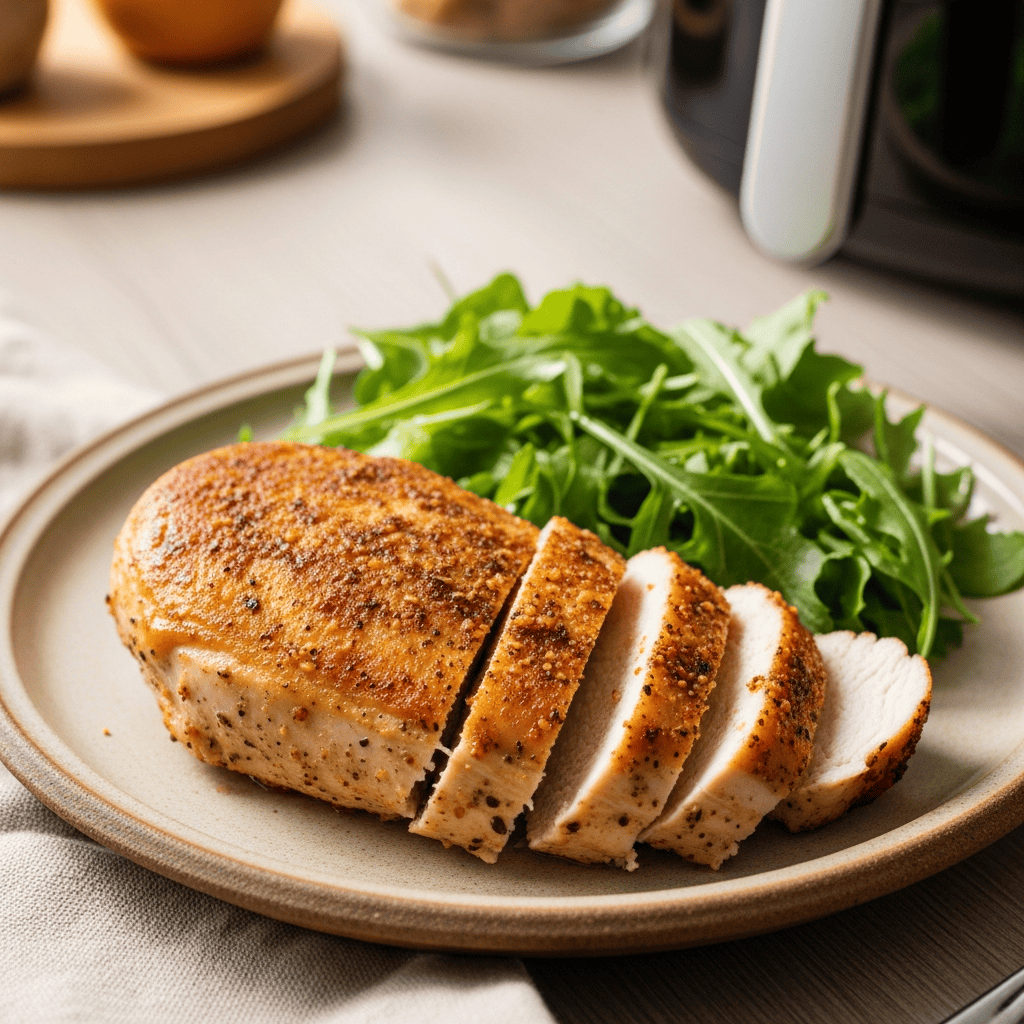
Okay, friends, if you’re like me, finding dinner ideas that are quick, healthy, and actually taste good is a constant mission. Well, I’ve got to tell you, this recipe for **air fryer chicken breast** has been a total lifesaver in my kitchen lately! It takes almost no time to get on the table, which is huge when you’ve got a gazillion things on your plate and hungry folks waiting. Seriously, I’ve tested this method more times than I can count, and it delivers perfectly cooked, juicy chicken every single time. So, if you’re looking for an easy, delicious **air fryer chicken breast** recipe, you are in the right place.

You might think air-frying chicken sounds basic, but the seasoning blend here is truly amazing. Plus, the air fryer gives the chicken a lovely, slightly crisp exterior while keeping the inside incredibly tender. It’s perfect for the whole family, and you’ll wonder how you ever lived without this quick meal option!

Getting Started: Prepping and Seasoning Your Air Fryer Chicken Breast

First things first, you’ll want to get your chicken breasts prepped. I always start by patting them really dry with paper towels; this helps the oil and seasoning stick better, and it also helps them crisp up in the air fryer. Then, grab your half tablespoon of rapeseed oil – I like it because it has a neutral flavor and a high smoke point, which is great for air frying. Just drizzle it over the chicken, making sure each piece gets a nice, even coating. This initial oil layer is super important because it helps the seasoning adhere, and it also contributes to that lovely golden crust we’re aiming for.

Meanwhile, let’s talk seasoning! In a small bowl, combine the salt, garlic granules, smoked sweet paprika, mixed herbs, and a good grind of black pepper. The smoked paprika especially adds a wonderful depth of flavor that’s just fantastic. If you’re curious about different types of paprika, you can learn more about its origins and varieties on Wikipedia. Once your spices are mixed, just scatter them onto a plate. Then, one by one, roll each oiled chicken breast in the seasoning blend. Make sure to press gently so the herbs and spices really adhere all over. This step takes just a moment, but it makes all the difference in flavor. On top of that, getting a good, even coating ensures every bite is packed with deliciousness!

Cooking Your Air Fryer Chicken Breast to Perfection

Now for the main event: cooking! Once your chicken breasts are beautifully seasoned, arrange them in your air fryer basket. Don’t overcrowd the basket; you want enough space around each piece for the hot air to circulate freely. Otherwise, they’ll steam instead of crisp. Depending on the size of your air fryer, you might need to cook them in batches. Set your air fryer to 350°F (180°C). Then, let them cook for 18-20 minutes total.

Ensuring Juicy Results: The Flip and the Temp Check

After about 10 minutes, you’ll need to open up the air fryer and carefully flip each chicken breast. This ensures even cooking and browning on both sides. Plus, it helps that seasoning get nice and toasty all over! Once flipped, continue cooking for the remaining 8-10 minutes. However, the exact timing can vary a bit based on the thickness of your chicken breasts and your specific air fryer model. So, a meat thermometer is truly your best friend here. Always check the internal temperature at the thickest part of the breast; it should read 165°F (74°C) to be safely cooked. For more details on safe cooking temperatures for chicken, the USDA has excellent guidelines. If the juices run clear when you pierce the chicken with a knife, that’s another good sign it’s done. Finally, let the chicken rest for a few minutes after cooking. This allows the juices to redistribute, ensuring a super tender and juicy **air fryer chicken breast** every single time. It’s a simple step, but so worth it!

AD — Mediavine Content 300×250 / Responsive

Why This Recipe Works

The air fryer circulates hot air around the chicken, creating a convection effect that cooks food quickly and evenly, giving it a crispy exterior without needing a lot of oil. This specific recipe uses just enough oil to help the flavorful seasoning adhere, while the quick cook time in the air fryer prevents the chicken from drying out, leaving you with tender, juicy meat.

This air fryer chicken breast recipe is truly a weeknight miracle. It's so quick, so flavorful, and always perfectly juicy. You'll wonder how you ever managed without it!— Charlotte
AD — Mediavine Native / 728×90 Leaderboard

Prep 5 minutesCook 18-20 minutesYield 4 servings
Ingredients
  • 4 chicken breasts
  • ½ tbsp rapeseed oil
  • 1 tsp salt
  • 1 ½ tsp garlic granules
  • 1 tsp smoked sweet paprika
  • 2 tsp mixed herbs (like Italian seasoning)
  • ½ tsp black pepper, freshly ground
Instructions
  1. Prep and Season the Chicken Pat the chicken breasts dry with paper towels. Drizzle them with rapeseed oil, making sure each piece is lightly coated. In a small bowl, combine the salt, garlic granules, smoked sweet paprika, mixed herbs, and black pepper. Scatter this seasoning blend onto a plate.
  2. Coat the Chicken Roll each oiled chicken breast in the seasoning mixture, pressing gently to ensure an even coating on all sides. Place the seasoned chicken in your air fryer basket, making sure not to overcrowd it. Cook in batches if necessary.
  3. Air Fry to Perfection Cook the chicken at 350°F (180°C) for 18-20 minutes total. Halfway through cooking (around 10 minutes), carefully flip each chicken breast to ensure even browning and cooking. Use a meat thermometer to check for doneness; the thickest part of the breast should reach 165°F (74°C). Allow the chicken to rest for 5 minutes before serving for the juiciest results.
Tested Tip

I've learned that not all chicken breasts are created equal! If yours are really thick, you might want to gently pound them to a more even thickness before seasoning. This helps them cook more uniformly and prevents dry spots. Plus, it can shave a minute or two off your cook time!

AD — Mediavine Content 300×250 / Responsive

Getting Started: Prepping and Seasoning Your Air Fryer Chicken Breast

Cooking Your Air Fryer Chicken Breast to Perfection

Make It Yours

  • Spicy Kick — Add ¼ teaspoon of cayenne pepper or a pinch of red pepper flakes to the seasoning blend for a bit of heat. This makes a nice contrast to the sweet paprika.
  • Lemon-Herb Freshness — Squeeze fresh lemon juice over the cooked chicken and sprinkle with fresh parsley or cilantro. It adds a bright, zesty finish that's lovely.
  • BBQ Flavors — Instead of the dry rub, brush the oiled chicken with your favorite BBQ sauce during the last 5 minutes of cooking. This creates a sticky, caramelized coating.
  • Garlic & Parmesan — After the chicken is cooked, sprinkle it with a tablespoon of grated Parmesan cheese and a little extra garlic powder. Pop it back in the air fryer for 1-2 minutes until the cheese is melted and bubbly.
AD — Mediavine Content / Native

FAQ

Can I use frozen chicken breasts in the air fryer?

You can, but it’s best to thaw them completely first. Cooking chicken from frozen will significantly increase the cook time, and it might not cook as evenly. For the best and juiciest results for your **air fryer chicken breast**, I always recommend starting with thawed chicken.

How do I know my chicken breast is fully cooked?

The most reliable way is to use a meat thermometer. Insert it into the thickest part of the chicken, and it should read 165°F (74°C). If you don't have one, pierce the chicken with a knife; the juices should run clear, not pink.

My air fryer chicken breast is dry. What went wrong?

Overcooking is the most common culprit for dry chicken. Always use a meat thermometer and take the chicken out as soon as it hits 165°F (74°C). Also, letting it rest for 5-10 minutes after cooking helps keep the juices locked in. Sometimes, too much chicken in the basket can also lead to uneven cooking and dryness.

AD — Mediavine 728×90 Leaderboard / Responsive

This post contains affiliate links. We may earn a small commission at no extra cost to you.

More Recipes You'll Love

Tested twice, weeknight-ready, family-approved.