Opens in a new tab

Juicy Cast Iron Pork Chops: Your New Weeknight Go-To

TOTAL TIME
SERVES
COURSE
DIFFICULTY
Tested5× before publishing

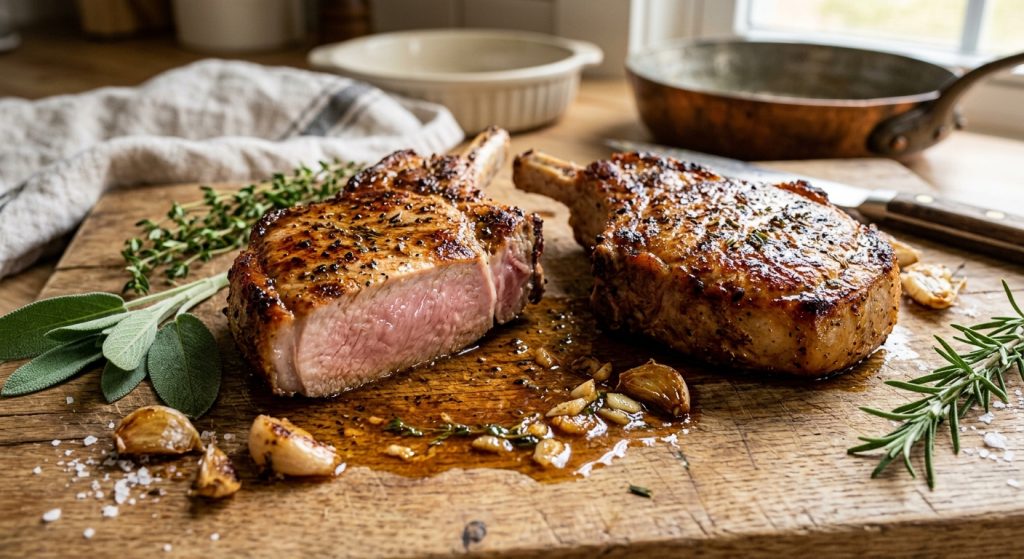
Alright, busy parents, let’s talk about the absolute best way to make **cast iron pork chops** for dinner tonight. Seriously, if you’ve ever felt like pork chops were dry or tough, this recipe is about to change everything you know about them. I’ve personally tested this recipe more times than I can count, tweaking little things here and there, and this version? It’s the one. You’re going to get pork chops that are incredibly juicy on the inside, with a gorgeous, deeply golden-brown crust that just begs for another bite. It’s surprisingly simple, uses just a few common ingredients you likely already have, and comes together faster than you can decide what to order for takeout.

This method focuses on a clever searing technique that keeps the chops from drying out while building up amazing flavor. Plus, there’s a super simple butter basting step at the end that infuses them with fresh herbs and garlic, making them truly special. This is the kind of easy, delicious meal that feels like a treat but is totally doable even on your busiest weeknights. Perfect for the whole family, this dish will quickly become a favorite in your kitchen!

Getting Started: Prepping for Perfect Pork Chops

When you’re aiming for truly delicious pork chops, the prep makes a big difference. First things first, get your skillet heating. A good cast iron pan holds heat so well, which is exactly what we want for a fantastic sear. While it’s heating up, grab your pork chops. I always recommend bone-in, about 1½ inches thick; they just have more flavor and are less prone to drying out. The absolute key here is to pat them *super* dry with paper towels. Any moisture on the surface will steam instead of sear, and we want that beautiful, crispy crust, not a soggy exterior! A dry surface means a golden-brown surface.

Next comes the seasoning. Don’t be shy with the salt and pepper! I like to season them generously all over, making sure to hit the fat cap too. The salt helps draw out some moisture and penetrate the meat, while the pepper adds a lovely aromatic kick. Think about how much you’d season a steak; pork chops need that same love. This simple step sets the stage for all that amazing flavor we’re about to build. Once they’re seasoned, they’re ready for the hot pan, and you’ll be so glad you took these few extra minutes.

The Searing Secret to Amazing Cast Iron Pork Chops

Okay, this is where the magic happens for your **cast iron pork chops**! Most people think you sear on one side, then flip once, and that’s it. But the secret to these incredibly juicy, beautifully crusted chops is frequent flipping. Yep, you heard that right – we’re flipping them every minute or so. Why does this work? It allows the heat to distribute more evenly, preventing one side from burning while the other struggles to catch up. This constant movement builds up a consistent, deep golden-brown crust all over, without overcooking the inside.

As you’re flipping, watch for those color changes. You’re looking for a rich, deep golden hue, not just a pale brown. The fat cap will also render down and crisp up beautifully, adding even more flavor. Keep an eye on your skillet’s heat; if it’s smoking too much, turn it down a notch. If it’s not browning enough, nudge it up a bit. The total searing time will be around 8-10 minutes, and I always recommend using an instant-read thermometer. You’re aiming for 135°F in the thickest part of the chop before taking it off the heat. That might seem a little low, but remember, it will keep cooking while it rests, getting to that perfect 145°F for tender, safe pork!

Finishing Strong: Flavor Boost & Resting for Juicy Perfection

Once your pork chops hit that 135°F mark and have that gorgeous crust, pull the skillet off the heat immediately. This is a crucial moment for adding a burst of flavor. Toss in the fresh sage, smashed garlic, and a pat of unsalted butter around the chops. The residual heat from the cast iron skillet will melt the butter and gently sizzle the aromatics, releasing all their wonderful fragrance. Tilt the skillet slightly and use a large spoon to baste the foaming, herby butter over the chops. Get it all over, especially on the fat cap and any exposed bone. This step really enriches the flavor and adds a beautiful sheen to the meat.

After the basting, transfer those beautiful chops to a cutting board. Resist the urge to slice right into them! Resting is absolutely vital for juicy meat. As the pork cools slightly, the muscle fibers relax and reabsorb all those delicious juices that got pushed to the center during cooking. If you cut into it too soon, all that precious moisture will just run out onto your board. Five minutes is usually enough, and during this time, the internal temperature will climb to a perfect 145°F. Once rested, slice them up and make sure to spoon all those accumulated juices from the cutting board over each serving. Seriously, don’t skip those! They’re pure gold.

AD — Mediavine Content 300×250 / Responsive

Why This Recipe Works

This recipe works so well because of the high heat sear combined with frequent flipping, which develops a beautiful, even crust without overcooking. The butter basting infuses flavor, and the critical resting period allows the meat to reabsorb its juices, ensuring every slice is tender and incredibly juicy.

This quick sear-and-baste method gives you incredibly juicy pork chops with the most amazing crust!— Charlotte
AD — Mediavine Native / 728×90 Leaderboard

Prep 5 minutesCook 10 minutesYield 4 servings
Ingredients
  • 1 tablespoon vegetable oil
  • 2 (1½-inch thick) bone-in pork rib chops, about 8-10 ounces each
  •  Kosher salt, to taste
  •  Freshly ground black pepper, to taste
  • 8 sprigs fresh sage
  • 2 garlic cloves, peeled and smashed
  • 1 tablespoon unsalted butter
Instructions
  1. Prep the Chops Heat the vegetable oil in a large cast iron skillet over medium-high heat. While the skillet heats, pat the pork chops very dry with paper towels. Season them generously all over, including the fat cap, with kosher salt and freshly ground black pepper. Don't be shy with the seasoning!
  2. Sear for a Golden Crust Once the oil is shimmering and just starting to smoke, carefully place the seasoned pork chops in the hot skillet. Cook the first side until it's a beautiful golden brown, which usually takes about 1 minute. Flip the chops and cook for another minute on the other side. Continue this process, turning the chops every minute or so, until they develop a deep, rich golden-brown crust on both sides. This frequent flipping helps create an even crust and ensures the chops cook through without drying out. This step should take about 8–10 minutes total, depending on how thick your chops are. Use an instant-read thermometer to check the thickest part of the chop; it should register 135°F.
  3. Baste and Rest for Juicy Perfection Immediately remove the skillet from the heat. Carefully add the sage sprigs, smashed garlic cloves, and unsalted butter to the hot pan around the chops. As the butter melts and foams, tilt the skillet slightly. Use a large spoon to continuously baste the foaming butter and pan drippings over the pork chops, making sure to coat the fat cap and the rib bone areas. This step takes about a minute and infuses so much flavor! Transfer the pork chops to a cutting board and let them rest for at least 5 minutes. The internal temperature will continue to rise to a perfect 145°F as they rest. Once rested, cut away the bone and slice the pork about ¼-inch thick. Spoon any accumulated juices from the cutting board over the sliced pork before serving.
Tested Tip

Always pat your pork chops bone-dry with paper towels before seasoning and searing. This is the single most important step for achieving that incredible, deeply golden crust.

AD — Mediavine Content 300×250 / Responsive

Getting Started: Prepping for Perfect Pork Chops

The Searing Secret to Amazing Cast Iron Pork Chops

Finishing Strong: Flavor Boost & Resting for Juicy Perfection

Make It Yours

  • Herb Swap — If sage isn't your thing, or you just want to change it up, try swapping it for fresh rosemary or thyme sprigs. They both infuse wonderfully with the butter and garlic, giving a different aromatic note to your pork.
  • Add a Little Heat — For those who like a tiny kick, sprinkle a pinch of red pepper flakes into the pan when you add the butter and garlic. It adds a subtle warmth that complements the richness of the pork beautifully.
  • Different Cuts — This method works best with thicker, bone-in chops, but you can adapt it. For boneless chops, reduce the cooking time slightly, as they cook faster. If using thinner chops, keep the high heat and frequent flips, but reduce the total cooking time to avoid drying them out, aiming for 140°F before resting.
  • Scaling Up — If you need to cook more than two chops, sear them in batches. Overcrowding the pan will lower the temperature and lead to steaming instead of searing, preventing that beautiful crust from forming. Cook two at a time, remove them to rest, and then cook the next batch.
AD — Mediavine Content / Native

FAQ

How thick should my pork chops be for this recipe?

I highly recommend using bone-in pork chops that are about 1½ inches thick. This thickness allows for that perfect balance of a golden, crispy crust and a tender, juicy interior without drying out too quickly.

Can I use a regular skillet instead of cast iron?

While cast iron is ideal for its heat retention and even cooking, you can use any heavy-bottomed, oven-safe skillet. Just make sure it can get and stay nice and hot to achieve a good sear on the chops.

How do I know when my pork chops are done?

The best way is to use an instant-read thermometer. Insert it into the thickest part of the chop, avoiding the bone. You're aiming for 135°F when you take them off the heat, as they'll continue to cook to a perfect 145°F while resting.

Why is resting the meat so important?

Resting allows the muscle fibers to relax and reabsorb all the delicious juices that get pushed to the center during cooking. If you cut into the chops too soon, those juices will just run out, leaving you with drier meat. A short rest means a much juicier chop!

Can I use dried sage?

Fresh sage is definitely preferred here as it infuses a much brighter, more aromatic flavor into the butter. If you absolutely must use dried, use about ½ teaspoon of dried sage leaves and add them with the butter to avoid burning.

AD — Mediavine 728×90 Leaderboard / Responsive

What To Serve With This

  • Creamy Mashed Potatoes
  • Roasted Asparagus with Lemon
  • Simple Green Salad with Vinaigrette
  • Garlic Parmesan Roasted Broccoli
  • Sweet Potato Fries
  • Sautéed Green Beans with Toasted Almonds

This post contains affiliate links. We may earn a small commission at no extra cost to you.

More Recipes You'll Love

Tested twice, weeknight-ready, family-approved.
