Opens in a new tab

Easy No Bake Vanilla Cheesecake with Chocolate Crust

TOTAL TIME
SERVES
COURSE
DIFFICULTY
Tested5× before publishing

Hey everyone! I just whipped up an amazing dessert that I *have* to tell you about – this simple no bake vanilla cheesecake. Seriously, if you’re looking for a dessert that feels fancy but requires almost no effort, this is it. It comes together so quickly, which is exactly what busy parents need on a weeknight or even for a last-minute get-together. The best part? No oven needed, so your kitchen stays cool, and you’re not tied to the stove!

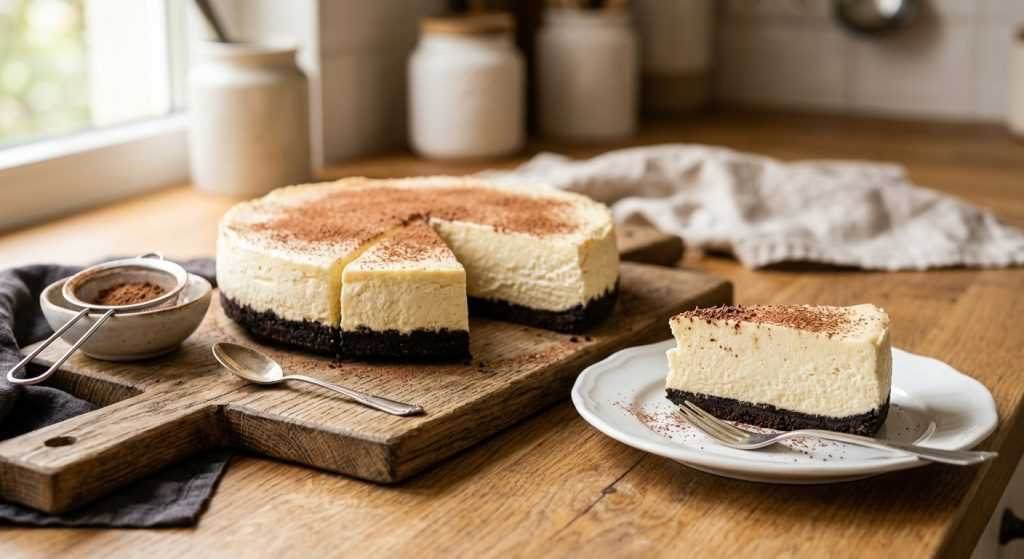
I’ve made this creamy dream several times now, testing out different little tweaks, and I’ve finally landed on what I think is THE best version. It’s got that classic sweet and tangy vanilla filling, all nestled in a rich chocolate cookie crust. The texture is just perfect—silky smooth and firm enough to slice beautifully. You’re going to love how little time this takes to put together for such a show-stopping result.

Crafting the Perfect Chocolate Cookie Crust for Your No Bake Vanilla Cheesecake

Let’s talk about the foundation of this amazing dessert: that rich, dark chocolate cookie crust. For this no bake vanilla cheesecake, I swear by crispy chocolate wafer cookies. They grind down beautifully and create a really dense, flavorful base that holds up without being too hard. The secret to a perfect crust is getting those crumbs super fine. If you have a food processor, this is a breeze! Just pulse away until there are no chunky bits left. The finer the crumbs, the better they’ll pack together and create a sturdy base.

Once your cookies are pulverized with a little sugar and salt, you’ll pour in the melted butter and a splash of vanilla. That vanilla in the crust really makes a difference, giving it an extra layer of flavor. You want to process it just until it looks like wet sand and holds together when you pinch it. If you’re doing this by hand with a rolling pin, really get in there and crush those cookies well. Then mix the butter and vanilla thoroughly so every crumb is coated. When you press the mixture into the pan, be firm! I like to use the bottom of a clean measuring cup or a flat-bottomed glass to really compact it evenly across the bottom and up the sides. This ensures your crust won’t crumble when you slice into it. A quick chill in the freezer while you make the filling helps solidify that buttery goodness, making sure it’s rock-solid and ready to hold all that creamy goodness.

Whipping Up the Dreamy No Bake Vanilla Cheesecake Filling

Now for the star of the show: the incredibly smooth and luscious no bake vanilla cheesecake filling. The key here is starting with cream cheese that’s at true room temperature. I mean, leave it out for a good hour or two before you plan to bake. If it’s too cold, it won’t beat into that silky-smooth consistency we’re aiming for, and you’ll end up with lumps. First, give the cream cheese a quick beat on its own until it’s light and fluffy, scraping down the sides of the bowl often to make sure everything gets incorporated.

Next comes the sweetened condensed milk. This is what gives our cheesecake its sweetness and that dense, creamy texture without needing any baking. Mix it in gently until just combined. Don’t go wild with the mixer here; overmixing can introduce too much air, which can make your cheesecake less dense and sometimes prevent it from setting up as firmly. Finally, the lemon juice and vanilla extract go in. The lemon juice might seem like an odd addition, but it’s brilliant – it adds a subtle tang that balances the sweetness of the condensed milk beautifully, and actually helps the cream cheese mixture firm up without any heat. Once everything is mixed just until smooth, quickly transfer it into your chilled crust. A few taps on the counter can help release any tiny air bubbles, and then it’s off to the fridge to set up into pure bliss.

Chilling and Serving Your Perfect Cheesecake

Patience, my friends, is absolutely a virtue when it comes to this no bake vanilla cheesecake. While it’s technically ready after 5 hours in the fridge, I really, really recommend chilling it overnight. That extra time lets all the ingredients meld together, and more importantly, it ensures the cheesecake is perfectly firm and sliceable. There’s nothing worse than cutting into a cheesecake that’s still a little wobbly!

When it’s time for the big reveal, gently unclip the springform pan. If you lined the sides with parchment paper as I suggested, it should come off like a dream, revealing those beautifully clean edges. You can absolutely serve the cake right on the springform base, but if you want to move it to a prettier serving plate, run a thin, serrated knife carefully between the crust and the parchment. Don’t worry if it’s not absolutely perfect; the joy is in the eating! For neat slices, run a large chef’s knife under hot water and wipe it dry between each cut. This creates clean lines and keeps the creamy filling from sticking. A light dusting of cocoa powder or even some fresh berries on top adds a lovely finishing touch. This dessert is such a crowd-pleaser and holds up well in the fridge, so you can make it ahead and enjoy it for a few days.
AD — Mediavine Content 300×250 / Responsive

Why This Recipe Works

This no-bake cheesecake works because of the unique interaction between cream cheese and sweetened condensed milk. The acidity from the lemon juice helps the cream cheese molecules tighten and set, creating a firm, rich texture without the need for eggs or baking. The chilled butter in the crust solidifies, giving a sturdy base that doesn't crumble, making it a simple yet effective dessert.

This creamy no bake vanilla cheesecake feels fancy but is ridiculously easy to make!— Charlotte
AD — Mediavine Native / 728×90 Leaderboard

Prep 15 minutesCook 0 minutesYield One 9-inch round cake
Ingredients
  • 9 oz. crispy chocolate cookies, such as Nabisco chocolate wafers
  • 3 Tbsp. granulated sugar
  • ½ tsp. kosher salt (for the crust)
  • 7 Tbsp. unsalted butter, melted and cooled slightly
  • ½ tsp. vanilla extract (for the crust)
  • 16 oz. cream cheese, at room temperature
  • One 14-oz. can sweetened condensed milk
  • ½ tsp. kosher salt (for the filling)
  • 3 Tbsp. freshly squeezed lemon juice
  • 2 tsp. vanilla extract (for the filling)
  • Optional Dutch-process cocoa powder for dusting
Instructions
  1. Prepare the Pan First things first, grab your 9-inch springform pan. Give it a quick spray with cooking spray or rub it down with a tiny bit of softened butter. Then, for the easiest release, line the bottom and even the sides with parchment paper. This step makes unwrapping your beautiful cake so much smoother!
  2. Make the Chocolate Cookie Crust To get that perfect chocolate crust, either toss your crispy chocolate cookies, 3 tablespoons of granulated sugar, and ½ teaspoon of kosher salt into a food processor. Pulse until the cookies are finely ground into even crumbs. Then, pour in the melted butter and ½ teaspoon of vanilla extract and process again until the mixture clumps together when you squeeze it. If you don't have a food processor, no worries! You can put the dry ingredients in a sturdy, sealed plastic bag, cover it with a kitchen towel, and crush them with a rolling pin. Once you have crumbs, transfer them to a medium bowl and stir in the melted butter and vanilla. Scrape this delicious mixture into your prepared pan and use your fingers or the bottom of a glass to firmly press it into the bottom and about 1 inch up the sides. Pop this crust into the freezer while you work on the filling—it helps it set up nicely.
  3. Whip Up the Creamy Filling Now for the star of the show! In the bowl of a stand mixer fitted with the paddle attachment (or use a large bowl and a hand mixer), briefly beat your room temperature cream cheese on medium-low speed. You just want it smooth and creamy, so scrape down the bowl with a flexible spatula as needed to catch all those bits. Next, add the entire can of sweetened condensed milk and the other ½ teaspoon of kosher salt. Beat just until everything is combined—no need to go crazy here! Finally, mix in the lemon juice and the 2 teaspoons of vanilla extract. As soon as all the ingredients are incorporated, turn off the mixer. Be careful not to overmix it; if you beat the cream cheese too much, it can become runny and won't set up as firmly. Scrape this luscious no bake vanilla cheesecake filling into your chilled crust, smoothing the top with an offset spatula or the back of a butter knife. Cover the cheesecake tightly with plastic wrap and refrigerate it for at least 5 hours, though overnight is truly best for the firmest set.
  4. Serve Your Cheesecake When you're ready to serve, take the cheesecake out of the fridge. Carefully unclip and remove the sides of the springform pan. You can totally serve it right on the pan's base. If you want to move it to a fancy serving plate, carefully slide a long, thin, serrated knife between the crust and the parchment paper on the bottom, then gently transfer it. To get super clean slices, dip a large chef's knife in hot water and wipe it dry between each cut. A little dusting of Dutch-process cocoa powder on top is a lovely finishing touch if you like! Keep any leftovers wrapped snugly in the refrigerator for up to 3 days.
Tested Tip

For the easiest slicing, make sure your cheesecake has chilled overnight. And always, always wipe your knife clean and warm it with hot water between each slice for a perfectly clean cut!

AD — Mediavine Content 300×250 / Responsive

Crafting the Perfect Chocolate Cookie Crust for Your No Bake Vanilla Cheesecake

Whipping Up the Dreamy No Bake Vanilla Cheesecake Filling

Chilling and Serving Your Perfect Cheesecake

Make It Yours

  • Berry Swirl — Before chilling, gently swirl about ½ cup of berry preserves (raspberry or strawberry would be delicious!) into the cheesecake filling with a butter knife for a beautiful marbling effect and a fruity tang.
  • Chocolate Chip Delight — Fold in ½ cup of mini chocolate chips or finely chopped regular chocolate bars into the filling just before pouring it into the crust for little bursts of chocolate in every bite.
  • Espresso Kick — Add 1 teaspoon of instant espresso powder (dissolved in 1 teaspoon of hot water) to the cream cheese mixture along with the vanilla for a subtle, sophisticated coffee note that pairs wonderfully with the chocolate crust.
  • Citrus Zest — Amp up the brightness by adding 1 tablespoon of finely grated orange or lime zest to the filling along with the lemon juice. It gives a lovely aromatic lift to the classic vanilla flavor.
AD — Mediavine Content / Native

FAQ

How long does no bake vanilla cheesecake need to chill?

It needs at least 5 hours in the refrigerator to firm up properly, but for the best texture and easiest slicing, I really recommend chilling it overnight. That extended time ensures it's perfectly set and ready to enjoy.

Can I use other types of cookies for the crust?

Absolutely! While chocolate wafers give a great dark flavor, you can certainly experiment. Graham cracker crumbs, vanilla wafers, or even shortbread cookies would make a fantastic crust. Just make sure they're finely crushed and properly mixed with butter to hold together.

Why is my cheesecake filling not setting?

The most common reasons for a runny filling are using cream cheese that wasn't at room temperature, or overmixing the filling. Overmixing can incorporate too much air, which breaks down the cream cheese's structure. Also, make sure your sweetened condensed milk hasn't expired! A little extra chill time can sometimes help, too.

Can I make this cheesecake ahead of time?

Yes, it’s a perfect make-ahead dessert! You can prepare the entire cheesecake up to 2-3 days in advance. Just keep it covered tightly with plastic wrap in the refrigerator until you're ready to serve. In fact, a little extra chilling time often improves the flavor and texture.

AD — Mediavine 728×90 Leaderboard / Responsive

What To Serve With This

  • Fresh Berries (strawberries, raspberries, blueberries)
  • Chocolate Shavings
  • A dollop of whipped cream
  • A drizzle of caramel sauce
  • Fresh mint sprig for garnish
  • A light dusting of cocoa powder

This post contains affiliate links. We may earn a small commission at no extra cost to you.

More Recipes You'll Love

Tested twice, weeknight-ready, family-approved.