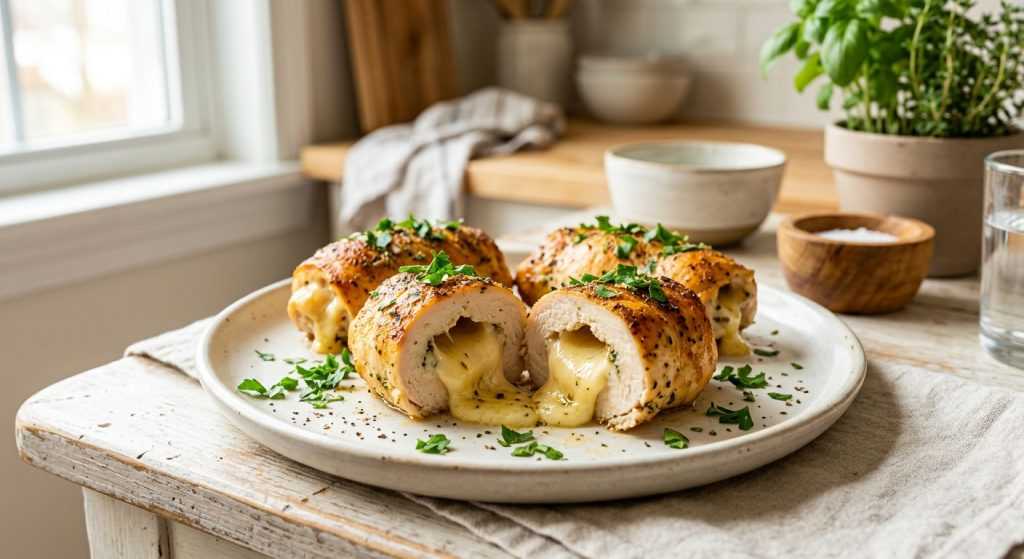
Okay, so you know those nights when you just stare into the fridge hoping dinner will magically appear? Yeah, me too. That’s why I’m so excited about these baked chicken rolls. I’ve made them probably a dozen times, tweaking little things here and there, and they’ve become a total lifesaver for our family. You get tender chicken, a gooey cheese center, and a perfectly crispy, herby coating – all baked in under 20 minutes! This recipe is a staple for busy parents who want something genuinely satisfying without a huge fuss. It’s truly a win-win.
Seriously, I’ve served these on chaotic school nights and even for casual get-togethers, and they always disappear. The best part? You can prep them ahead of time, which is huge for making dinner feel less like a sprint. Pound the chicken, roll in cheese, coat, and bake. It sounds simple because it IS simple, but the flavor payoff is incredible. It’s comforting, satisfying, and a dish I feel good about putting on the table.
Prepping Your Chicken for Perfect Baked Chicken Rolls
The secret to these tender, juicy baked chicken rolls starts with how you handle the chicken breasts. Don’t skip the pounding step! Placing the chicken between waxed paper or plastic wrap makes this a super clean task. Then, using a meat mallet or even a rolling pin, gently but firmly pound each breast to a uniform 1/4-inch thickness. This isn’t just about making them thin enough to roll; it also tenderizes the meat, ensuring that every bite is incredibly soft. Uniform thickness is important so they all cook at the same rate, preventing some from drying out while others are still catching up.
You want to aim for a consistent thickness across the entire breast. If one part is thicker, it will cook slower and could make your roll uneven. Seasoning at this stage is also crucial. A good sprinkle of salt and pepper on both sides permeates the chicken before it’s even rolled, laying a foundational layer of flavor. It’s a small step that makes a big difference in the final taste. Take your time here – a well-prepped chicken breast makes for a much easier rolling process later on, and a much more satisfying end result.
Rolling and Coating Your Cheese-Filled Chicken
Now for the fun part – assembling your cheesy chicken rolls! The Muenster cheese is a great choice here because it melts beautifully, but doesn’t get overly greasy. When you place the cheese stick at the short end of your pounded chicken breast, make sure there’s enough chicken around it to completely enclose the cheese. This is key to preventing those cheesy explosions in the oven. Roll it up tightly, tucking in the sides as you go, almost like you’re wrapping a tiny burrito. If your cheese stick is a little long, just trim it so it’s flush with the ends of the chicken. Nobody wants lost cheese!
Next, the coating! Before you dip, give each roll a quick brush with olive oil. This isn’t just for flavor; it acts like a delicious glue, helping those seasoned breadcrumbs really cling to the chicken. It also contributes to that gorgeous golden-brown color and crispy texture we’re aiming for. The breadcrumb mixture, with its paprika and thyme, gives such a comforting, savory aroma as it bakes. Press the crumbs onto the chicken gently but firmly from all sides to ensure an even coat. This forms a protective and flavorful crust that locks in moisture and adds a delightful crunch.
Baking Your Baked Chicken Rolls to Golden Perfection
Once your chicken rolls are neatly coated and lined up on your prepared baking sheet, they’re ready for their oven spa treatment! Into the preheated 400°F oven they go, seam-side down. This helps keep them from unrolling as they bake and gives the seam a chance to crisp up nicely. The baking time for these is incredibly quick – usually around 15 minutes. This is where the thinness of your pounded chicken really shines; it cooks through fast, keeping the chicken moist and tender.
Keep an eye on them towards the end. You’re looking for that perfect golden brown crust. It should look invitingly crisp, and when you gently press it, it should feel firm. If you’re unsure, you can always check the internal temperature of one of the rolls with a meat thermometer; it should register 165°F. Resist the urge to open the oven door too often, as this can drop the temperature and extend baking time. Once they’re done, pull them out and let them rest on the baking sheet for just a minute or two before serving. This allows the juices to redistribute, making for an even juicier bite. Enjoy the incredible aroma that fills your kitchen!