Easy Baked Buffalo Chicken Jalapeño Poppers

TOTAL TIME
SERVES
COURSE
DIFFICULTY
Tested5× before publishing

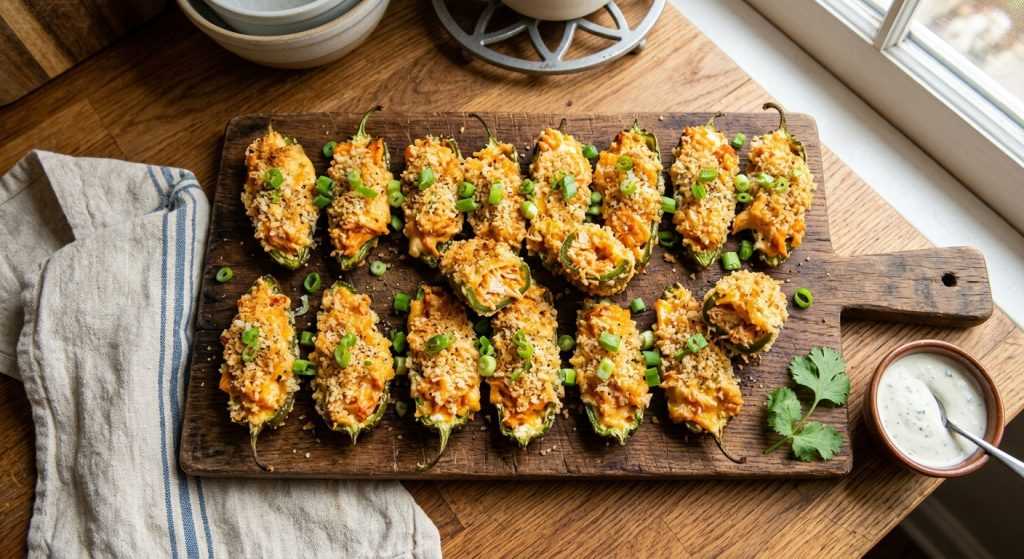
Alright, busy parents, let’s talk appetizers! Sometimes you just need something that feels a little special, a little celebratory, but doesn’t take all day to make. That’s exactly why I love these baked buffalo chicken jalapeno poppers. They’re savory, they’ve got that perfect kick, and honestly, they disappear faster than a clean countertop in a house full of toddlers.

I’ve tested this recipe so many times, perfecting the balance of creamy, spicy, and crunchy. It’s one of those snacks that makes everyone happy, whether it’s game day, a casual get-together with friends, or just a Tuesday night when you’re craving something fun. Forget deep frying; we’re baking these beauties, so they come out wonderfully crisp without all the extra oil and mess. You’ll feel like a kitchen wizard, I promise!

Prepping Your Jalapeños: Safety First!

When you’re dealing with jalapeño peppers, the absolute first thing you need to do is put on some rubber gloves. Seriously, this isn’t an optional step! The capsaicin, which is the compound that makes peppers spicy, can really irritate your skin, and it’s super easy to accidentally touch your face or eyes later, even after washing your hands. Trust me, you do not want to experience that burn.

Once your hands are protected, you’ll slice each pepper in half lengthwise. You want nice, even halves so they bake consistently. Then comes the scooping. The seeds and, crucially, the white membrane inside the pepper are where the vast majority of the heat is concentrated. Use a small spoon, a grapefruit spoon, or even a melon baller to carefully scrape out every bit of that white pith and all the seeds. The cleaner you get them, the milder your baked buffalo chicken jalapeno poppers will be. If you like a lot of heat, you can leave a little bit of the membrane, but for a family-friendly appetizer, I usually aim for a pretty thorough clean-out. Choose peppers that are firm and bright green for the best texture and flavor.

Crafting the Creamy Buffalo Chicken Filling

This filling is what makes these poppers so incredibly satisfying. We’re starting with 1/3 less fat cream cheese, which keeps things a little lighter without sacrificing any of that creamy goodness. Make sure your cream cheese is softened to room temperature before you start mixing. This makes it so much easier to get a smooth, lump-free filling. If it’s too cold, you’ll end up with stubborn little chunks that won’t blend.

Next up are the sharp cheddar and green scallions. The cheddar adds a lovely savory, cheesy depth, and those fresh scallions bring a subtle oniony bite that really brightens the whole mixture. Stir those together well, then it’s time for the stars: cooked shredded chicken and your favorite buffalo wing sauce. You can use leftover rotisserie chicken, or boil and shred a couple of chicken breasts just for this. The buffalo sauce not only adds that signature tangy heat but also helps bind everything together. Mix it all until the chicken is evenly coated and the filling looks creamy and uniform. It should be thick enough to hold its shape when you scoop it into the peppers.

Achieving That Perfect Golden-Crisp Exterior

The crunchy coating is key to the deliciousness of these poppers, and panko breadcrumbs are our secret weapon here. Panko is lighter and flakier than regular breadcrumbs, which means it gets extra crispy in the oven. We’re seasoning the panko with paprika, garlic powder, and chili powder. These spices don’t just add flavor; they also help create that beautiful golden-brown color we’re looking for. A pinch of salt and pepper rounds out the seasoning perfectly.

Once your jalapeños are filled, it’s time for the dip-and-dredge. First, a quick dip in beaten egg whites. The egg whites act like glue, helping the panko stick to the smooth pepper surface and the creamy filling. Let any excess egg white drip off so you don’t end up with a gummy coating. Then, gently press the pepper into the seasoned panko, making sure every surface, especially the filling, is completely covered. Be gentle but firm to ensure good adhesion. Finally, a light mist of cooking spray over all the coated poppers before they go into the oven is super important. This helps the panko crisp up and turn that gorgeous golden color without needing to deep-fry. Bake until they look irresistible, then enjoy!
AD — Mediavine Content 300×250 / Responsive

Why This Recipe Works

These poppers combine creamy, savory, and spicy flavors with a satisfying crisp exterior from the panko. Baking instead of frying makes them lighter, and the balance of ingredients ensures they're flavorful without being overly hot.

Who knew an appetizer could be this easy AND this impressive? These poppers are a total win!— Charlotte
AD — Mediavine Native / 728×90 Leaderboard

Prep 20 minutesCook 25 minutesYield 20 poppers (10 whole peppers)
Ingredients
  • 10 jalapeño peppers, sliced in half lengthwise
  • 4 ounces 1/3 less fat cream cheese, softened
  • 3 medium scallions, green parts only, chopped
  • 2 ounces shredded low-fat sharp cheddar cheese (like Cabot 50%)
  • 4 ounces cooked shredded chicken
  • 1/4 cup buffalo wing sauce (such as Frank's RedHot)
  • 1/2 cup beaten egg whites
  • 3/4 cup panko breadcrumbs (or gluten-free panko)
  • 1/8 teaspoon paprika
  • 1/8 teaspoon garlic powder
  • 1/8 teaspoon chili powder
  • Pinch of salt and freshly ground black pepper
  •  Cooking spray
Instructions
  1. Prep Your Oven & Pan Preheat your oven to 350°F. Grab a large baking sheet and line it with parchment paper or aluminum foil. Lightly mist the lined sheet with cooking spray to prevent sticking later on.
  2. Tackle the Jalapeños It's glove time! Seriously, wear rubber gloves for this step. Carefully slice each jalapeño pepper in half lengthwise. Using a small spoon or a melon baller, scoop out all the seeds and the white membrane. This is where most of the heat lives, so removing it helps make the poppers more enjoyable for everyone.
  3. Mix the Creamy Filling In a medium bowl, combine the softened 1/3 less fat cream cheese, the shredded low-fat sharp cheddar, and the chopped green parts of the scallions. Stir well until everything is nicely combined. Now, fold in the cooked shredded chicken and the buffalo wing sauce. Give it another good mix, making sure the chicken is evenly coated and the filling is uniform.
  4. Season the Panko In a separate shallow bowl, combine the panko breadcrumbs, paprika, garlic powder, chili powder, and a pinch of salt and pepper. Stir these dry ingredients together until they’re well blended. This seasoned panko is going to give us that fantastic crispy exterior.
  5. Fill & Coat the Poppers Using a small spoon or a spatula, carefully fill each jalapeño half with a generous amount of the chicken and cheese filling. Don't overfill, but make sure they're nice and plump. Next, take each filled pepper half, dip it into the beaten egg whites, letting any excess drip off, then immediately press it into the seasoned panko mixture to completely coat the filling and the pepper itself. Place the coated poppers onto your prepared baking sheet.
  6. Bake to Golden Perfection Once all your poppers are filled and coated, give them another light mist of cooking spray. This helps them get beautifully golden and extra crispy in the oven. Bake for about 25 to 30 minutes, or until the panko is golden brown and the filling is bubbly. Keep an eye on them towards the end so they don't get too dark.
  7. Serve Hot Carefully remove the baking sheet from the oven. Let them cool just for a minute or two before serving immediately. These are best enjoyed hot and fresh!
Tested Tip

For the cleanest jalapeño prep and to avoid any spicy skin irritation, always wear disposable rubber gloves when slicing and seeding the peppers.

AD — Mediavine Content 300×250 / Responsive

Prepping Your Jalapeños: Safety First!

Crafting the Creamy Buffalo Chicken Filling

Achieving That Perfect Golden-Crisp Exterior

Make It Yours

  • Extra Spicy Kick — If your family loves heat, finely mince a quarter of one of the jalapeño membranes and mix it into the chicken filling. You can also add a tiny pinch of cayenne pepper to the panko mixture.
  • Cheese Please! — Feel free to experiment with other shredded cheeses in the filling. A little Monterey Jack or pepper jack would also be delicious and melt beautifully.
  • Vegetarian Version — Skip the chicken and add some finely chopped sautéed mushrooms or black beans to the cream cheese mixture for a hearty vegetarian option. You could also try some finely diced cooked bell pepper.
  • Gluten-Free Option — This recipe is super easy to make gluten-free! Just swap out regular panko breadcrumbs for a good quality gluten-free panko. The texture will be just as wonderfully crisp.
AD — Mediavine Content / Native

FAQ

Can I make these jalapeño poppers ahead of time?

Yes, you absolutely can! Prepare the poppers up to the point of coating them in panko. Arrange them on a baking sheet, cover loosely with plastic wrap, and refrigerate for up to 24 hours. When you're ready to bake, mist with cooking spray and bake as directed, adding a few extra minutes to the cooking time if they're still very cold.

How do I store leftover baked buffalo chicken jalapeño poppers?

Leftovers can be stored in an airtight container in the refrigerator for up to 3 days. To reheat, place them on a baking sheet in a 350°F oven for about 10-15 minutes, or until warmed through and re-crisped. The microwave will make them soft, so the oven is best for texture.

What if my jalapeños are too spicy, even after de-seeding?

Sometimes you get a super hot pepper! To further reduce the heat, you can soak the scooped-out jalapeño halves in ice water for about 15-30 minutes before filling. Just be sure to pat them completely dry with paper towels before adding the filling.

Can I use different types of chicken?

Absolutely! Cooked rotisserie chicken is a huge time-saver and works wonderfully. You can also boil or bake chicken breasts and shred them yourself. Just make sure the chicken is fully cooked and shredded before mixing it into the filling.

AD — Mediavine 728×90 Leaderboard / Responsive

What To Serve With This

  • Cool Ranch Dressing
  • Blue Cheese Dip
  • Celery Sticks
  • Carrot Sticks
  • Simple Green Salad

This post contains affiliate links. We may earn a small commission at no extra cost to you.

More Recipes You'll Love

Tested twice, weeknight-ready, family-approved.