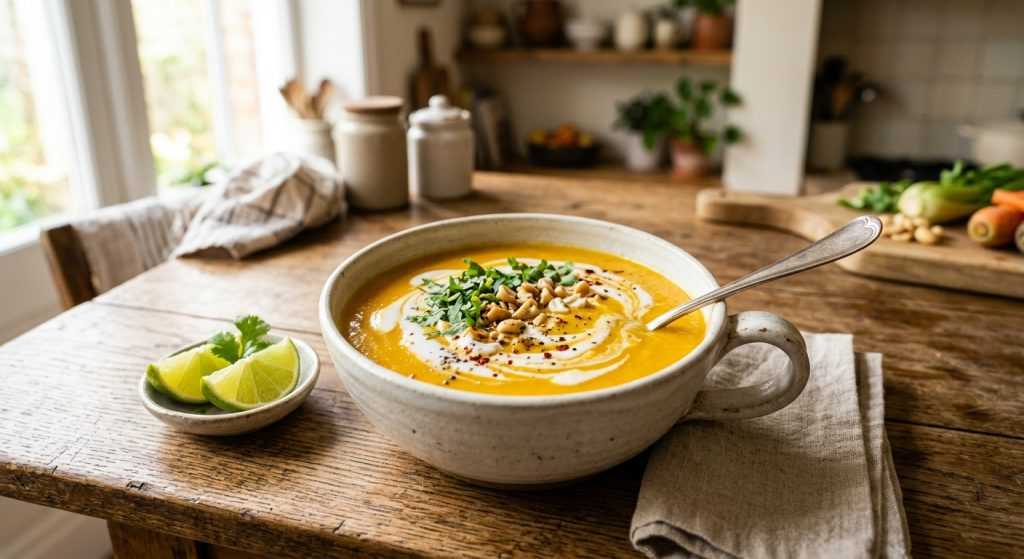
Easy Instant Pot Butternut Squash Soup (Thai Inspired!)

TOTAL TIME
SERVES
COURSE
DIFFICULTY
Tested5× before publishing

Hey friends! If you’re looking for a super cozy and flavorful instant pot butternut squash soup that practically makes itself, you’ve totally found it. I’ve been making variations of this for years, and this Instant Pot version is truly a weeknight lifesaver. It’s got that lovely sweet-savory balance with a hint of warmth from the curry, and it just feels like a hug in a bowl, especially when the evenings start getting a little chilly.

I know we’re all juggling a million things, so anything that saves time without sacrificing flavor is a win in my book. I tested this recipe a few times to get the spices and consistency just right, and it consistently turns out thick, creamy, and wonderfully aromatic. Seriously, your kitchen will smell amazing. It’s also surprisingly simple to pull together, even after a chaotic day!

Getting Started: Prepping Your Butternut Squash for Instant Pot Butternut Squash Soup

Okay, let’s talk prep! The hardest part of making an instant pot butternut squash soup, honestly, is usually dealing with the squash itself. But don’t worry, I’ve got a couple of tricks to make it easier. First, pick a good squash – one that feels heavy for its size and has no soft spots. To peel it, I usually cut the squash into a few large sections first, often slicing off the top and bottom, then cutting it right where the neck meets the fatter bulbous part. This makes it much more manageable.

Once you have those sections, a good sturdy vegetable peeler works wonders. Or, if you’re feeling bold, a sharp chef’s knife can remove the skin in strips. Then, scoop out the seeds from the bulb section. Aim for roughly 3/4-inch cubes. Uniformity here helps everything cook evenly, so try not to have super tiny pieces next to huge chunks. While you’re chopping, get your onions and carrots diced. Mincing the garlic and ginger is next – these aromatic powerhouses are what give this soup such a rich, warming base. Having everything prepped before you even turn on the Instant Pot makes the rest of the cooking process super smooth and less stressful!

Instant Pot Magic: Building Flavor and Pressure Cooking

Now for the fun part – watching the Instant Pot do its thing! Start by hitting that “Sauté” button on your Instant Pot. Make sure it’s on “Normal” setting. When it says “Hot” (usually after a minute or two), go ahead and add your water or oil. I usually opt for water here to keep it lighter, but a little oil works too. Toss in your diced onion and carrots, along with the minced garlic, ginger, and a pinch of salt. Give it a good stir and let it sauté for about 3-5 minutes. You’re looking for the onions to become translucent and soften up a bit, giving off a lovely sweet aroma. Don’t rush this step; building this aromatic base is key for a truly flavorful soup.

Next, stir in the red curry paste. Let it cook for just about a minute, stirring constantly. This step is fantastic because it “blooms” the curry paste, waking up all those amazing spices and making your kitchen smell absolutely incredible. After that, press “Cancel” to turn off the sauté function. Add your cubed butternut squash, vegetable broth, and the cayenne if you’re feeling a little extra heat. Stir everything together well, making sure the squash is mostly submerged in the liquid. Secure the lid, make sure the valve is set to “Sealing,” and cook on HIGH pressure for 8 minutes. Once the timer beeps, let it naturally release the steam for about 20 minutes. If you’re really in a hurry, you can do a quick release after about 10 minutes, but the natural release helps keep the soup creamy and prevents any potential scorching.

The Creamy Finish: Blending and Perfecting Your Soup

Once the pressure has fully released and the valve drops, it’s time to carefully open that lid! Be ready for a burst of delicious steam. You’ll see your butternut squash will be super tender, practically falling apart. Now for the creamy goodness: stir in the full-fat coconut milk and, if your squash isn’t super sweet on its own, a little maple syrup. I find that the sweetness of butternut squash can vary a lot, so tasting here is important. If it’s already naturally sweet, you might not need any maple syrup at all, which is great!

Next, grab your immersion blender. This is seriously one of my favorite kitchen tools for soups – no transferring hot liquid to a regular blender! Just dunk it right into the pot and blend until the soup is perfectly smooth and creamy. If you don’t have an immersion blender, no worries. Just let the soup cool down a bit before carefully transferring it in batches to a regular blender. Make sure not to overfill it, and hold down the lid with a kitchen towel to prevent any hot splashes. Once it’s all blended, give it a taste test. This is your moment to be the chef! Need more creaminess? Add a splash more coconut milk. Want more curry kick? A bit more paste. A dash more salt can really make all the flavors sing. You can even add another tiny pinch of cayenne for more warmth if you like. Adjust until it’s just right for your taste buds.

Stovetop Simplicity: Making Butternut Squash Soup Without the Instant Pot

Don’t have an Instant Pot yet, or maybe it’s just doing duty as a yogurt maker today? No problem! This butternut squash soup is just as delicious made the old-fashioned way on the stovetop. You’ll start by heating a large pot or Dutch oven over medium heat. Add your water or oil, then the onion, carrots, minced garlic, ginger, and salt. Sauté everything for about 2 minutes, stirring frequently until the onions become soft and translucent. The key here is to soften those veggies and build that aromatic base, just like in the Instant Pot version. Your kitchen will start to smell amazing already!

Next, stir in your red curry paste and let it cook for about a minute, stirring it around so those flavors can really bloom. After that, add the cubed butternut squash, vegetable broth, and the optional cayenne. Give everything a good stir to combine it all. Bring the mixture to a low boil over medium heat, then reduce the heat to low, pop a lid on, and let it simmer away for about 15-20 minutes. You’ll know it’s ready when the butternut squash is fork-tender. Once it’s soft, stir in the coconut milk and maple syrup (if you’re using it). Finally, grab your immersion blender and blend until it’s super smooth and creamy. Taste and adjust the seasonings as needed – a little more salt, curry paste, or maple syrup can make all the difference. Enjoy!
AD — Mediavine Content 300×250 / Responsive

Why This Recipe Works

This recipe works wonders because the Instant Pot does all the heavy lifting, tenderizing the squash quickly while infusing it with deep Thai-inspired flavors. Sautéing the aromatics first builds a robust base, and the full-fat coconut milk adds incredible creaminess without needing any dairy, making it super comforting. Plus, the natural release period lets all those flavors meld together perfectly.

This soup is like a warm, comforting hug in a bowl, perfect after a busy day!— Charlotte
AD — Mediavine Native / 728×90 Leaderboard

Prep 30Cook 30Yield 4
Ingredients
  • 1/4 cup water (or 2 teaspoons oil)
  • 1 cup diced yellow or white onion (about 1 small onion)
  • 1 cup peeled and diced carrots (about 2-3 carrots)
  • 3 cloves garlic, minced
  • 1 tablespoon fresh minced ginger (about a 1-inch piece)
  • 1/2 teaspoon sea salt (plus more to taste)
  • 2 tablespoons red curry paste
  • 6 cups cubed butternut squash, peeled and cut into about 3/4-inch cubes (from 1 large squash)
  • 3 cups vegetable broth
  • 1/8 teaspoon ground cayenne (optional, adjust based on curry paste spice level)
  • 1 cup canned full-fat coconut milk (plus more for garnish, if desired)
  • 2-3 teaspoons maple syrup (optional, depending on the sweetness of your squash)
Instructions
  1. Instant Pot Method 
  2. Step 1: Sauté Aromatics Turn on the 'Sauté' function on your Instant Pot (set to 'Normal'). Once hot, add 1/4 cup water (or 2 teaspoons oil), diced onion, carrots, minced garlic, fresh minced ginger, and 1/2 teaspoon sea salt. Stir well and sauté for 3-5 minutes, stirring frequently, until the onion becomes translucent and softened.
  3. Step 2: Bloom Curry Paste Add the red curry paste to the pot. Stir constantly for 1 minute until the vegetables are well coated and the paste becomes fragrant. This step really brings out the flavors!
  4. Step 3: Add Squash and Broth Press 'Cancel' to turn off the sauté function. Now, add the cubed butternut squash, vegetable broth, and the optional ground cayenne. Give everything a good stir to combine.
  5. Step 4: Pressure Cook Secure the Instant Pot lid, making sure the steam release valve is set to 'Sealing'. Pressure cook on HIGH for 8 minutes. Once the timer finishes, let the steam release naturally for about 20 minutes (the float valve will drop on its own). If you're really in a rush, you can carefully do a quick release after about 10 minutes. Press 'Cancel' to turn off the Instant Pot.
  6. Step 5: Creamy Finish When the pressure has fully released and the valve drops, carefully open the lid. Stir in the canned full-fat coconut milk and the optional maple syrup (adjust sweetness to your liking, depending on your squash). You can add more coconut milk now for extra creaminess if desired.
  7. Step 6: Blend and Season Purée the soup directly in the pot using an immersion blender until it's perfectly smooth and creamy. (Alternatively, let it cool slightly and blend in batches in a high-speed blender.) Taste and adjust the seasonings – you might want more salt, a little extra curry paste for flavor, or more maple syrup for sweetness. Add a pinch more cayenne if you like a spicier kick!
  8. Stovetop Method 
  9. Step 1: Sauté Aromatics (Stovetop) Heat a large pot or Dutch oven over medium heat. Add 1/4 cup water (or 2 teaspoons oil), diced onion, carrots, minced garlic, fresh minced ginger, and 1/2 teaspoon sea salt. Stir and sauté for 2 minutes, stirring frequently, until the onion is translucent and softened.
  10. Step 2: Bloom Curry Paste (Stovetop) Add the red curry paste and stir for 1 minute, ensuring everything is well coated and fragrant.
  11. Step 3: Simmer Squash (Stovetop) Add the cubed butternut squash, vegetable broth, and the optional ground cayenne. Stir to combine. Bring the mixture to a low boil over medium heat, then reduce the heat to low. Cover the pot and simmer for 15-20 minutes, or until the butternut squash is fork-tender.
  12. Step 4: Creamy Finish (Stovetop) Remove from heat. Stir in the canned full-fat coconut milk and the optional maple syrup (adjust sweetness based on your squash). You can add more coconut milk for extra creaminess here if you wish.
  13. Step 5: Blend and Season (Stovetop) Purée the soup directly in the pot using an immersion blender until smooth. (Or let cool slightly and blend in batches in a high-speed blender.) Taste and adjust seasonings as needed, adding more salt, curry paste, or maple syrup until it's perfect for you. A little extra cayenne can be added for more warmth if you like.
  14. Serving & Storage Garnish your warm bowl of soup with a swirl of full-fat coconut milk, a dash of sriracha or cayenne, chopped roasted cashews, and/or fresh lime wedges, if desired. Leftovers will keep beautifully in an airtight container in the refrigerator for 4-5 days, or you can freeze it for up to 1 month. Reheat gently in a saucepan on the stovetop.
Tested Tip

For easy butternut squash prep, poke the whole squash with a fork a few times, then microwave it for 3-5 minutes. It softens the skin and makes it so much easier (and safer!) to peel and chop. You'll thank me later!

AD — Mediavine Content 300×250 / Responsive

Getting Started: Prepping Your Butternut Squash for Instant Pot Butternut Squash Soup

Instant Pot Magic: Building Flavor and Pressure Cooking

The Creamy Finish: Blending and Perfecting Your Soup

Stovetop Simplicity: Making Butternut Squash Soup Without the Instant Pot

Make It Yours

  • Extra Spice Kick — If you love things with a bit more heat, double the cayenne or add a dash of Sriracha when serving. You could even sauté a finely diced jalapeño with the onions for a fresh pop of spice.
  • Protein Power-Up — For a more substantial meal, add cooked, shredded chicken or plant-based protein like chickpeas at the end. It'll absorb all those lovely flavors.
  • Herbaceous Freshness — Stir in some fresh chopped cilantro or a squeeze of lime juice right before serving to brighten up the flavors. The acidity from the lime really makes everything sing.
  • Sweetness Swap — Instead of maple syrup, you can use a tiny pinch of brown sugar or even a Medjool date (pitted and blended in with the soup) for a natural touch of sweetness.
AD — Mediavine Content / Native

FAQ

Can I make this soup ahead of time?

Absolutely! This butternut squash soup actually tastes even better the next day as the flavors have more time to deepen. Store leftovers in an airtight container in the refrigerator for 4-5 days, or freeze it for up to a month.

What if I don't have an immersion blender?

No problem! Just let the soup cool down for about 15-20 minutes, then carefully transfer it in batches to a high-speed blender. Make sure not to overfill the blender, and always hold the lid on tightly with a kitchen towel when blending hot liquids.

How do I adjust the thickness of the soup?

If your soup is too thick for your liking, you can thin it out with a little extra vegetable broth or water until it reaches your desired consistency. If it's too thin, you can simmer it gently on the stovetop for a bit longer, uncovered, to allow some of the liquid to evaporate, or blend in a bit more cooked squash if you have any.

Can I use frozen butternut squash?

Yes, you can! If using frozen, pre-cut butternut squash, you can usually add it directly to the Instant Pot without thawing. Just make sure the pieces are similar in size to what’s called for in the recipe. The cooking time should remain largely the same.

Is this soup vegan and gluten-free?

Yes, it is! As long as you use vegetable broth and full-fat coconut milk, this soup is naturally vegan and gluten-free, making it a wonderful option for various dietary needs.

AD — Mediavine 728×90 Leaderboard / Responsive

What To Serve With This

  • Crusty Bread or Garlic Naan
  • A Simple Green Salad
  • Rice Noodles (for a more substantial meal)
  • Spring Rolls (store-bought or homemade)
  • Grilled Cheese Sandwiches (for a classic combo!)

This post contains affiliate links. We may earn a small commission at no extra cost to you.

More Recipes You'll Love

Tested twice, weeknight-ready, family-approved.