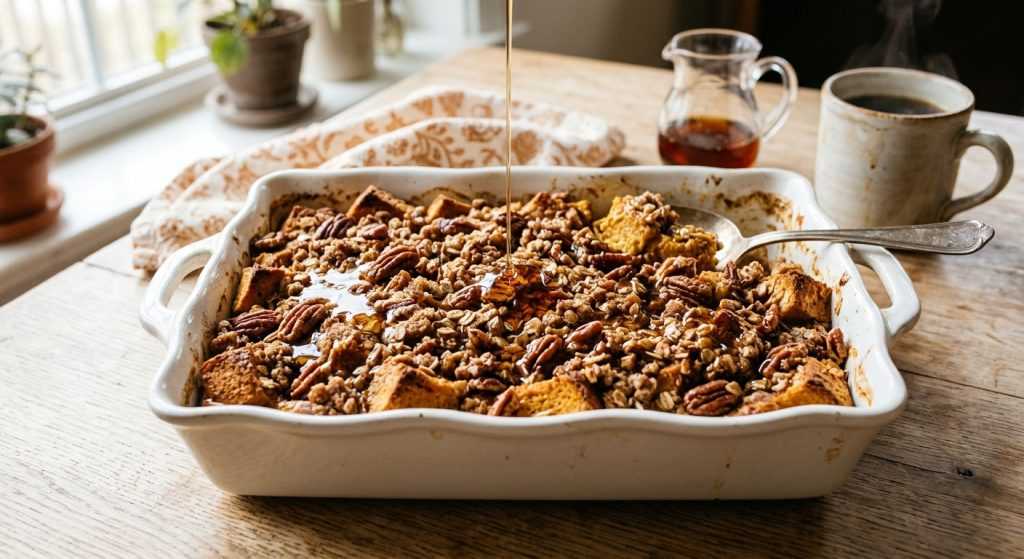
There’s nothing quite like the smell of fall spices baking in the oven on a crisp morning, and this **overnight pumpkin french toast casserole** brings all those cozy vibes right to your kitchen. Seriously, it’s like a warm hug in a baking dish! As busy parents, we all know how crazy mornings can get, so having breakfast already prepped and waiting for you is such a win. I’ve made this recipe countless times, trying different breads and tweaking the spices, and this version is truly fantastic.
Imagine waking up, popping a dish into the oven, and then relaxing with your coffee while your house fills with the aroma of pumpkin and cinnamon. That’s the dream, right? This casserole is hearty, comforting, and has that perfect balance of sweet and spice. The best part? Most of the work happens the night before, leaving your mornings free for whatever craziness (or calm!) the day brings. It’s a wonderful way to kick off a weekend or even a special weekday.
Prepping Your Bread for the Best Overnight Pumpkin French Toast Casserole
The secret to a fantastic French toast casserole really starts with the bread, and it might not be what you expect! You want your bread to be a little bit… dry. Not rock hard, but definitely not fresh and soft. When you cut your French bread, brioche, challah, or even sourdough into those 1-inch cubes, the goal is to give them some time to air out. Leaving them uncovered on the counter for a few hours or even overnight lets them get a little stale. Why does this matter? Well, dry bread is like a sponge, ready to soak up all that delicious pumpkin custard without falling apart or getting super soggy. If your bread is too fresh, it can just turn into a mushy mess once it hits the liquid, and nobody wants that! It’s worth the small extra step of planning ahead, I find.
If you’re in a pinch and completely forgot to dry out your bread (we’ve all been there!), don’t panic. You can do a quick cheat by spreading the cubes on a baking sheet and popping them into a 250°F oven for about 15-20 minutes. You’re not trying to toast them, just to gently dry them out. They should feel firm to the touch but not hard. This quick bake helps pull out some of that excess moisture, making them much more receptive to soaking up all the custardy goodness. Once they’re out, let them cool down before moving on to the next step. It’s a small detail, but it makes a big difference in the final texture of your French toast casserole.
Crafting That Perfect Pumpkin Custard
Now for the heart of our casserole: the pumpkin custard! This is where all those warm fall flavors come to life. In a big bowl, you’ll combine the smooth pumpkin puree with brown sugar, which adds a lovely deep sweetness, and pumpkin pie spice. Don’t skimp on the spice here; it’s what really makes this dish sing, giving it that comforting aroma of cinnamon, nutmeg, ginger, and cloves. Then, you’ll whisk in your eggs, which are crucial for giving the custard its rich, binding structure, and whole milk for creaminess. Finish it off with a good splash of pure vanilla extract – it always seems to tie all the flavors together so beautifully.
You want to whisk all these ingredients together until the mixture is completely smooth and evenly colored. There shouldn’t be any streaks of egg or unincorporated spice. It should look like a silky, light orange dream. Once your custard is ready, pour it slowly and evenly over your prepared bread cubes. Take your time to make sure every piece of bread gets a good drenching. The key here is allowing those bread cubes to truly soak up the custard. This is why the overnight chill is so important. It gives the bread ample time to absorb the liquid, ensuring that every bite of your baked casserole will be moist, flavorful, and custardy, instead of just dry bread with some topping. This soaking step makes all the difference for a truly amazing breakfast.
The Secret to a Deliciously Crunchy Pecan Crumble
What’s a cozy casserole without a delightful topping? For this pumpkin French toast, we’re making a simple yet incredibly effective pecan crumble. This topping adds a wonderful texture contrast to the soft, custardy bread underneath. You’ll start by mixing brown sugar, all-purpose flour, and ground cinnamon in a separate bowl. This base provides a lovely spiced sweetness. Now, here’s where a little technique comes in: you’ll add cold, cubed unsalted butter to this mixture. The cold butter is key! When you cut it into the dry ingredients using a pastry blender, a fork, or even just your fingertips, you’re aiming for pea-sized crumbles. The goal is to keep the butter bits distinct and cold.
Why cold butter? As the casserole bakes, those tiny pieces of cold butter slowly melt, creating little pockets of steam that make the topping extra crispy and delicious. If your butter is too warm, it’ll just blend into a paste, and you won’t get that wonderful crumbly texture. After you’ve got your perfect crumbles, stir in the roughly chopped pecans. These add a fantastic nutty crunch that complements the pumpkin flavors perfectly. Make sure to keep this topping chilled in the refrigerator until right before you’re ready to bake. A cold topping means it will stay on top of the casserole during baking, rather than sinking down into the custard. It’s a little trick that ensures every forkful has that satisfying crunch!
Baking Your Way to Breakfast Bliss
Finally, it’s time for the oven to work its magic! When you’re ready to bake, pull your casserole out of the fridge – it’s okay if it’s been chilling for hours or even overnight. Preheat your oven to a steady 350°F. Once the oven is hot, sprinkle that beautiful, chilled pecan crumble evenly over the top of your soaked bread. You want a good, consistent layer across the whole dish so every serving gets some of that delightful crunch. Pop it into the oven, uncovered, for the first 20 minutes. This initial uncovered bake helps the topping get a head start on browning and crisping up.
After that first 20 minutes, you’ll want to gently cover the dish with aluminum foil. This step is important because it prevents the topping from getting too dark or even burning while the casserole finishes cooking through. Continue baking for another 25-35 minutes. How do you know it’s done? The center should look set and firm when you gently jiggle the baking dish. There shouldn’t be any runny liquid. Once it’s golden brown and cooked through, take it out of the oven. It will deflate just a little as it cools, which is totally normal. Let it rest for about 5 minutes before serving. This brief rest helps the casserole set up even more and makes it easier to scoop. Then, a generous drizzle of pure maple syrup is the ultimate finishing touch!