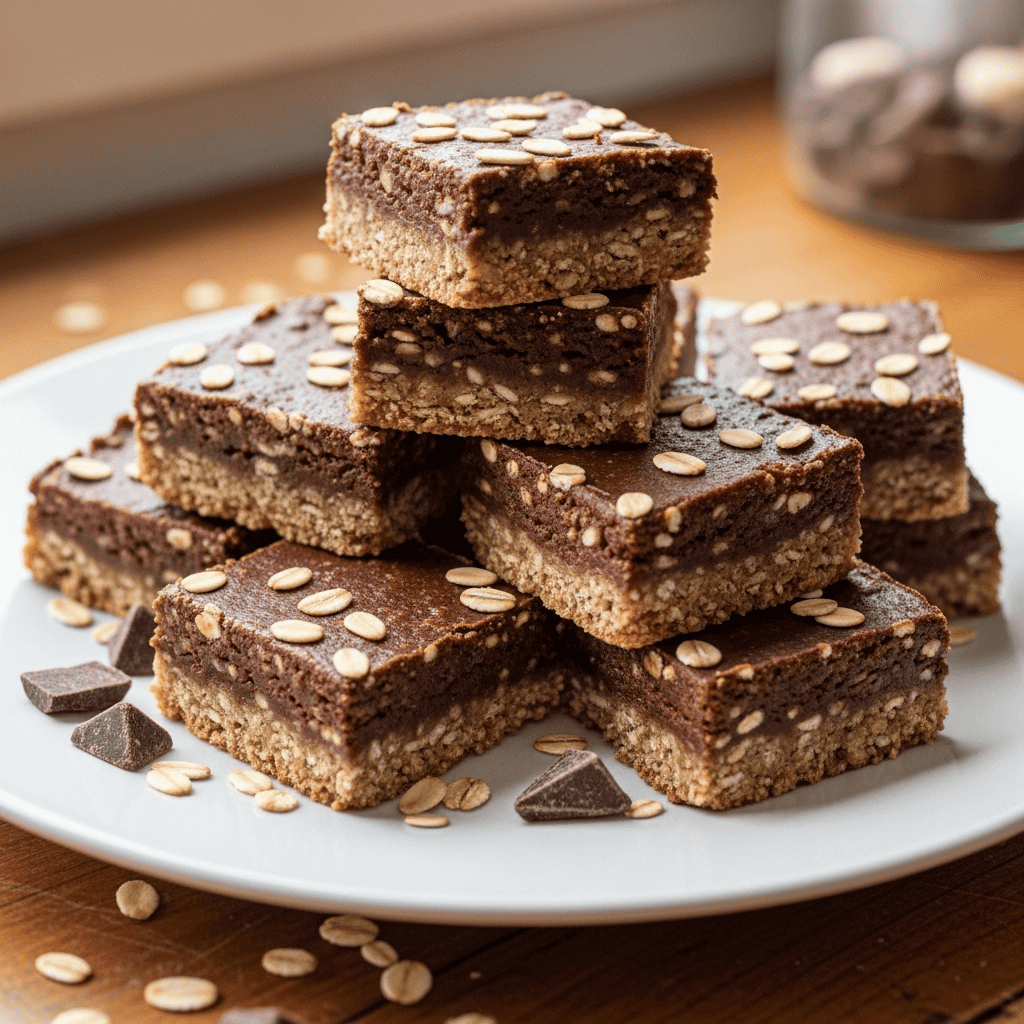
Easy No Bake Chocolate Oat Bars: Your New Favorite Snack!

TOTAL TIME
SERVES
COURSE
DIFFICULTY
Tested5× before publishing

Hey friends! Today, I’m so excited to share my go-to recipe for the BEST no bake chocolate oat bars. Seriously, sometimes you just need a treat that comes together fast, doesn’t require turning on the oven, and still feels really satisfying. These bars hit all those marks, and I’ve made them probably a dozen times, tweaking little things to get them just right for busy weeknights or a quick afternoon pick-me-up.

I originally stumbled on a version of these years ago, craving something chocolatey but not wanting a huge baking project. After testing them out, adding my own little twists, I’ve got this super simple method down. They’re perfectly chewy, with a nice little crunch from the rice cereal, and that classic chocolate-peanut butter combo that everyone seems to love. Plus, they stay good in the fridge for ages, making them perfect for a little make-ahead magic!

Getting Started with Your No Bake Chocolate Oat Bars

Alright, let’s talk about the setup for these easy no bake chocolate oat bars. The very first thing you want to do is grab your 9-inch square baking pan and line it with parchment paper. Don’t skip this step! It makes a world of difference when it’s time to take your delicious bars out and cut them neatly. I always leave a bit of an overhang on two sides so I have handles to lift. It’s a small detail that saves you from scraping and frustration.

Next up, you’ll melt the base. Get a medium saucepan on the stove over medium heat. Add your coconut oil and semi-sweet chocolate chips. Now, be patient here. Stir often! You want this to melt smoothly into a beautiful, shiny chocolate liquid, not scorch on the bottom. Once it’s completely melted and smooth, take it off the heat right away. This prevents any overheating and keeps your chocolate mixture perfect for the next step. Then, stir in the peanut butter and maple syrup until everything is perfectly blended. It should look like a rich, luscious sauce.

Mixing and Chilling for Perfect Bars

Now for the fun part: mixing! In a separate bowl, toss together your old-fashioned oats, crispy rice cereal, and whatever add-ins you’re using. I usually do a quick whisk with a fork to make sure everything is evenly distributed. This ensures you get that great texture in every bite.

Pour your warm, gorgeous chocolate-peanut butter concoction over the dry ingredients. Give it a really good stir until every single oat and piece of cereal is coated. It will feel a little sticky and wet, but that’s exactly what you want. Then, transfer this mixture into your prepared pan. This is where you get to be a little aggressive! Use the back of a flat spatula to press the mixture down super firmly. I mean, really press it in there. The tighter it is, the better your bars will hold their shape when you cut them. If you’re adding shredded coconut, sprinkle it on top now and give it a final gentle press.

Finally, the hardest part: the wait! Pop your pan into the fridge, uncovered, for at least two hours. Don’t try to rush this. That chilling time is crucial for the bars to set up properly and become sliceable. Once they’re firm, just lift them out using that parchment paper, cut into squares, and enjoy!
AD — Mediavine Content 300×250 / Responsive

Why This Recipe Works

These no bake bars are fantastic because the coconut oil and peanut butter firm up beautifully when chilled, binding all the oats and add-ins together without any baking. The maple syrup adds sweetness and helps with binding, while the crispy rice cereal gives them a lighter texture and satisfying crunch that contrasts with the chewy oats. It's a perfect balance of textures and flavors that comes together with minimal effort.

Sometimes you just need a treat that comes together fast and feels really satisfying. These bars hit all those marks!— Charlotte
AD — Mediavine Native / 728×90 Leaderboard

Prep 15 minutesCook 0 minutesYield 12 bars
Ingredients
  • 1/3 cup (70g) coconut oil
  • 1/2 cup (90g) semi-sweet chocolate chips
  • 1/2 cup (125g) crunchy or creamy peanut butter
  • 1/4 cup (60ml) pure maple syrup (or honey)
  • 1 and 1/4 cups (106g) old-fashioned whole rolled oats
  • 3/4 cup (19g) crispy rice cereal
  • 3/4 cup (about 100-120g) add-ins (like salted peanuts, raisins, or mini chocolate chips – see notes)
  • 1 Tablespoon unsweetened shredded coconut for topping (optional)
Instructions
  1. Prepare Your Pan Line the bottom and sides of a 9-inch square baking pan with parchment paper. Make sure to leave a little overhang on the sides – it makes lifting the bars out super easy later! Set this aside for now.
  2. Melt the Base In a medium saucepan, gently melt the coconut oil and chocolate chips over medium heat. Stir them frequently until everything is smooth and glossy. Once melted, take the pan off the heat.
  3. Stir in Peanut Butter & Sweetener To the melted chocolate mixture, stir in the peanut butter and maple syrup (or honey) until it's all nicely combined. It should be smooth and look delicious already!
  4. Combine Dry Ingredients In a separate medium bowl, whisk together the old-fashioned oats, crispy rice cereal, and any add-ins you've chosen. Give it a good mix so they're evenly distributed.
  5. Mix Everything Together Pour the warm chocolate-peanut butter mixture over the dry oat mixture. Stir it really well until all the oats and cereal are completely coated. The mixture will look quite wet, and that’s totally normal.
  6. Press into Pan Transfer the whole mixture into your prepared baking pan. Using the back of a flat spatula or even your clean hands (lightly dampened helps!), press the mixture down very tightly and firmly into the pan. This step is key to making sure your bars hold together beautifully. If you're using the optional shredded coconut, sprinkle it evenly over the top and gently press it in.
  7. Chill Time! Pop the pan into the refrigerator, uncovered, for at least 2 hours. This chilling time is essential for the bars to set up properly. If you're chilling for longer than 2 hours (up to 2 days), you can cover the pan lightly with plastic wrap.
  8. Cut and Store Once firm, use the parchment paper overhang to lift the entire slab of bars out of the pan. Place it on a cutting board and cut into 12 squares (or whatever size you like!). Store any leftover bars in an airtight container in the refrigerator for up to 2 weeks.
Tested Tip

When pressing the mixture into the pan, really put some muscle into it! The more compact it is, the less crumbly your bars will be when you cut them. I sometimes use the bottom of a clean glass to get an extra firm, even press.

AD — Mediavine Content 300×250 / Responsive

Getting Started with Your No Bake Chocolate Oat Bars

Mixing and Chilling for Perfect Bars

Make It Yours

  • Add-in Fun — Beyond peanuts and raisins, try mini M&Ms for a pop of color, chopped dried cranberries for a tart counterpoint, or even some mini pretzels for an amazing salty-sweet crunch. Don't be afraid to mix and match your favorites!
  • Nut Butter Swaps — If peanut butter isn't your jam, almond butter or cashew butter would work great. Just make sure it's a creamy, stirrable nut butter for the best texture and binding.
  • Extra Chocolatey — For serious chocolate lovers, you can sprinkle an extra handful of mini chocolate chips into the oat mixture before adding the liquid. The extra bits of chocolate make them even more indulgent!
  • Spice It Up — Add a pinch of cinnamon or a tiny dash of cayenne pepper to the chocolate mixture for a subtle warmth and depth of flavor. It's a small touch that can really make these bars sing.
AD — Mediavine Content / Native

FAQ

How long do these no bake chocolate oat bars last?

When stored in an airtight container in the refrigerator, these bars will stay fresh and delicious for up to 2 weeks. They're great for meal prepping snacks!

Can I use quick oats instead of old-fashioned oats?

I really recommend sticking with old-fashioned rolled oats for these bars. Quick oats absorb liquid differently and can make the bars too soft or crumbly. The rolled oats give that perfect chewy texture.

What if my mixture seems too wet or too dry?

The mixture should be pretty wet when you combine it. If it seems excessively runny, it might be due to warmer ingredients or an ingredient measurement error. If it's too dry and won't hold together, you can try adding another tablespoon of maple syrup or melted coconut oil to help it bind.

Can I freeze these no bake chocolate oat bars?

Yes, absolutely! These bars freeze beautifully. Wrap individual bars in plastic wrap, then store them in a freezer-safe bag or container for up to 2-3 months. Thaw in the refrigerator or at room temperature before enjoying.

AD — Mediavine 728×90 Leaderboard / Responsive

What To Serve With This

  • A Tall Glass of Cold Milk
  • Your Morning Coffee or Tea
  • A Scoop of Vanilla Ice Cream (for dessert!)
  • Alongside Fresh Berries
  • As a Quick Lunchbox Treat

This post contains affiliate links. We may earn a small commission at no extra cost to you.

More Recipes You'll Love

Tested twice, weeknight-ready, family-approved.