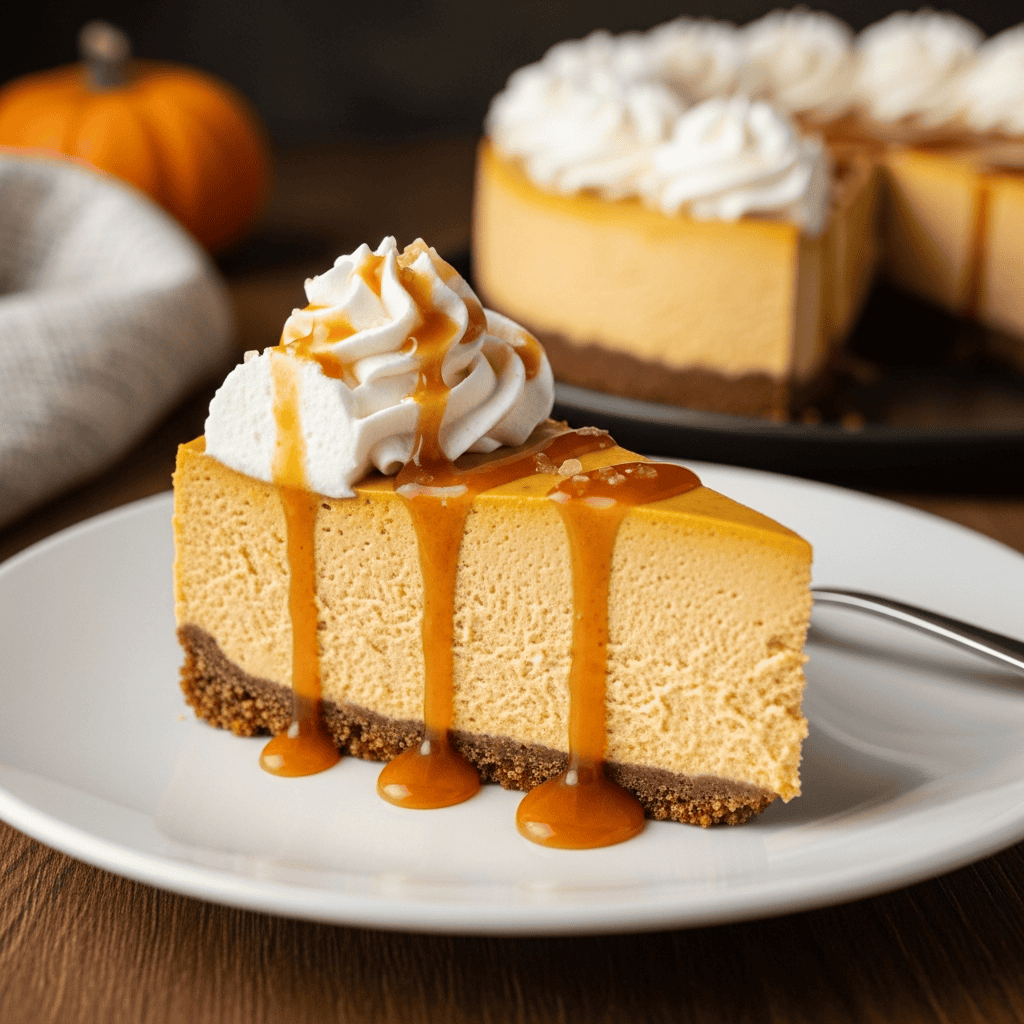
Quick No Bake Pumpkin Cheesecake: The Easiest Holiday Treat!

TOTAL TIME
SERVES
COURSE
DIFFICULTY
Tested5× before publishing

Hey friend! If you’re looking for a super simple, absolutely delicious fall dessert that requires zero oven time, then this no bake pumpkin cheesecake is about to become your new favorite. Seriously, after testing this recipe a few times, it’s quickly moved to the top of my go-to list for easy holiday treats. It’s so creamy and spiced, with that perfect gingersnap crunch underneath – a fantastic contrast in textures.

It’s one of those recipes you can whip up ahead of time, which is a total lifesaver during busy weeks or when you’re hosting a gathering. No need to worry about oven space, and it looks beautiful on any table. This truly is a stress-free dessert that everyone will love, even the pickiest eaters. Let’s make some magic!

Making the Perfect Gingersnap Crust

Okay, first things first: that crust! For this no bake pumpkin cheesecake, we’re going with gingersnaps, and honestly, they’re the BEST choice. They bring this warm, spicy flavor that just screams fall, and they have the perfect crunchy texture. You’ll crush them up (a food processor makes this super quick, but a ziploc bag and a rolling pin work too!). Then, you mix in a little extra ground ginger and cinnamon, melted butter, and a touch of sugar. The key here is to pack it in *really* tightly into your springform pan. I mean, use the bottom of a measuring cup or a flat glass and just press, press, press. Get it firm on the bottom and up the sides. This isn’t just for looks; it helps the crust hold its shape when you slice into that beautiful cheesecake later. Pop it in the freezer while you work on the filling, just to get it extra firm.

Crafting That Creamy Pumpkin Filling

Now for the star of the show: the incredibly smooth, spiced pumpkin filling. This is where the magic happens, and it’s surprisingly simple. You’ll start by whipping cold heavy cream until it holds stiff peaks. This adds so much lightness and air to the cheesecake, so don’t skip this step! Set that aside gently. Next, in a separate bowl, you’ll beat your *room temperature* cream cheese. Seriously, make sure it’s softened, or you’ll end up with lumps, and nobody wants lumpy cheesecake. Beat it until it’s perfectly smooth and velvety. Then, add in your pumpkin puree (make sure it’s pure pumpkin, not pie filling!), confectioners’ sugar, brown sugar, vanilla, pumpkin pie spice, more cinnamon, and a tiny pinch of salt. Beat it all together until it’s completely combined and super creamy. Finally, gently fold in that whipped cream. Use a light hand here – you want to keep all that beautiful air you just whipped into it. This combination gives you that signature light-yet-rich texture that everyone loves.

Chill Time for Your No Bake Pumpkin Cheesecake

Once your gorgeous no bake pumpkin cheesecake is assembled, the hardest part is waiting! This dessert needs time to firm up in the fridge. I know it’s tempting to cut into it sooner, but resist! Seriously, plan for at least 8 hours of chill time, but honestly, overnight (or 12 hours) is truly the sweet spot. The longer it chills, the better it sets, and the more developed those yummy flavors become. When you refrigerate it, make sure it’s tightly covered with plastic wrap to prevent any fridge odors from sneaking in. Don’t try to speed this up by putting it in the freezer to set the filling – it won’t give you the same creamy texture. Good things come to those who wait, and this cheesecake is definitely worth it.
AD — Mediavine Content 300×250 / Responsive

Why This Recipe Works

This recipe just works for so many reasons. First, no oven! That’s huge when your oven might be full of other holiday dishes, or you just don’t want to heat up the kitchen. Second, it’s a total make-ahead star. You can prep it a day or two before, which is amazing for keeping stress levels low. And finally, the flavors are classic fall, but the process is so straightforward. It feels fancy but it’s actually really easy to put together.

This no bake pumpkin cheesecake is like a big, warm hug in dessert form, but without any of the baking fuss!— Charlotte
AD — Mediavine Native / 728×90 Leaderboard

Prep 20 minutesCook 0 minutesYield 10 servings
Ingredients
  • 2 cups gingersnap cookie crumbs (200g)
  • 1/4 teaspoon ground ginger
  • 1/4 teaspoon ground cinnamon
  • 6 Tablespoons unsalted butter, melted (85g)
  • 1/4 cup granulated sugar or packed brown sugar (50g)
  • 1 cup cold heavy cream or heavy whipping cream (240ml)
  • 16 ounces full-fat brick cream cheese, softened to room temperature (452g)
  • 1 cup pumpkin puree (226g, not pie filling)
  • 3/4 cup confectioners’ sugar (90g)
  • 1/4 cup packed light or dark brown sugar (50g)
  • 1 teaspoon pure vanilla extract
  • 2 teaspoons pumpkin pie spice
  • 1/2 teaspoon ground cinnamon
  • 1/8 teaspoon salt
  •  Whipped Cream (optional, for serving)
  •  Salted Caramel (optional, for serving)
Instructions
  1. Prepare the Gingersnap Crust In a medium bowl, combine the gingersnap cookie crumbs, ground ginger, ground cinnamon, melted butter, and granulated or brown sugar. Stir until well combined. Pour the mixture into a 9-inch or 10-inch springform pan. Press the crumbs in very tightly and evenly across the bottom and slightly up the sides of the pan. Use the bottom of a flat measuring cup or glass to help pack it down firmly. Place the pan in the freezer for 10-20 minutes while you prepare the filling.
  2. Whip the Cream In a large mixing bowl (or the bowl of a stand mixer fitted with a whisk attachment), whip the cold heavy cream on medium-high speed until stiff peaks form. This usually takes about 4 minutes. Be careful not to over-whip. Set the whipped cream aside.
  3. Make the Pumpkin Filling Base In a separate large mixing bowl (or the bowl of a stand mixer fitted with a whisk or paddle attachment), beat the softened cream cheese on medium speed until it is perfectly smooth and creamy, with no lumps. Scrape down the sides and bottom of the bowl with a silicone spatula as needed. Add the pumpkin puree, confectioners’ sugar, and brown sugar. Beat on medium-high speed until fully combined and smooth. Again, scrape down the bowl. Add the vanilla extract, pumpkin pie spice, cinnamon, and salt. Beat until the mixture is creamy and perfectly smooth, ensuring there are no remaining cream cheese lumps.
  4. Fold in Whipped Cream Using your mixer on low speed or a silicone spatula, gently fold the whipped cream into the pumpkin cheesecake filling. Take your time with this step, incorporating it slowly over several turns of the spatula. The goal is to combine it without deflating all the air from the whipped cream, which helps create that light, fluffy texture.
  5. Assemble the Cheesecake Remove the prepared crust from the freezer. Carefully spread the pumpkin filling evenly into the gingersnap crust. Use an offset spatula or the back of a spoon to smooth down the top.
  6. Chill Thoroughly Cover the springform pan tightly with plastic wrap or aluminum foil. Refrigerate for at least 8 hours, but for the very best results and a perfectly set cheesecake, chill for at least 12 hours or ideally, overnight. This long chill time is crucial for the cheesecake to firm up properly. Do not attempt to use the freezer to set the filling quickly.
  7. Slice and Serve Once thoroughly chilled, use a thin, sharp knife to carefully loosen the cheesecake from the rim of the springform pan, then remove the rim. For neat, clean slices, wipe the knife clean with a damp cloth between each cut. Serve chilled with optional toppings like extra whipped cream or a drizzle of salted caramel.
  8. Store Leftovers Cover any leftover cheesecake tightly and store it in the refrigerator for up to 5 days.
Tested Tip

To get the neatest slices and a cheesecake that holds its shape beautifully, make sure you pack that gingersnap crust in super tight. Really press it down into the pan and up the sides. And then, seriously, give your cheesecake plenty of time in the fridge – overnight is always best. It makes all the difference in the texture.

AD — Mediavine Content 300×250 / Responsive

Making the Perfect Gingersnap Crust

Crafting That Creamy Pumpkin Filling

Chill Time for Your No Bake Pumpkin Cheesecake

Make It Yours

  • Adjust the Spice Level — Love a little extra kick in your fall desserts? Feel free to play with the spices! You can add an extra pinch of ground ginger or cinnamon to the filling, or even a tiny dash of ground cloves or nutmeg if you want to deepen those warm, cozy flavors. Just taste as you go – a little extra spice can go a long way!
  • Crust Variations — Gingersnaps are fantastic, but you can totally switch up the crust! Graham crackers are a classic choice for cheesecake and work beautifully here. Or, for a twist, try Speculoos cookies (those Biscoff-style cookies) for a European flair, or even chocolate wafer cookies for a darker, richer base. Any crisp cookie that crumbles well will do the trick!
  • Topping Adventures — While this cheesecake is delicious on its own, toppings can take it to the next level of pretty and tasty! A simple dollop of homemade whipped cream is always a winner. You could drizzle it with salted caramel sauce, sprinkle on some toasted pecans or walnuts, or even grate a little dark chocolate over the top for an elegant finish. Get creative!
  • Mini Cheesecakes — Want to make individual servings for a party or just for easy grab-and-go treats? You can absolutely make these into mini no-bake pumpkin cheesecakes! Line a muffin tin with paper liners, press a smaller amount of crust into each, and then pipe or spoon in the filling. Chill them the same amount of time. They’re super cute and perfect for portion control!
AD — Mediavine Content / Native

FAQ

Can I use canned pumpkin pie filling instead of pure pumpkin puree?

Definitely not! This is a really common question, but canned pumpkin pie filling is already sweetened and spiced, and it has a different consistency than pure pumpkin puree. Using it would throw off the balance of flavors and the texture of your cheesecake, making it too sweet and potentially too thin. Stick to 100% pure pumpkin puree for this recipe.

How long does this no bake pumpkin cheesecake really need to chill?

For the best results, you absolutely need to give this cheesecake ample time to chill and set up. A minimum of 8 hours in the refrigerator is required, but I highly recommend making it the day before you plan to serve it and letting it chill for 12 hours or even overnight. The longer it chills, the firmer and creamier the slices will be, and the flavors will meld beautifully.

Can I freeze leftover no bake pumpkin cheesecake?

While I don't recommend using the freezer to *set* the cheesecake filling initially (it can make the texture a bit icy and less creamy), you can absolutely freeze *leftover* slices! Wrap individual slices tightly in plastic wrap, then place them in an airtight container or freezer bag. They'll keep well for up to a month. Just thaw them in the refrigerator for a few hours before enjoying.

Can I make this dairy-free or gluten-free?

Making this entirely dairy-free would be quite a challenge, as the cream cheese and heavy cream are critical components for the texture and richness. You might be able to find dairy-free cream cheese and whipping cream alternatives, but I haven't tested this specific recipe with them. For gluten-free, you can easily swap the gingersnap cookie crumbs for gluten-free gingersnaps or even a gluten-free graham cracker crust alternative!

AD — Mediavine 728×90 Leaderboard / Responsive

What To Serve With This

  • A hot cup of coffee
  • Spiced apple cider
  • Ginger tea
  • Vanilla bean ice cream
  • A light fruit salad

This post contains affiliate links. We may earn a small commission at no extra cost to you.

More Recipes You'll Love

Tested twice, weeknight-ready, family-approved.